 Blood of the Bull: Forged in Flame and Fury
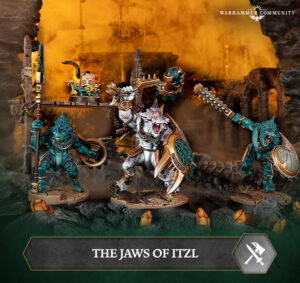
Welcome back to Path to Glory! Today we’re descending into the fiery depths of Spitewood to meet the Blood of the Bull: the first Helsmiths to hammer their mark into the Underworlds. For long-time Warhammer Underworlds fans, that means one thing: the Chaos Dwarfs are finally here. Massive thanks to Games Workshop for sending us a copy to explore these infernal artisans of war.
So, how do these daemon-bound Duardin carve their path to glory? Let’s fire up the forge and find out.

The Daemonforge Unleashed
The Helsmiths’ mechanics revolve around one burning core: Daemonforge dice: the molten essence that powers both their weapons and their will. These dice are everything.
To inspire a Chaos Duardin, you simply need to use a Daemonforge dice in an attack or defence roll for them (Grisk’s unique twist on this comes later). You start the game with one Daemonforge dice, and you gain more each time one of your fighters delves a treasure token while not staggered.
Here’s where it gets spicy: whenever one of your Helsmiths attacks or defends, you can spend a Daemonforge dice to add +1 to that roll’s dice characteristic. That single rule defines their entire rhythm: a cycle of aggression, control, and clever resource use that rewards players for dominating treasure tokens and managing their infernal reserves.
This mechanic is potent. It gives you both flexibility and inevitability: every attack or defence becomes an opportunity to accelerate inspiration. It also forces your opponent into difficult decisions – try to strike before they’re inspired, and you’ll probably just hasten the process.
For most of the warband, once they’re inspired, they essentially “lock in” the benefits of Daemonforge permanently, making early aggression and token control even more rewarding.
As for Grisk? He has his own condition: he inspires by being adjacent to an enemy targeted by a friendly attack. It’s trickier to pull off, but when it happens, it’s worth it.
Infernal Conflagration
Tokkor, the Helsmith gunner, has a neat trick up his soot-caked sleeve. His ranged weapon gains extra bite when he’s close to his target. Think of it as the Duardin equivalent of firing a daemon-loaded blunderbuss point-blank. His ranged weapon is already efficient, so this bonus just gives you more options, especially when facing enemies that punish melee engagement.
Hobgrot Cunning
Meanwhile, Grisk’s passive ability gives friendly fighters superior supports against enemies adjacent to him. That’s a big deal. It makes hammer attacks as accurate as surrounded ones, and sword attacks even deadlier. Since the ability only cares about adjacency, it can even apply against foes that can’t normally be flanked. Whenever Grisk gets into position, your attacks will land with punishing precision.
The Helsmiths at the Anvil

Zuldrakka – The Iron Matriarch
Your leader starts modestly with 4 wounds, 1 shield, 3 move, and a 2-hammer, 2-damage strike. Not impressive for 2 glory, but her access to Daemonforge changes everything. Spending one grants her 3 hammers or 2 shields on demand, and once inspired she keeps both as her new baseline. Crit-stagger becomes crit-grievous, and suddenly Zuldrakka feels every inch the hardened forgemaster she’s meant to be.

Imnidrin – The Hammerhand
At 3 wounds for 2 glory, Imnidrin looks fragile at first, but Daemonforge dice make him far tougher than his profile suggests. He can access 2-shield defence early and permanently gains it when inspired. His weapon is excellent throughout: range 2, 2 damage, and crit-stagger, improving to 3 hammers and 2 damage inspired. With Daemonforge support, 4-hammer attacks are very achievable. He’s your most reliable workhorse.

Morudok – The Emberguard
Morudok may only be worth 1 glory, but he’s no pushover. With 3 wounds, 1 shield, and 3 move, he benefits greatly from inspiration gaining +1 save, +1 dice, and swapping crit-stagger for crit-grievous. Efficient, tough, and accurate, he’s one of the strongest 1-glory fighters in the game.

Tokkor – The Flame-Eye
The Helsmith marksman brings a rare range 3 threat to the warband. His base damage is low, but his attacks gain grievous when shooting at adjacent enemies, giving him a satisfying versatility. He’s also the only fighter to dodge rather than shield, and upon inspiration, his weapon shifts from swords to hammers, making him significantly more consistent.

Grisk – The Hobgrot
The runt of the litter, but not useless. With 2 wounds and 2 dodge, Grisk isn’t built for combat, and he can’t use Daemonforge dice. His job is to run, delve, and disrupt. His adjacency buff makes him a valuable setup piece, but expect him to die often. Think of him as your resource engine and positioning piece, not a frontline brawler.
Wrath and Industry

So, how do the Blood of the Bull actually play? In a word: flexibly.
Despite their relatively low wounds, their reliable defences and Daemonforge efficiency make them incredibly resilient when managed properly. They can play aggressively, burning through dice to dominate the early rounds and snowball through inspired fighters, or lean defensive by stacking treasure tokens and forcing opponents to engage on unfavorable terms.
Whether you’re smashing skulls or stealing tokens, the key is to keep the forge burning: delve, spend, and strike.
Their versatility also means they can fit comfortably with a range of Rivals decks. The most obvious match is Pillage and Plunder, which rewards their treasure-focused mechanics and keeps the Daemonforge engine turning. Emberstone Sentinels is another natural fit, emphasizing control and efficiency.
If you’re looking for a more offensive bent, Blazing Assault gives them a terrifyingly accurate brawler setup, while Countdown to Cataclysm and countercharge mechanics let Grisk and company turn even defence into opportunity.
Verdict: The Fire Burns Bright

The Blood of the Bull are a thematic triumph: sturdy, angry, and resource-driven in a way that feels uniquely Duardin. They’re not overpowered, but their ability to flex between aggression and control will make them a nightmare to face in the right hands.
If you like clever resource management, adaptable play, and the grim satisfaction of hammering your foes into the dirt, these infernal smiths will feel right at home on your Path to Glory.