
Intro
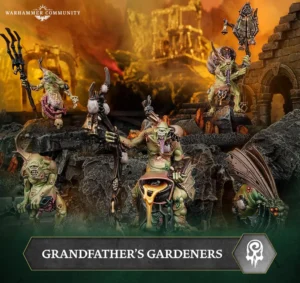
Hello and welcome back to Path to Glory! Have you ever felt like your opponent just has a clearer picture of the game than you? Are you walking away from tables feeling like you got absolutely bamboozled by your opponents? Well, you could put in all that time and effort to improve and be able to beat them—deckbuilding, practicing matchups, board setups, and play sequences—but what if there were an easier solution? Simply turn around, walk back to that table and… cut their head off to steal their brains to make you smarter. If you find this kind of logic appealing, then boy have I got a warband for you! Daggok’s Stabladz hit the field as the Destruction warband of Deathgorge and they’re here to claim those “know-wotz.” While the Kruleboyz aesthetic has never really done it for me, I can appreciate that a lot of people are into it (especially a particular PtG co-host/writer!). Despite this, DKK really is outstanding mechanically and I have to confess some disappointment in the Stabladz here when I got a hold of the cards. There’s certainly some neat stuff here with the horn, the schemes, and the leader’s attack reaction, but I do feel like it’s missing something. I’m getting ahead of myself though, let’s jump into the review and see what you guys think (or…fink)!
Thank you to Games Workshop for providing us a free preview copy to share with you today.
Plot Card
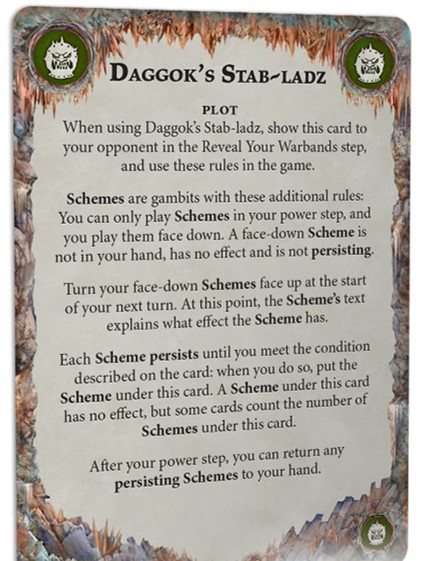
This warband’s plot card revolves around “scheme” gambits, which you play in your power step (facedown), then reveal at the beginning of your next turn for whatever effect they might have. Each scheme also comes with a “condition,” which, once satisfied, allows you to place the card beneath your plot card. While the effect only happens in the turn it’s flipped up, the card does persist until the condition is met. Since there are a number of objective cards in the deck that care about completing these schemes, there’s a definite incentive to try to fit them into your build. The hidden information here is a pretty interesting angle, especially given the way some of these schemes impact the “math” in the decision-making process. Cheating ahead a bit, three objectives ask you to lean into this mechanic, with 6 scheme gambits in the deck which I think gives you a nice midground of being able to go heavy into this route, or just take a select few and fill in with other cards. Since the schemes themselves have some reasonably useful effects, you still get to feel like they have value even if you’re not attempting to score off them. Similarly, if you do lean in, you don’t necessarily have to feel like you’re compromising deck efficiency to do so. I think this is a nice evolution of the Looncourt’s quest mechanic, where instead of openly telegraphing what you are trying to do, you telegraph that you are trying to do something without revealing exactly what it is. This gives a skilled player the opportunity to mindgame their opponents while also rewarding knowledgeable opponents for anticipating which schemes are brewing. While I do think the effects of the schemes could be tuned up a smidge (we’ll get into those shortly), I like the concept and I think it is generally pretty well executed and a huge step in the right direction if we are comparing to the aforementioned quest cards.
Fighters
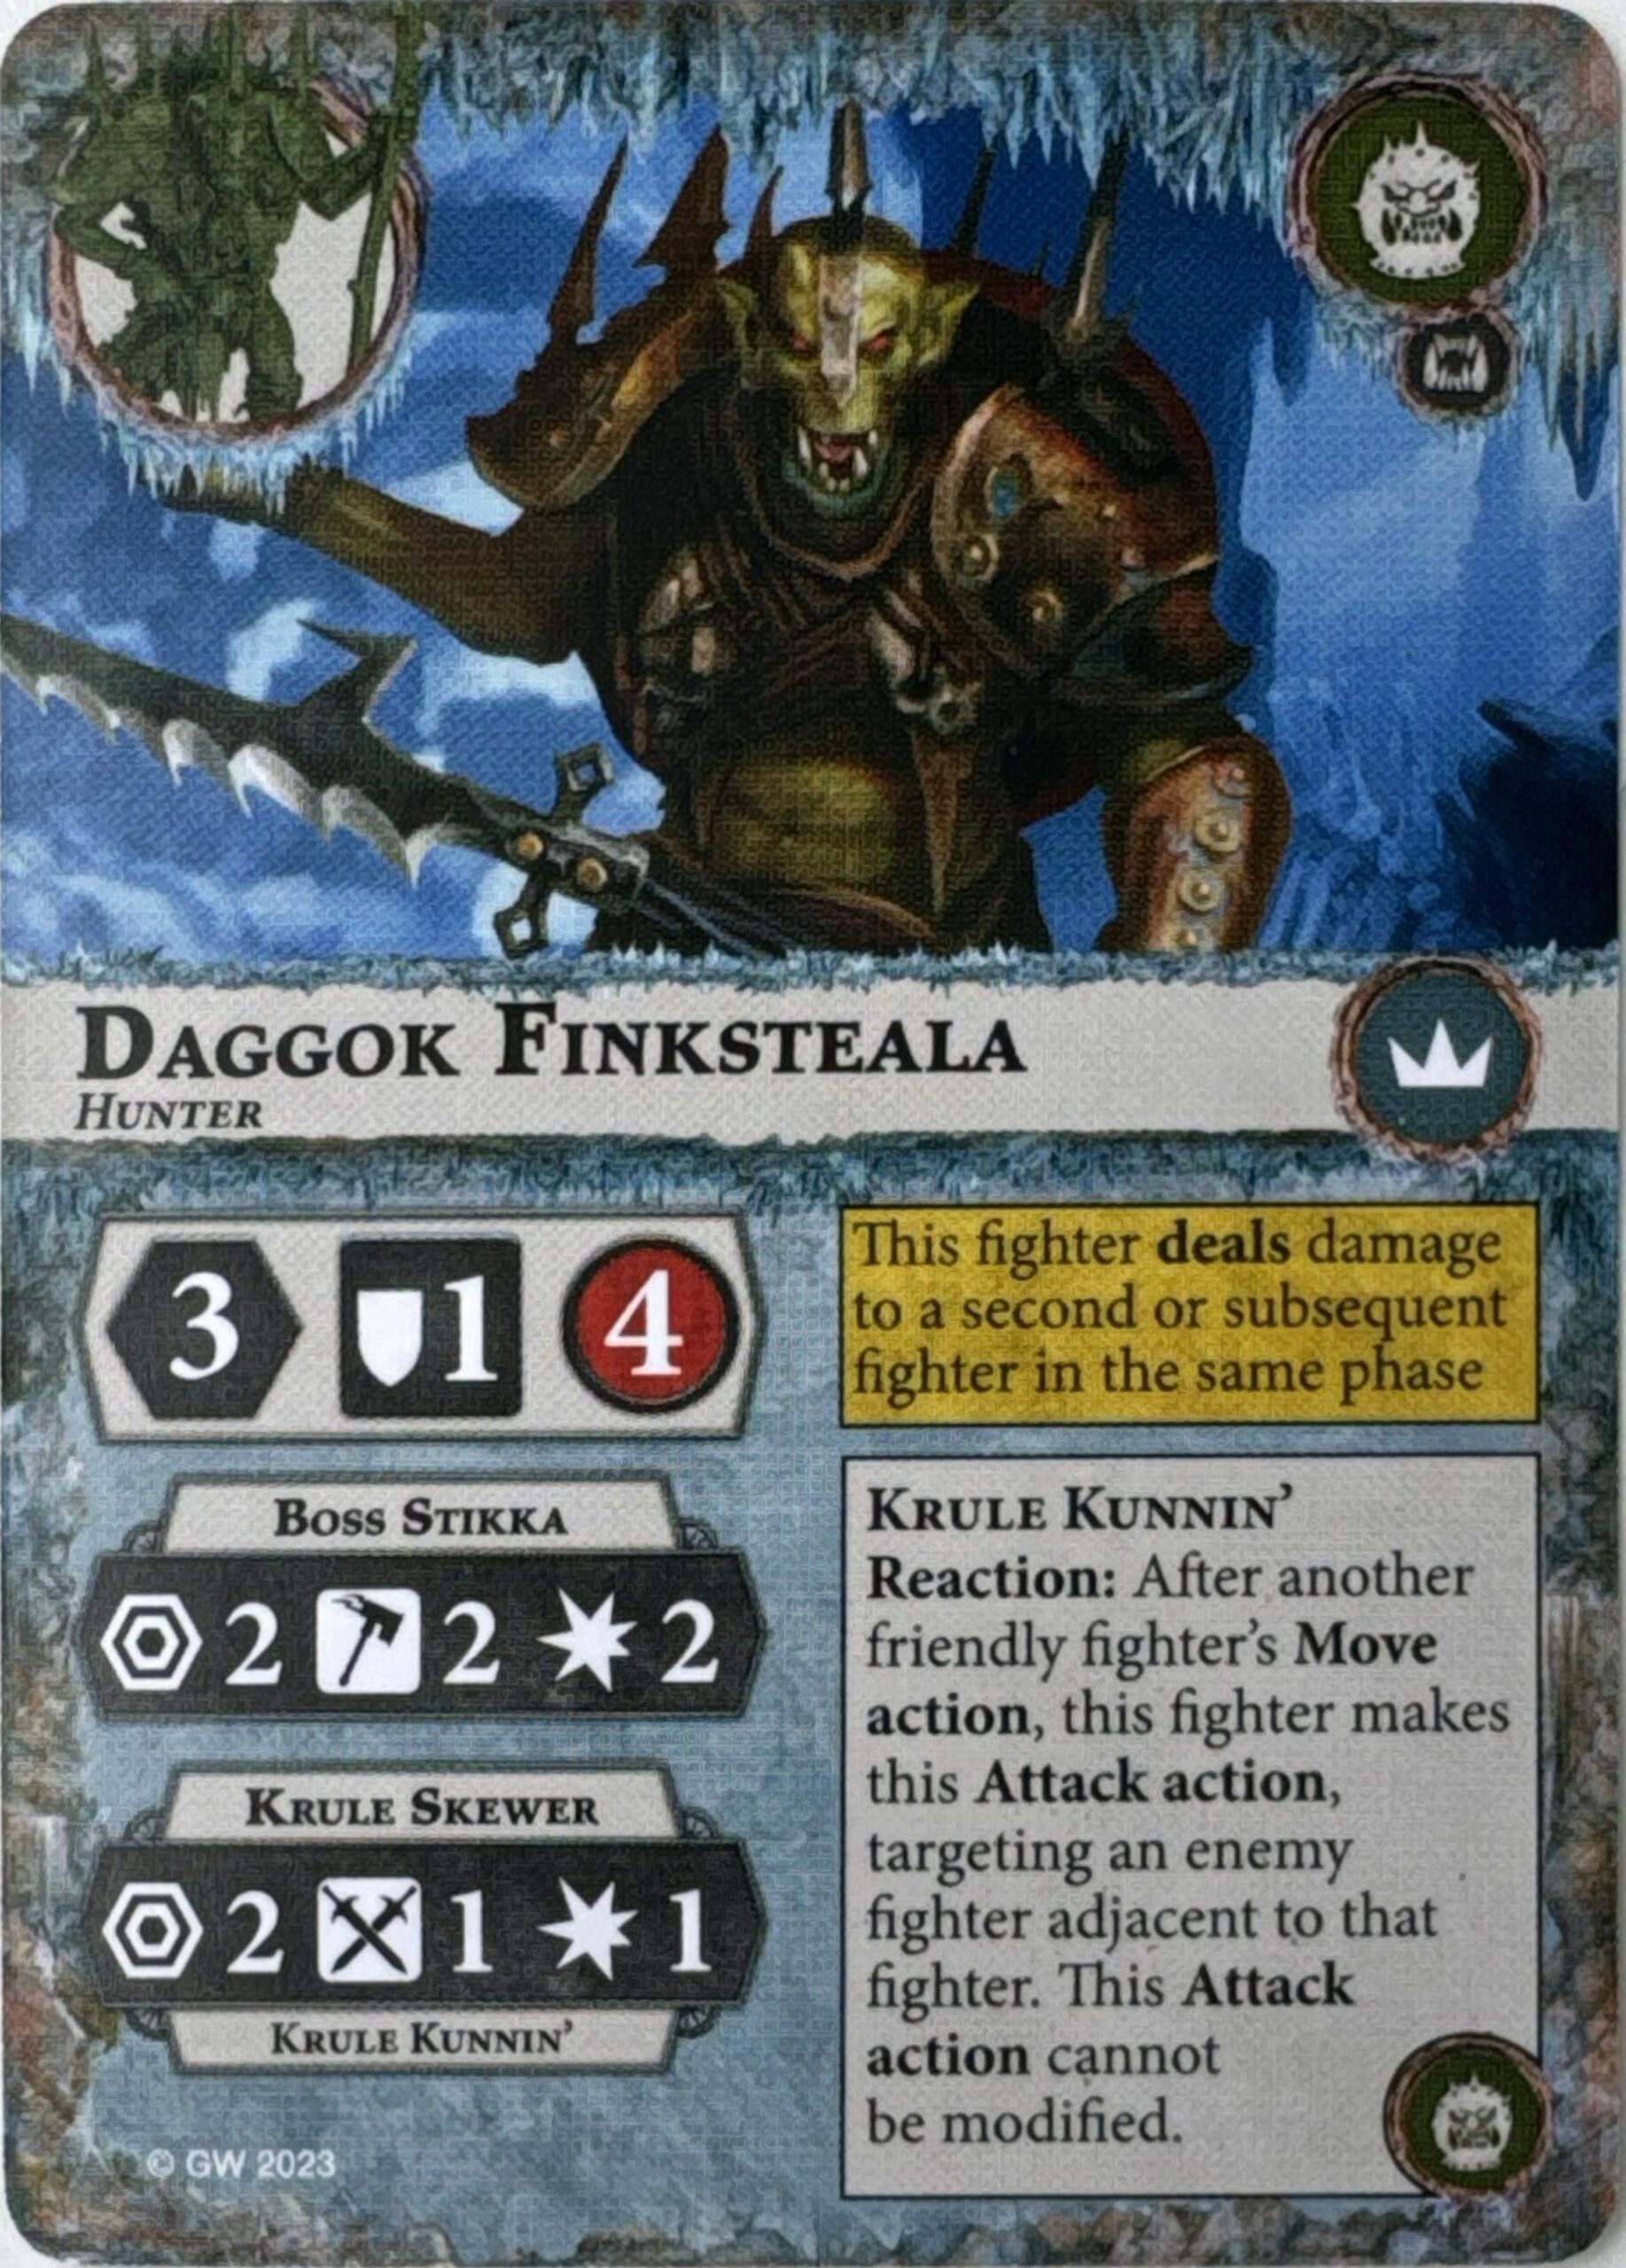
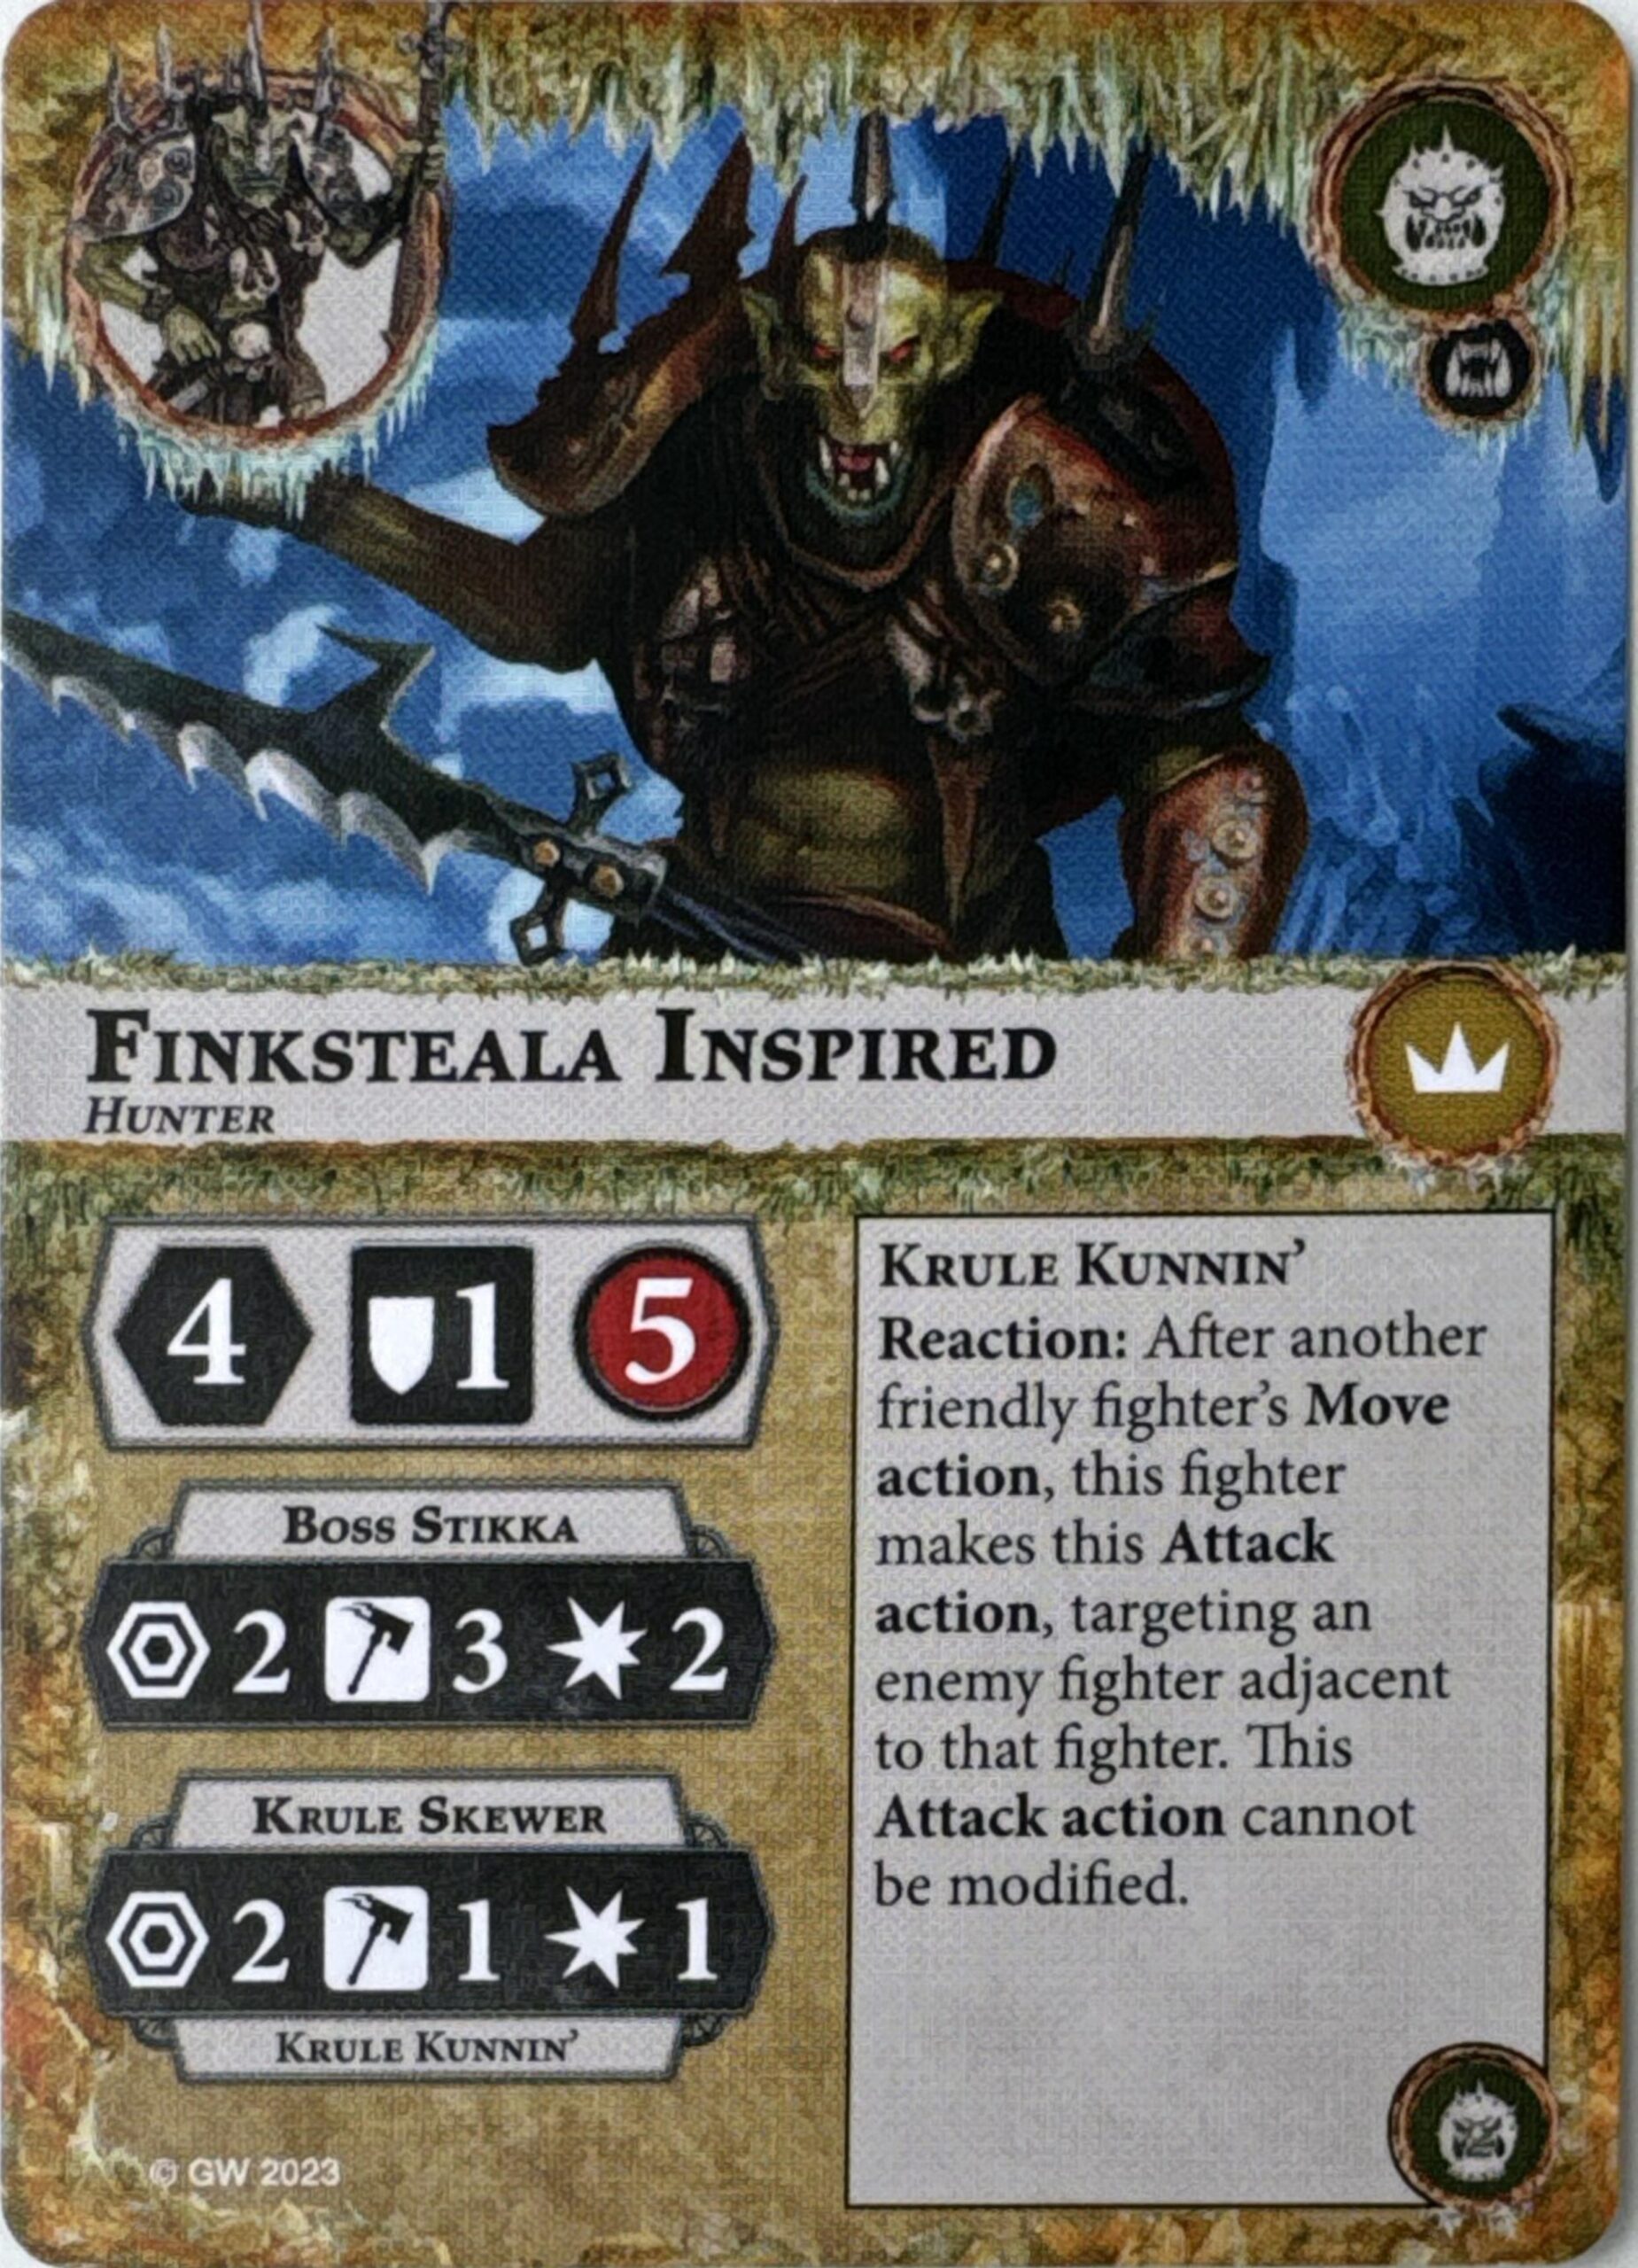
We start, as always, with the leader, Daggok Finksteala, a hunter (of brains, of course). I feel like I’ve been saying this a lot lately, but fairly standard leader stats at 3 Move, 1 Shield, and 4 Wounds accompanied by a very standard leader attack profile at 2R/2H/2D. Not much to speak of there, but the interesting bit comes in with Krule Skewer attack, which is 2R/1S/1D but has the Krule Kunnin’ keyword. This ability allows you to react after a friendly fighter moves adjacent to an enemy fighter for a little bit of out-of-sequence pokey-pokey. While this attack action cannot be modified, we’ve seen Snarlfangs use extra swings to great effect before. I have to say it: the most natural pairing here is with Voidcursed Thralls. Where else are you going to be able to pull multiple out-of-sequence move actions to proc this repeatedly? There’s also good synergy here with a few universals that want you to make attacks. Things like [ Carve a Path] and Gale Force become much easier when you’ve got this kind of reaction on hand. Furthermore, it leads into the inspire condition, which requires you to deal damage to two separate enemy fighters with Daggok in the same phase. Despite the praise I just gave the attack reaction, it is obviously not all that accurate. Furthermore, it’s not like [
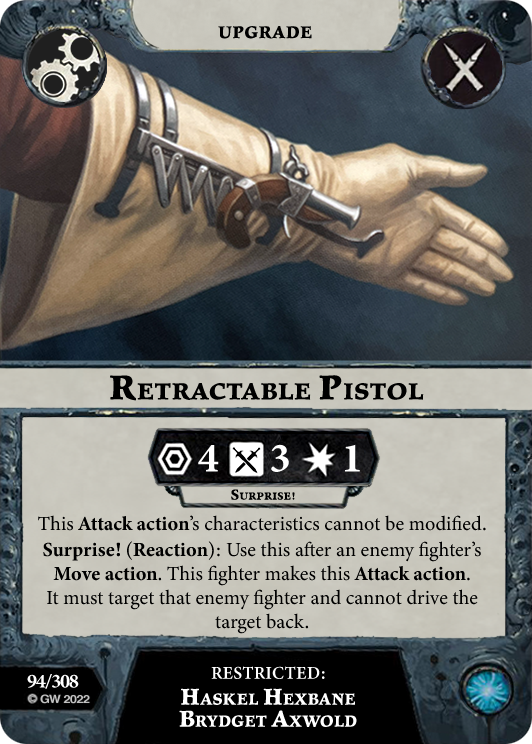 Retractable Pistol] where you can just plop in the center of the board and start blasting like there’s not tomorrow. Range 2 gives flexibility, but not a guarantee to proc the reaction, so you’re going to have to spend your resources carefully trying to set it up, especially if you want to hit more than a single fighter in a phase to snag that inspire. While you will certainly be able to pull off inspiration in some games, I don’t think it will be all that common, which means you’re unfortunately going to be stuck with your base profiles more often than not. This is another feather in the cap of VCT, as Voidcursed Assault can give you an extra (more accurate) chance to damage a second fighter. However, if you do manage to inspire, you gain quite a bit, jumping to 5 Wounds, adding a die to your main attack profile, and swapping from swords to hammers on the reaction attack. Really solid stats in this mode, if you can get there, I just wonder if you’ll access it early enough to be meaningful.
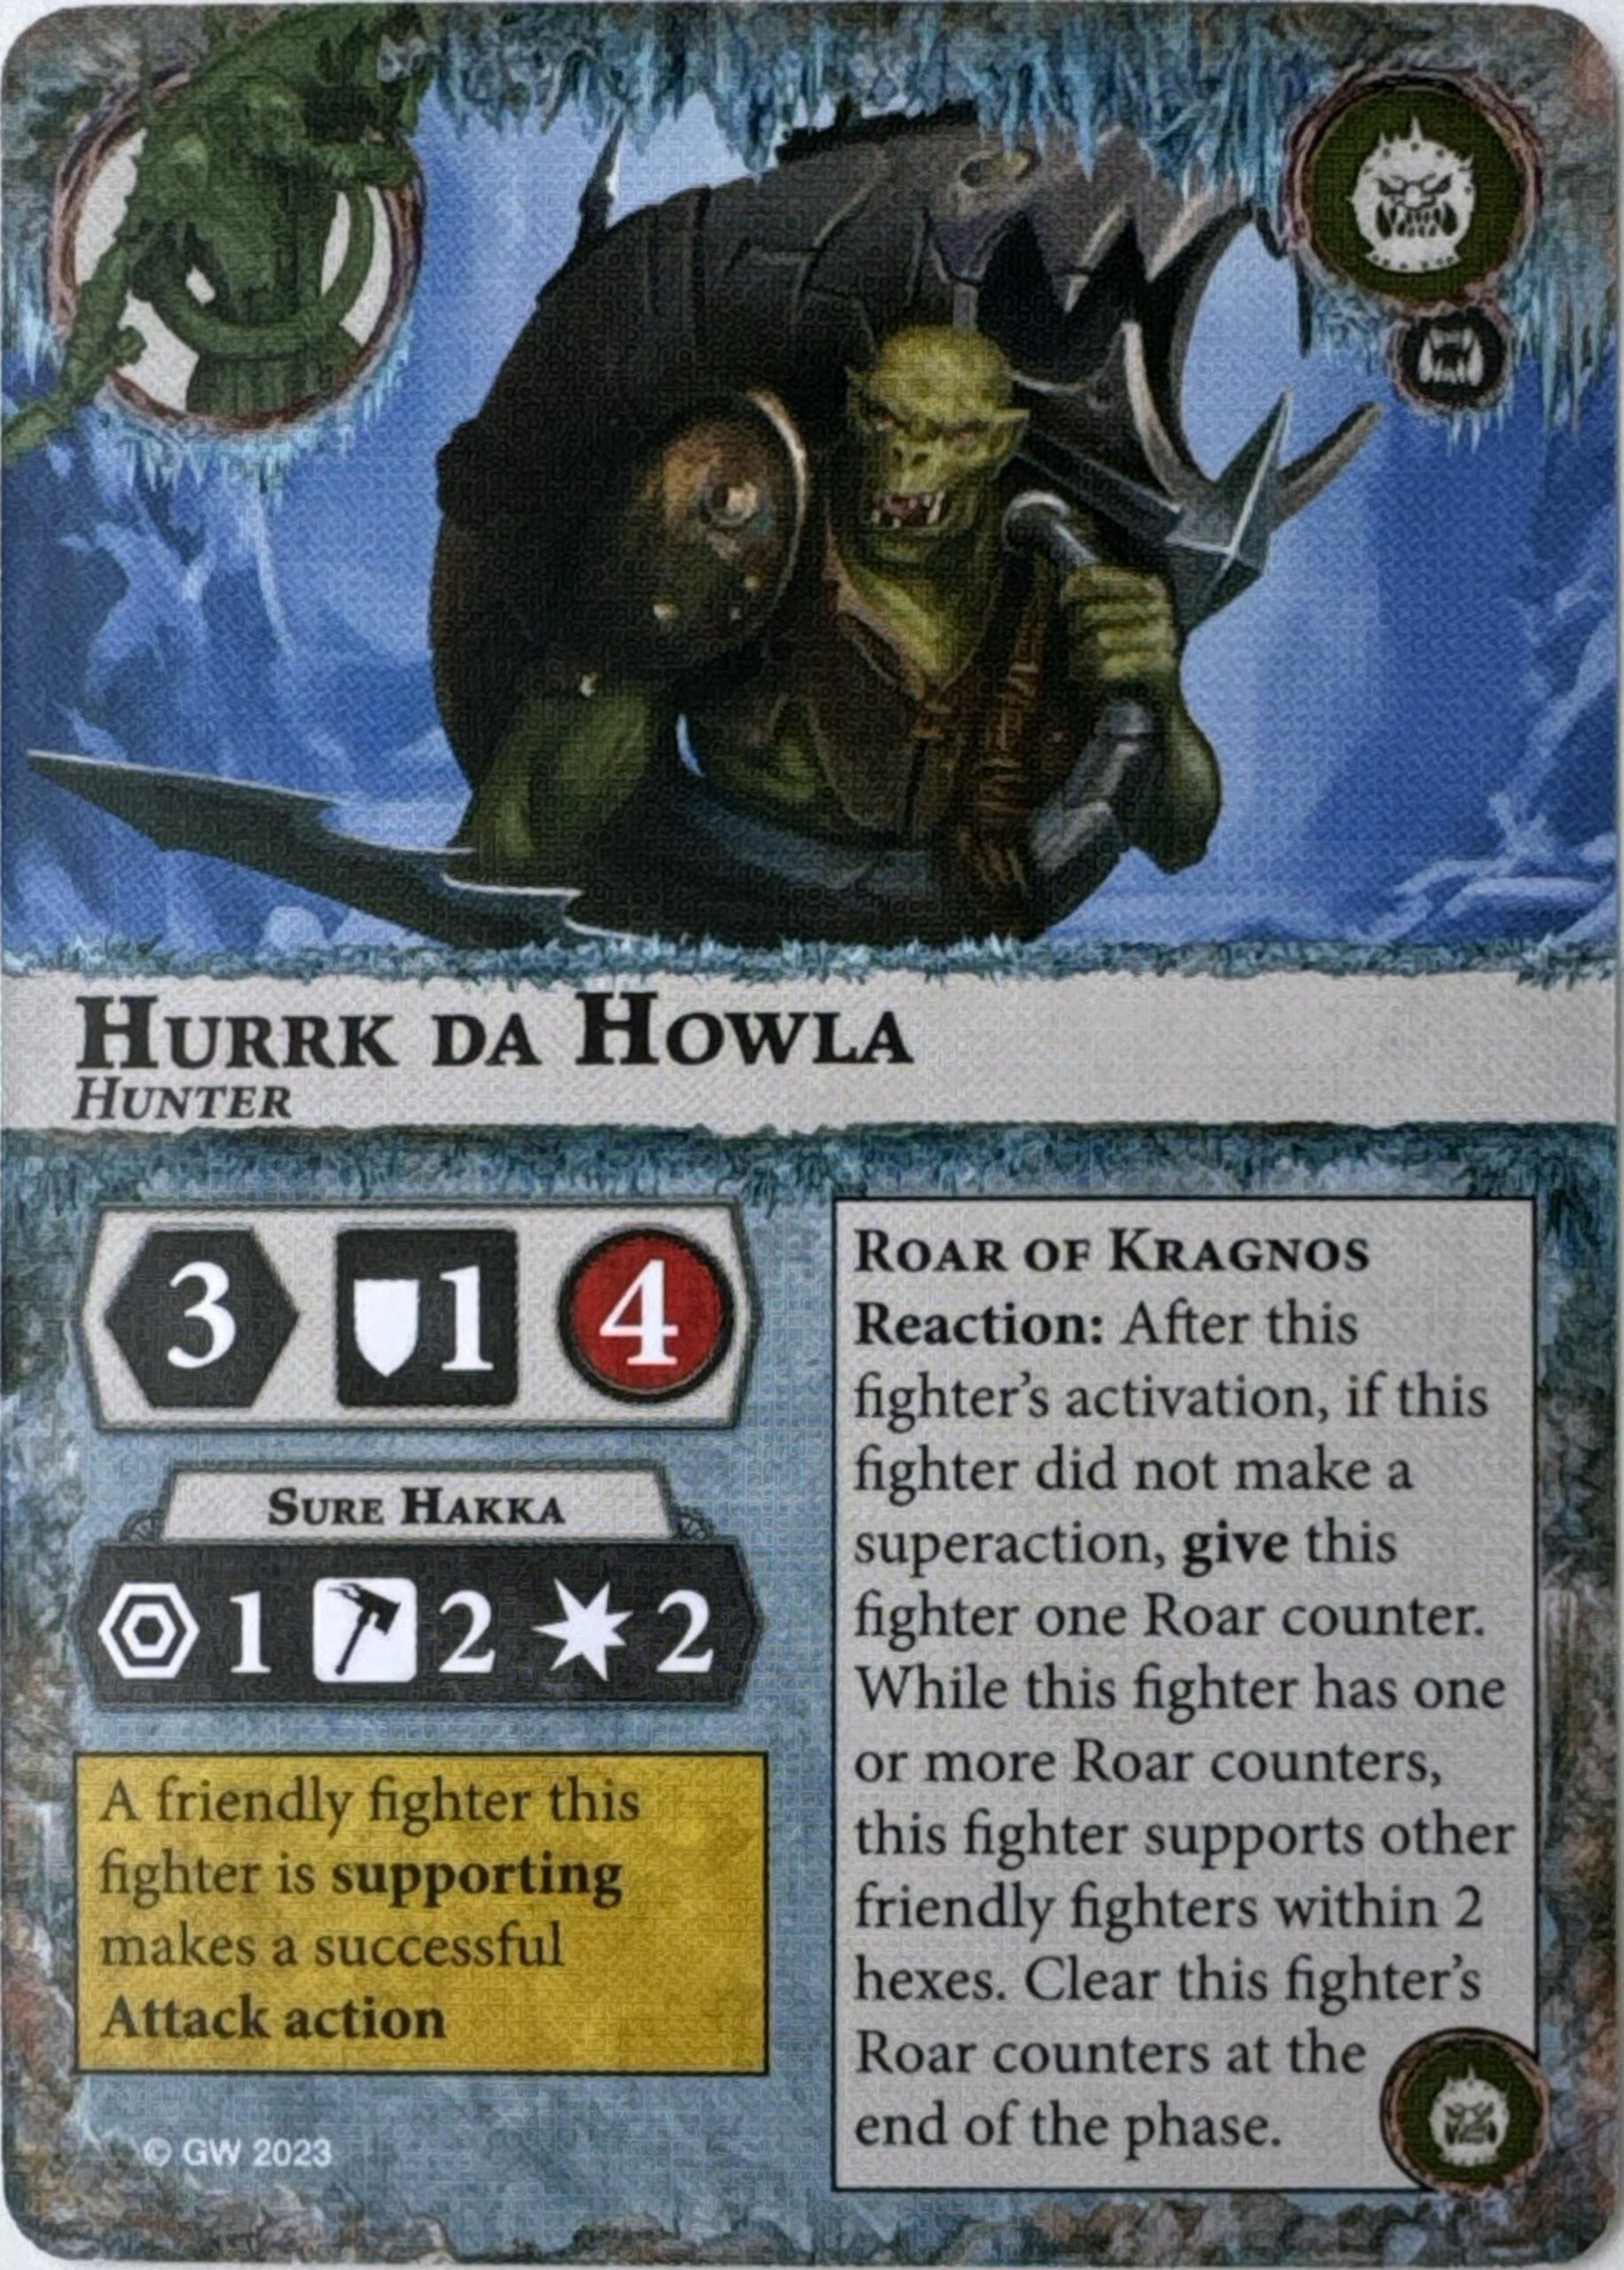
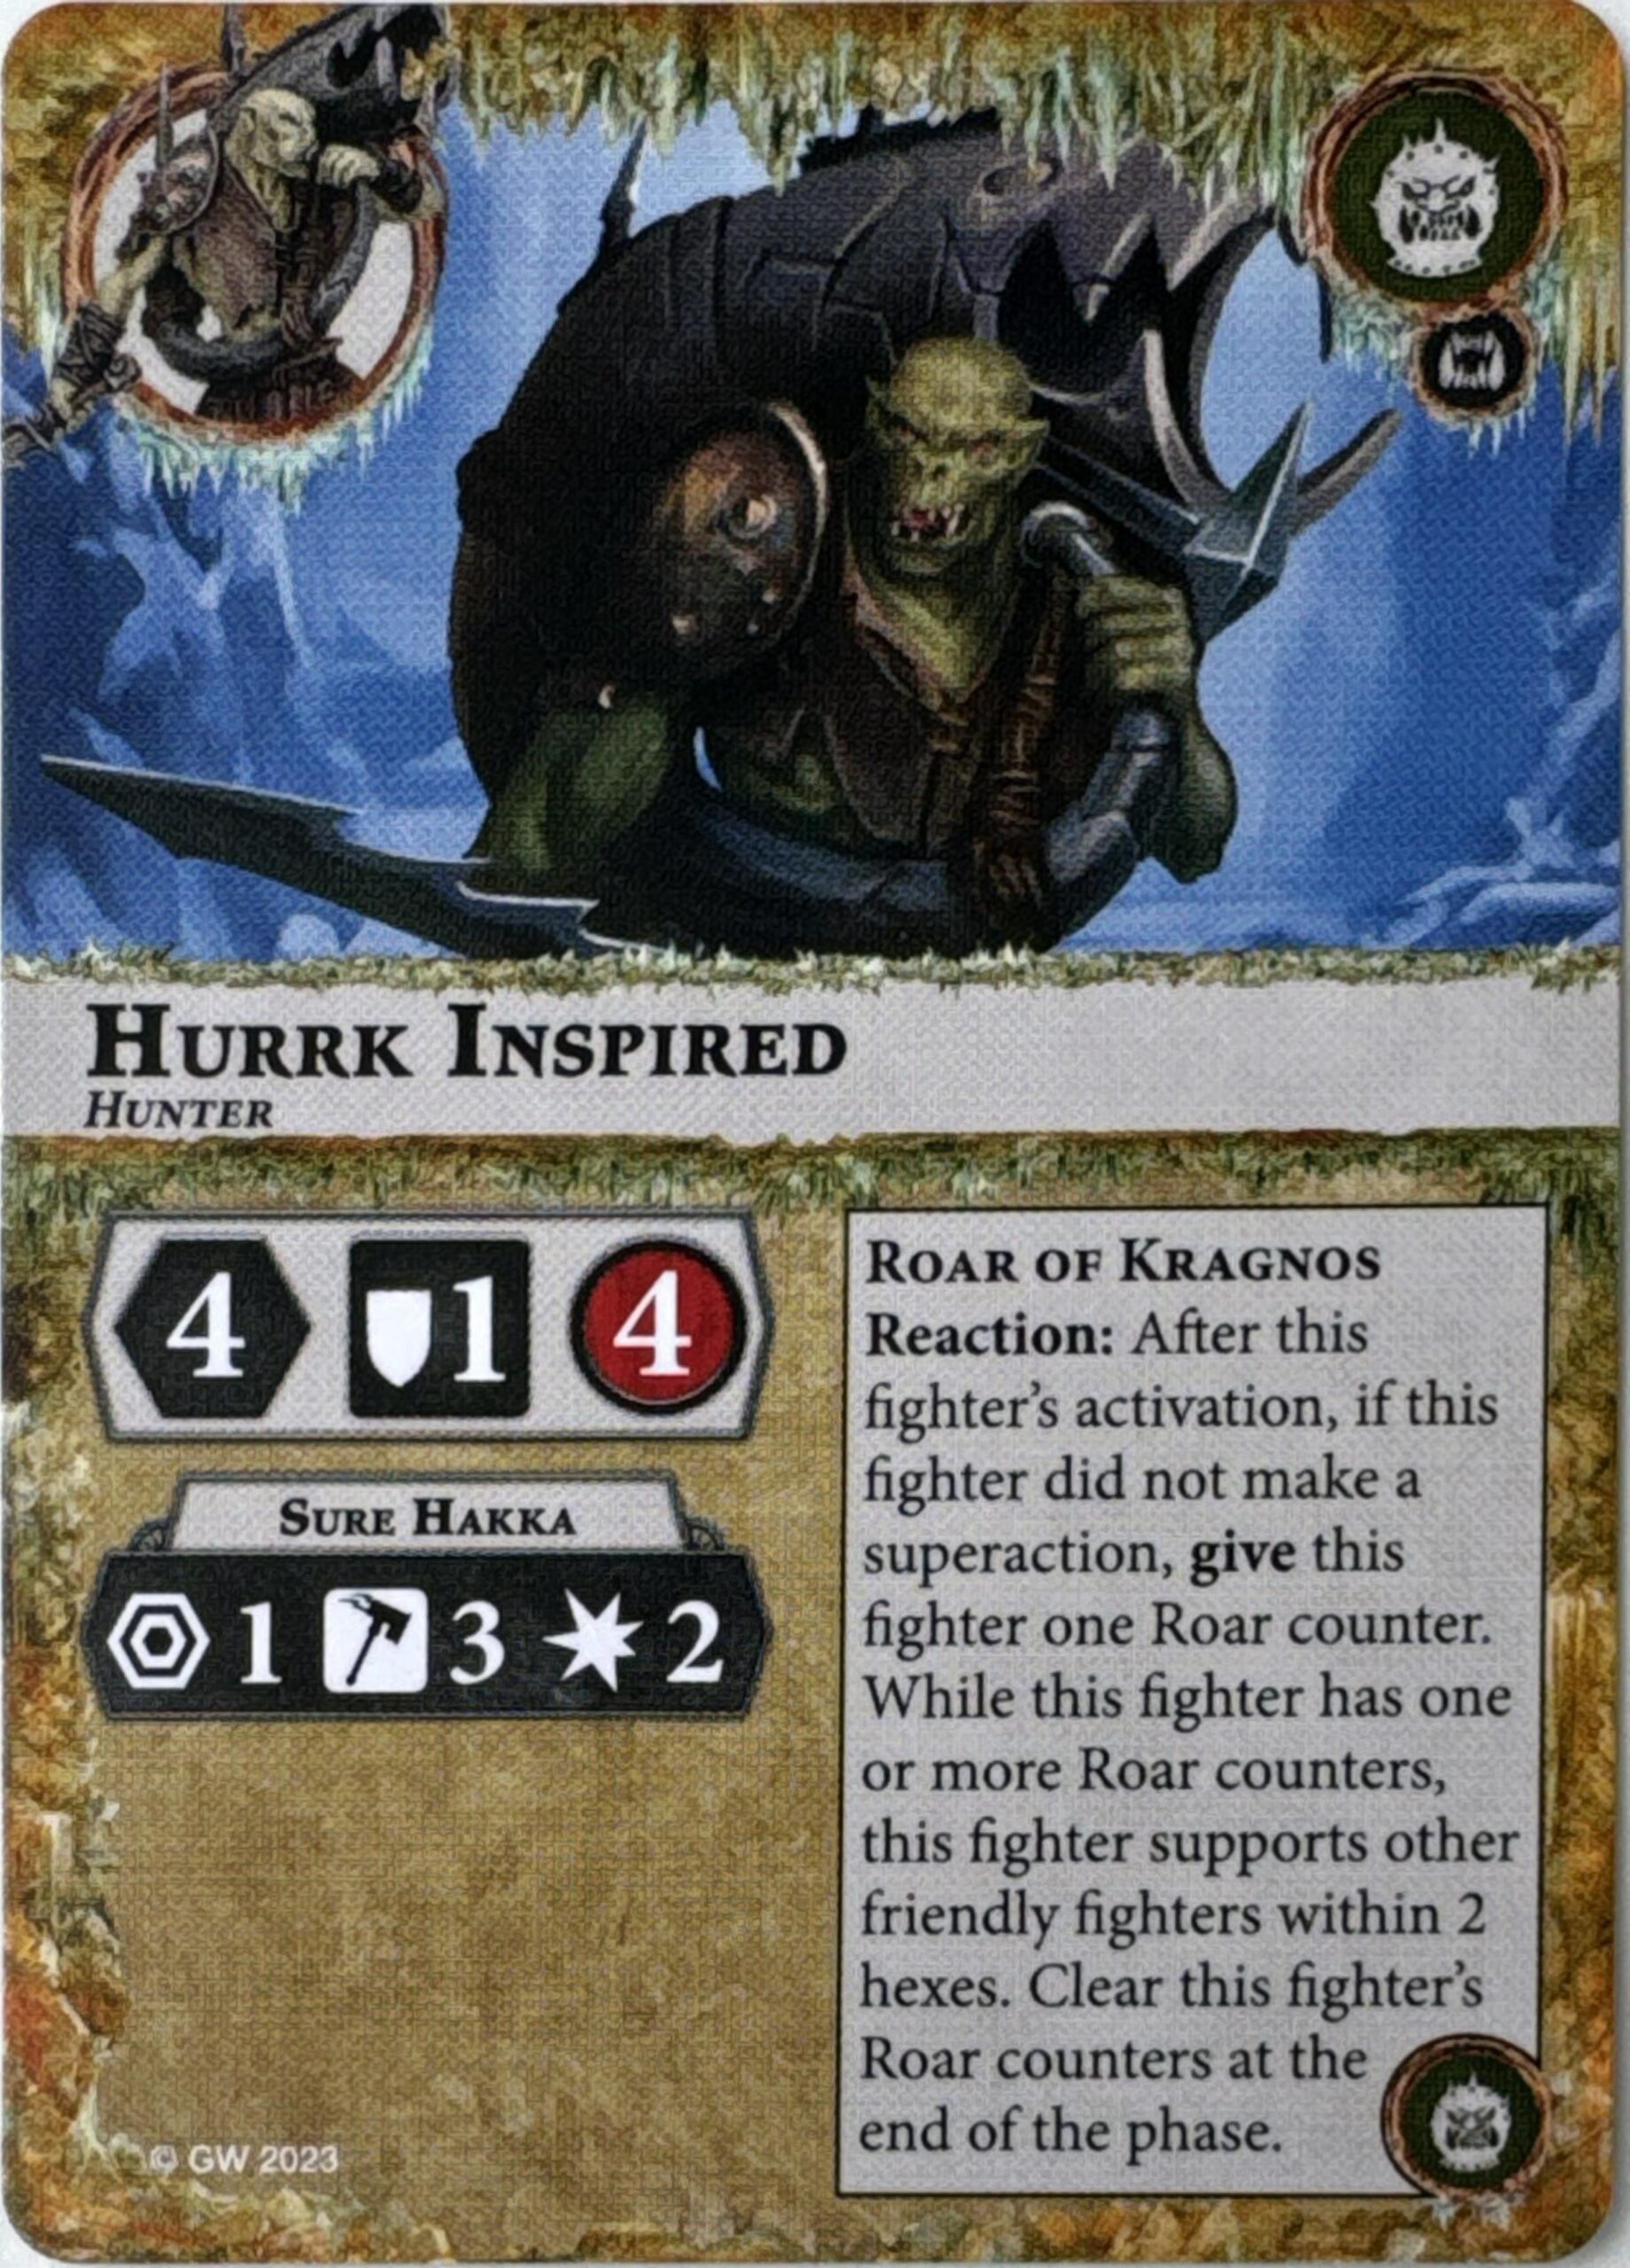
Next up is the tuba man himself: Hurrk da Howla. Another hunter sitting on 3 Move, 1 Shield, 4 Wounds, he also sports a 1R/2H/2D attack, which is serviceable but nothing to write home about. Instead, his schtick is, as you might expect, linked to the tuba, dubbed the Roar of Kragnos. After his activation, if he did not make a superaction, he gains a “roar” counter, allowing him to support all friendly fighters within 2 hexes (both defensively and offensively). This effect lasts for the round, but accessing it looks clunky to me. Typically (although of course not always), the best activation efficiency you get on these 4-fighter warbands is to charge 4 times. Not being able to react to that, or even to a barge, is extremely painful. While the effect is solid, we’ve seen a much better version of this with the original design of Velmorn, and we all know how that turned out. We’ll see how the power level on these guys shakes out, but I think either he should’ve just blanket given support (across the board) or needed to be able to react after a superaction. Back on track though, if he does manage to support a successful attack, he inspires to gain +1 Move and +1 Dice on his attack. A decent bump, but nothing too crazy, which makes sense given that he is at least theoretically easier to inspire than the leader. Missed opportunity I think with the reaction, but still potential to be a decent late-game stat stick, especially in Championship, where you have easier access to +Damage effects.
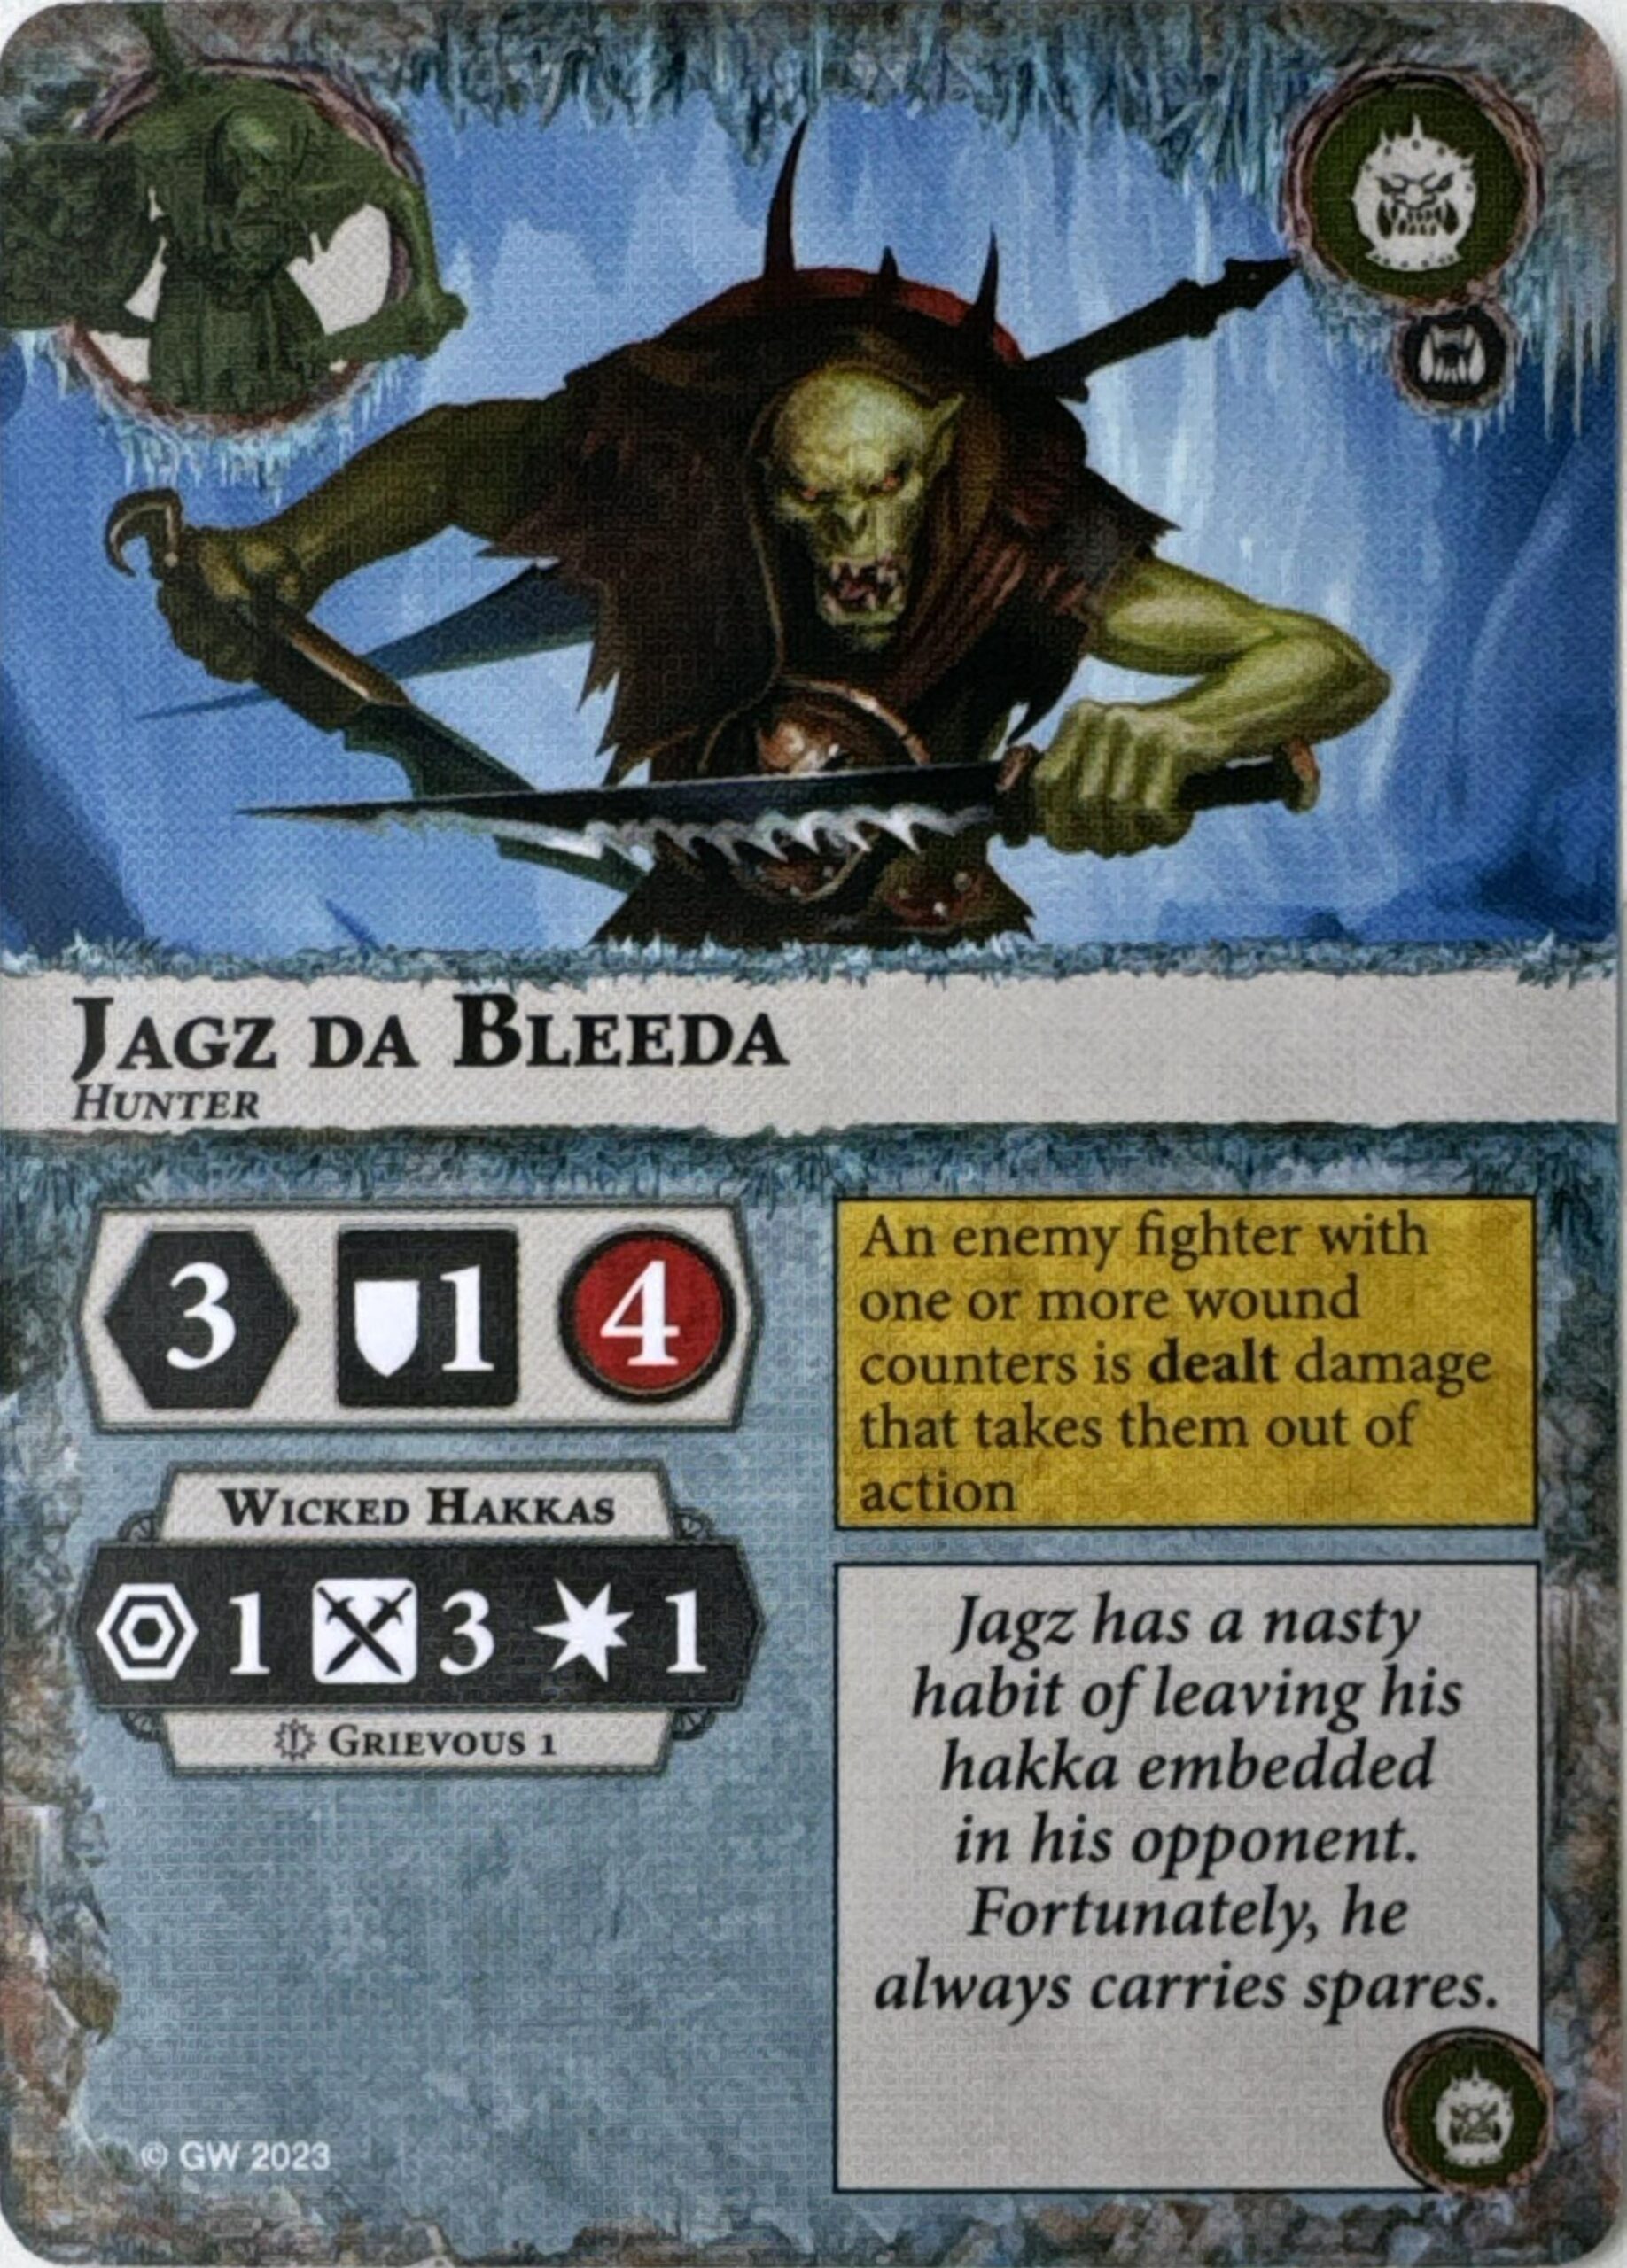
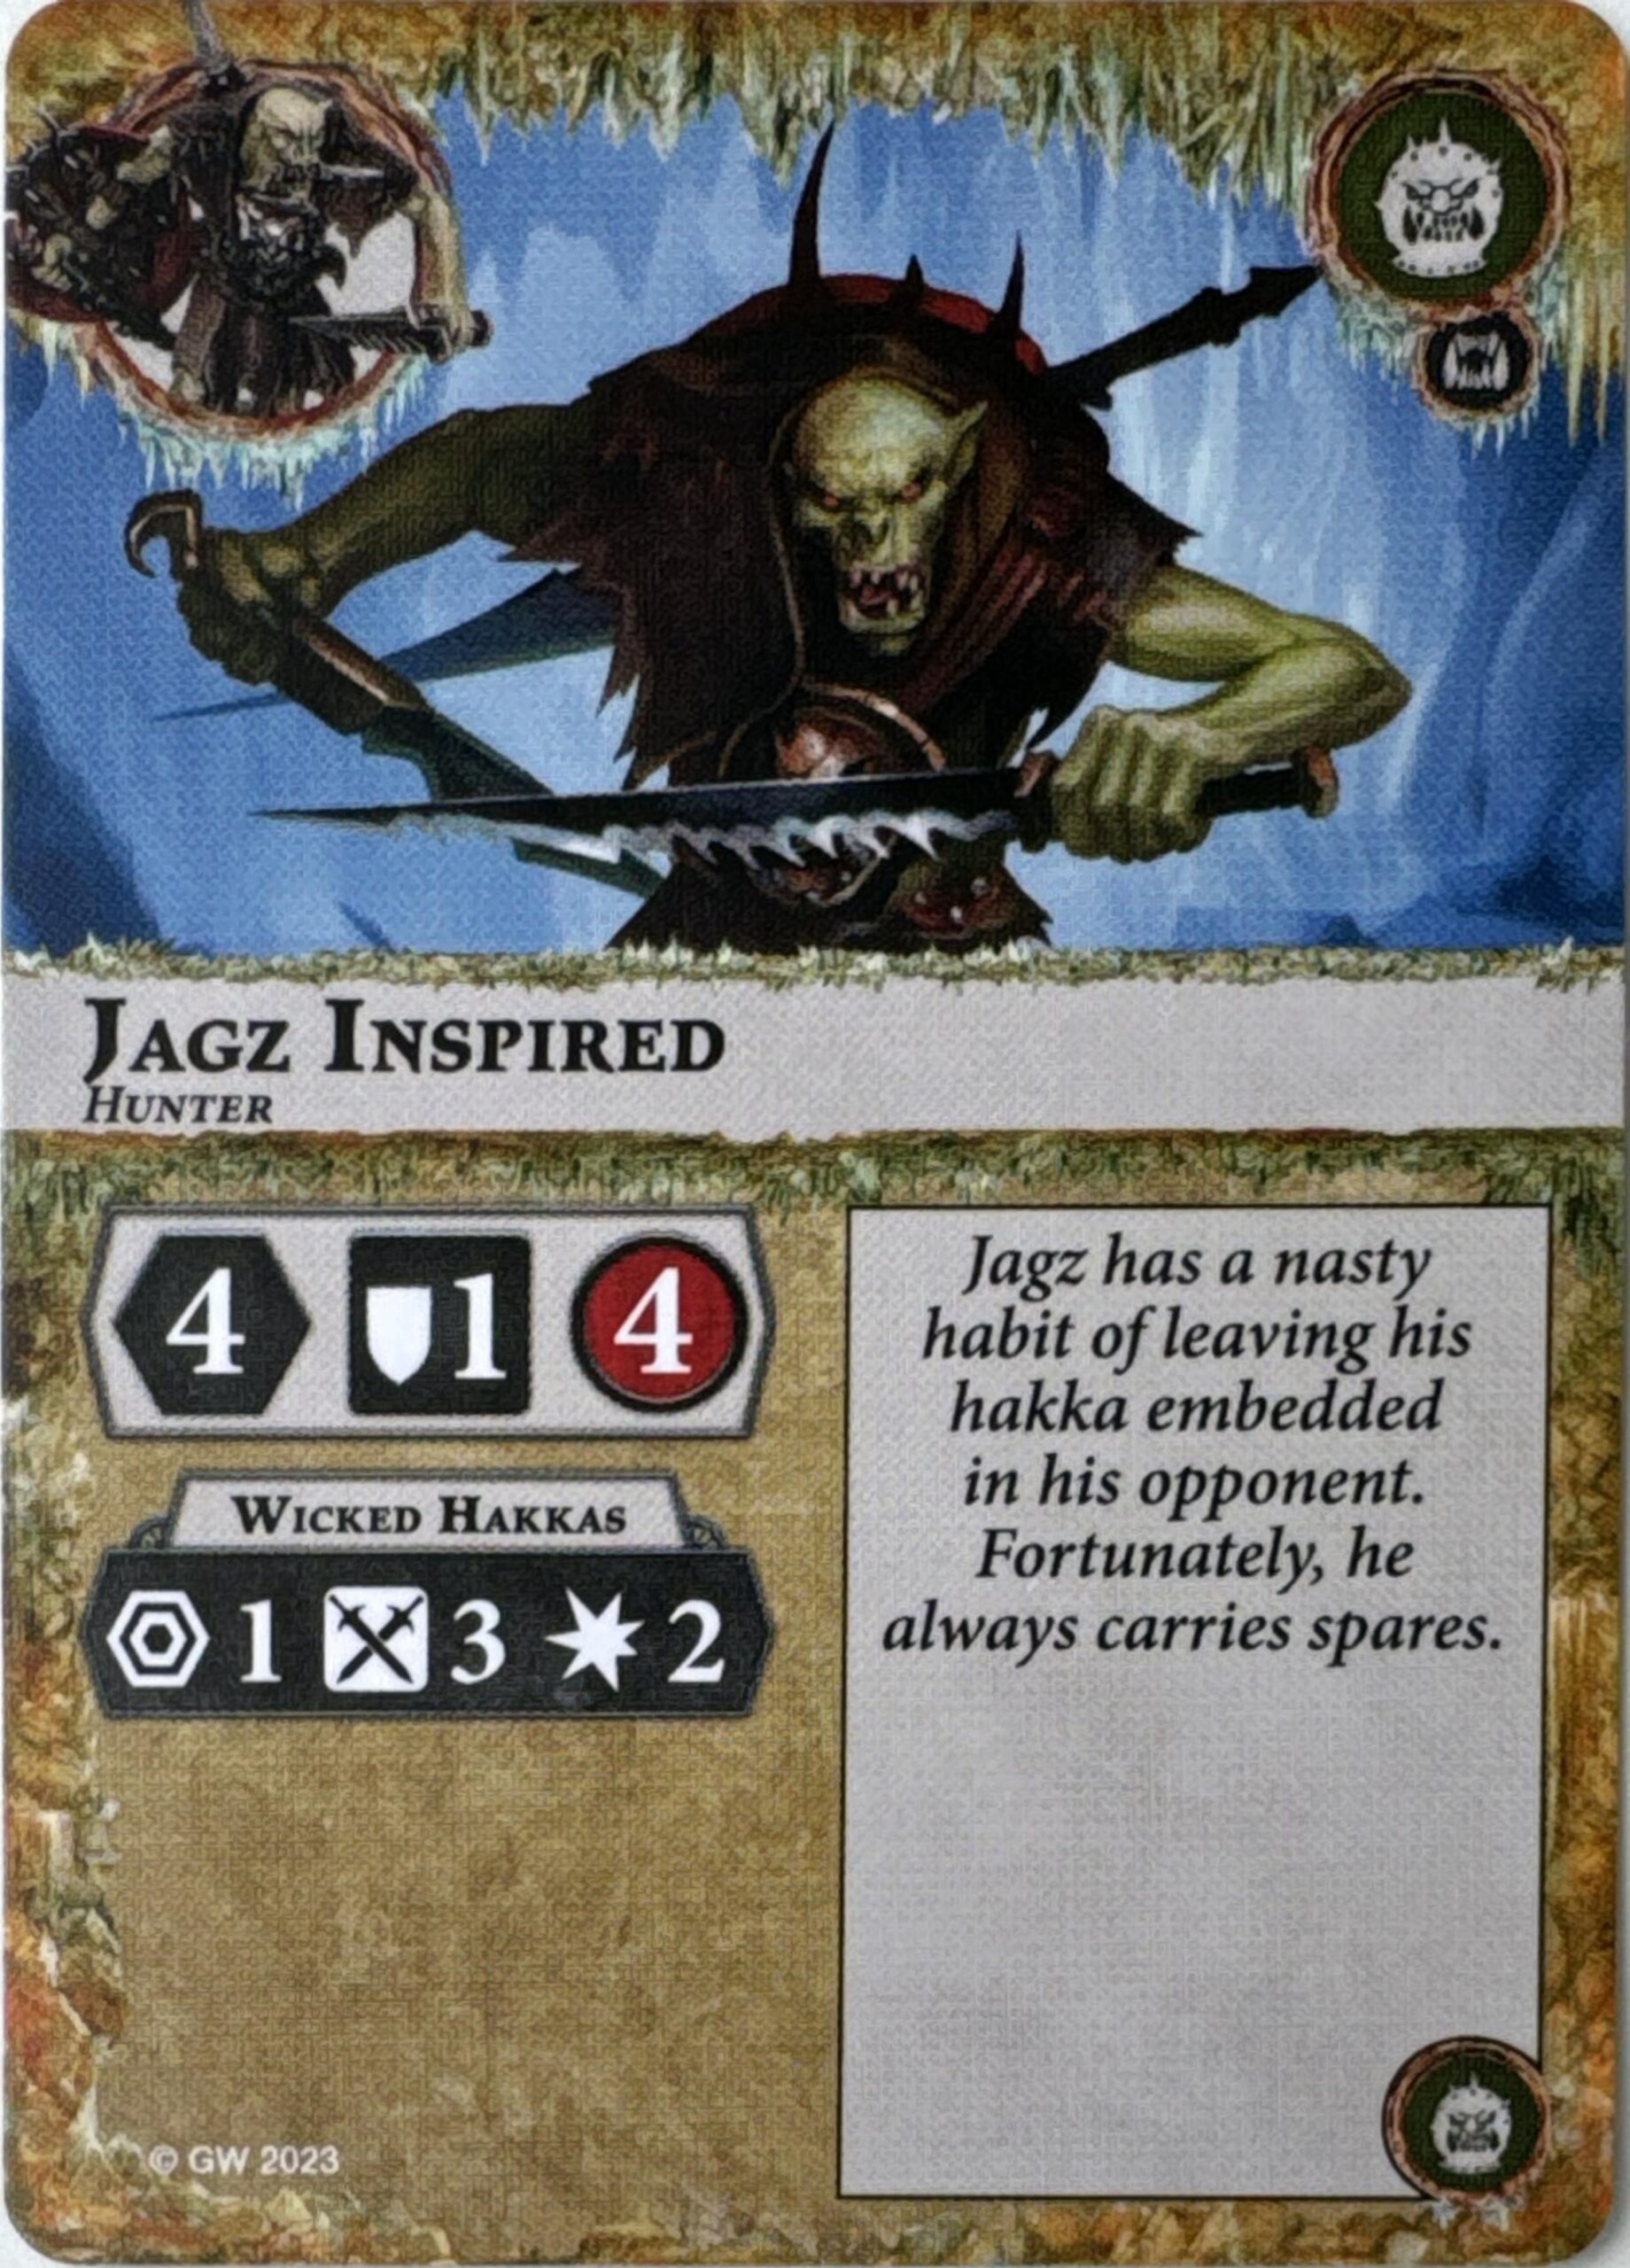
Following him is Jagz da Bleeda, once again a hunter with 3 Move, 1 Shield, and 4 Wounds. He has a base attack profile of 1R/3S/1D with grievous, which is honestly pretty rough in a 4-fighter warband. I don’t think it would have been unreasonable to just stick him at a flat 2 damage (no grievous) given comparable warbands we’ve seen in the past, such as Crimson Court. No special rules here, but he does inspire when a wounded enemy fighter is taken out of action, which should be fairly doable given it doesn’t need to be via attack action and he’s not the one who has to do the killing. Thankfully, this does get him to that flat 2 damage, as well as grants him an additional hex of movement, so it’s a good thing you ought to be able to inspire relatively early. Still, even his inspired stats are pretty much just the base stats of Ennias, which is disappointing. A little bit of a tune-up to 2 Dodge or something would’ve been much appreciated here, I think.
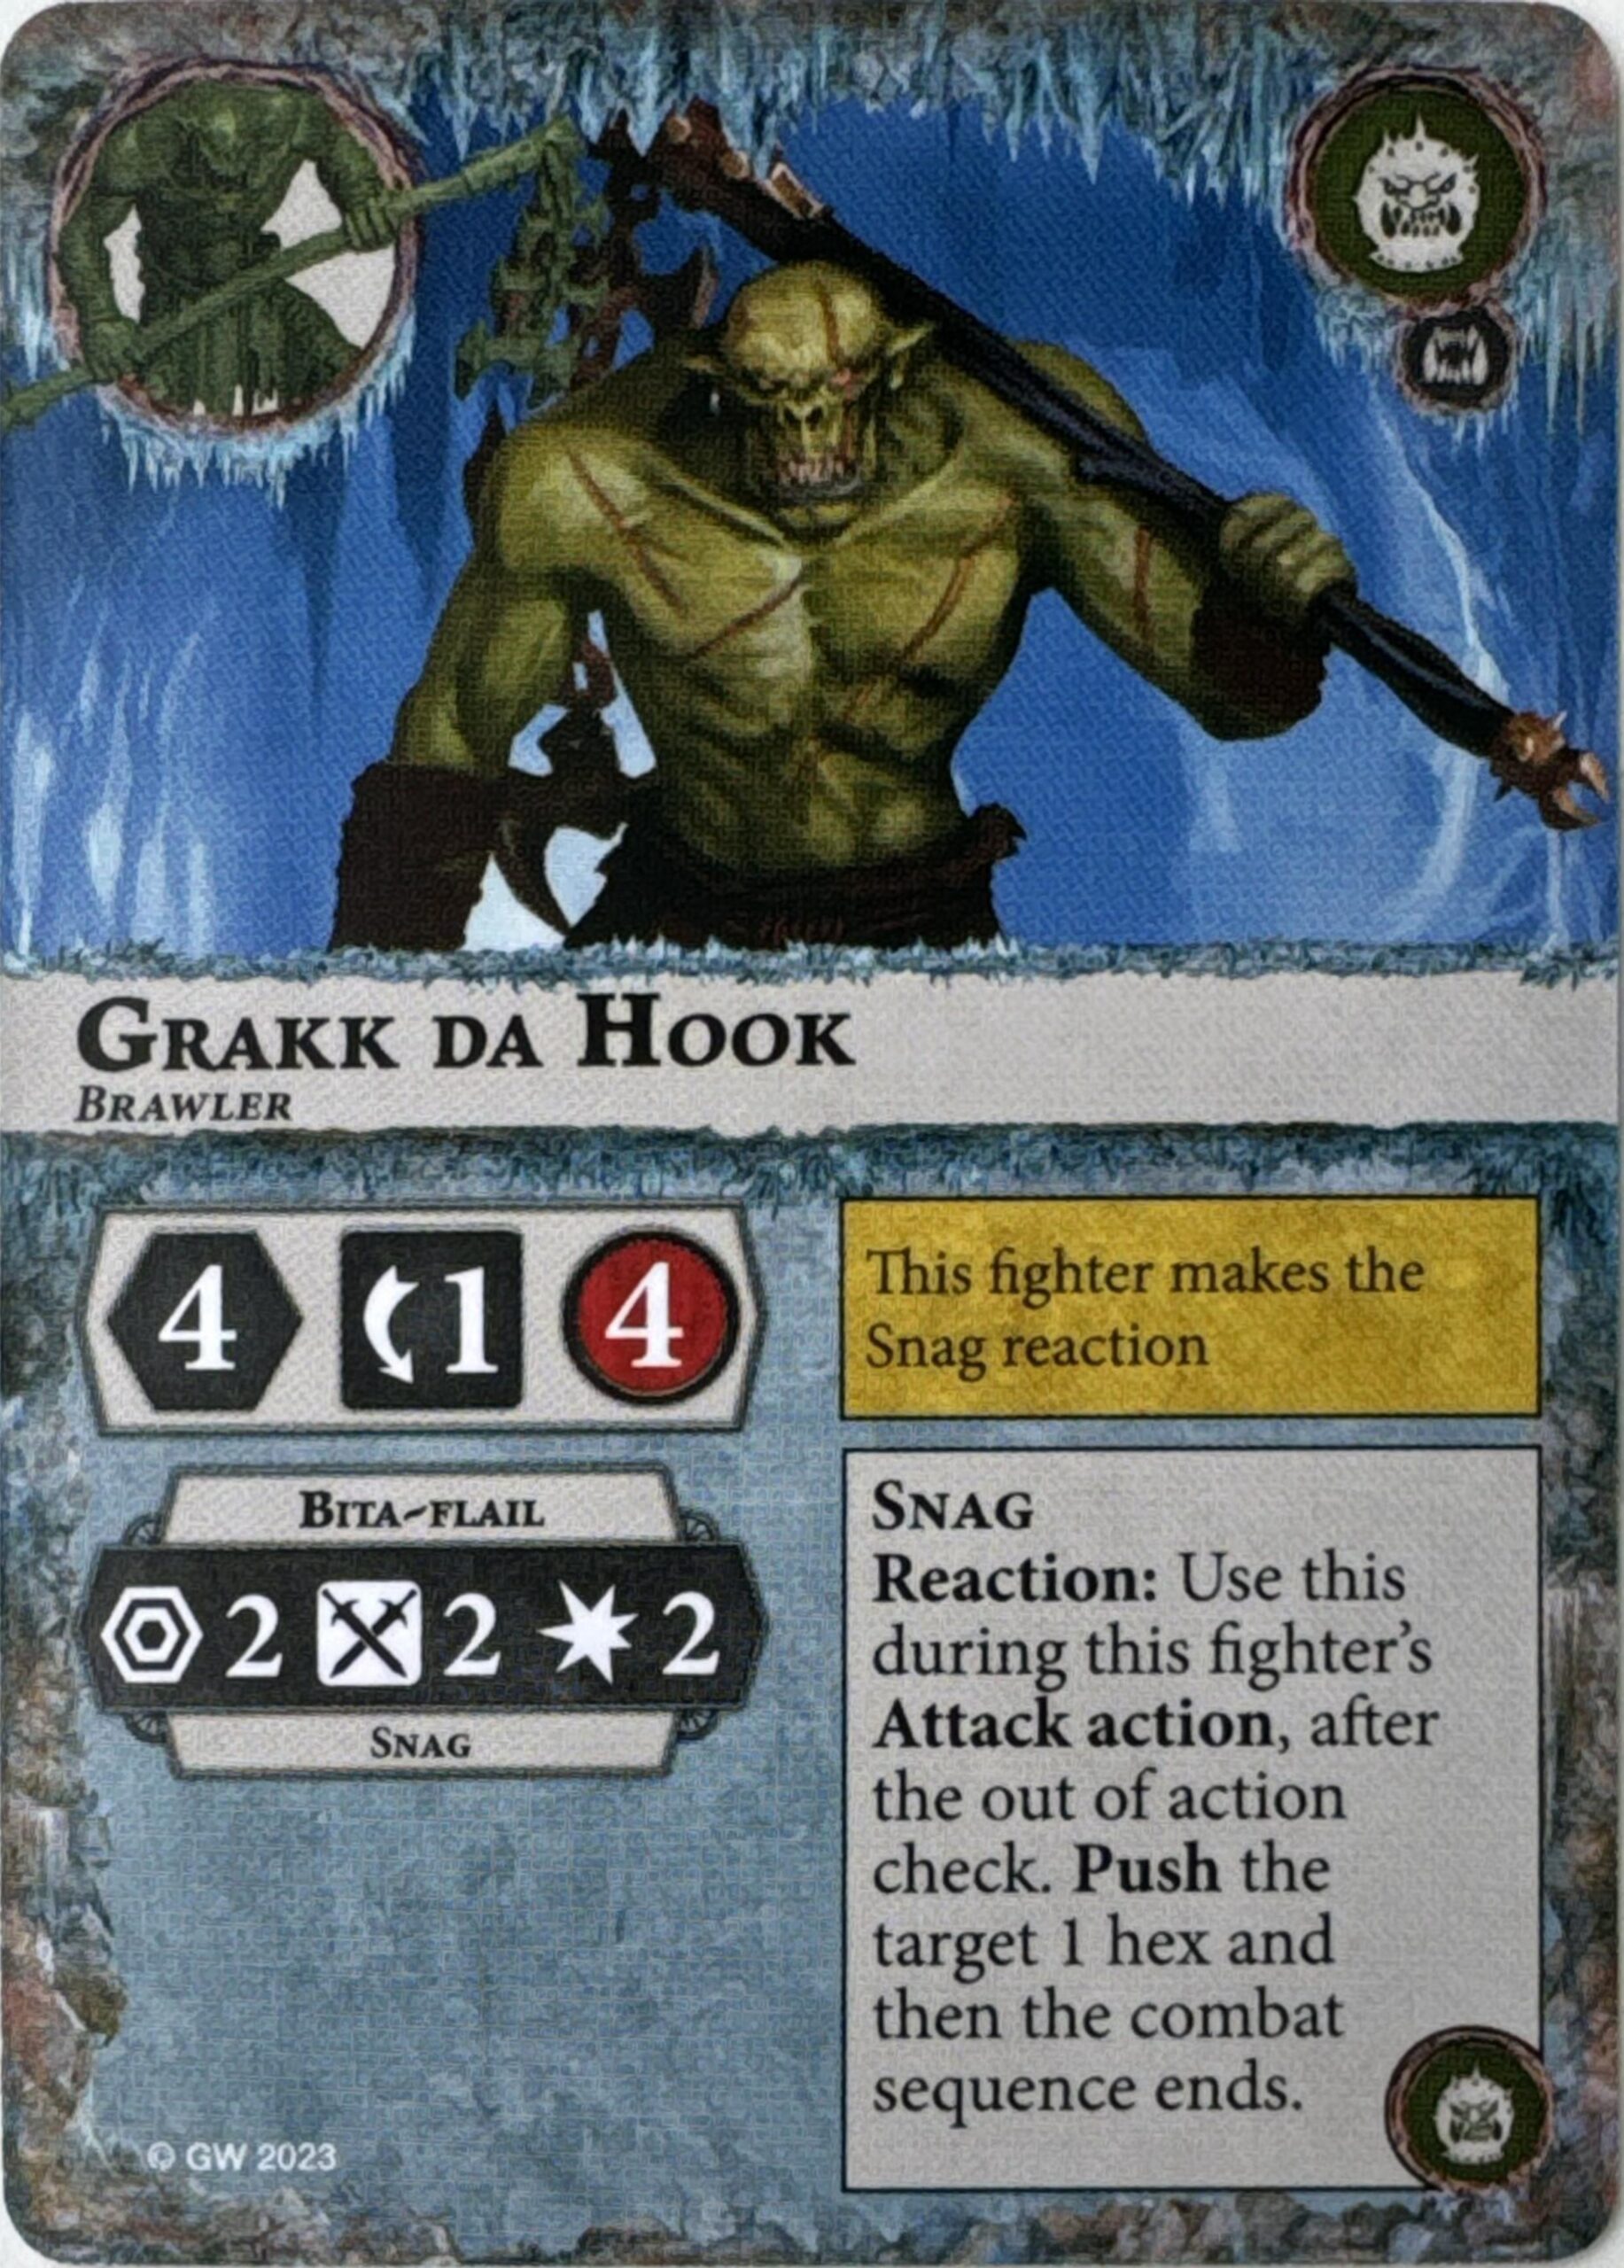
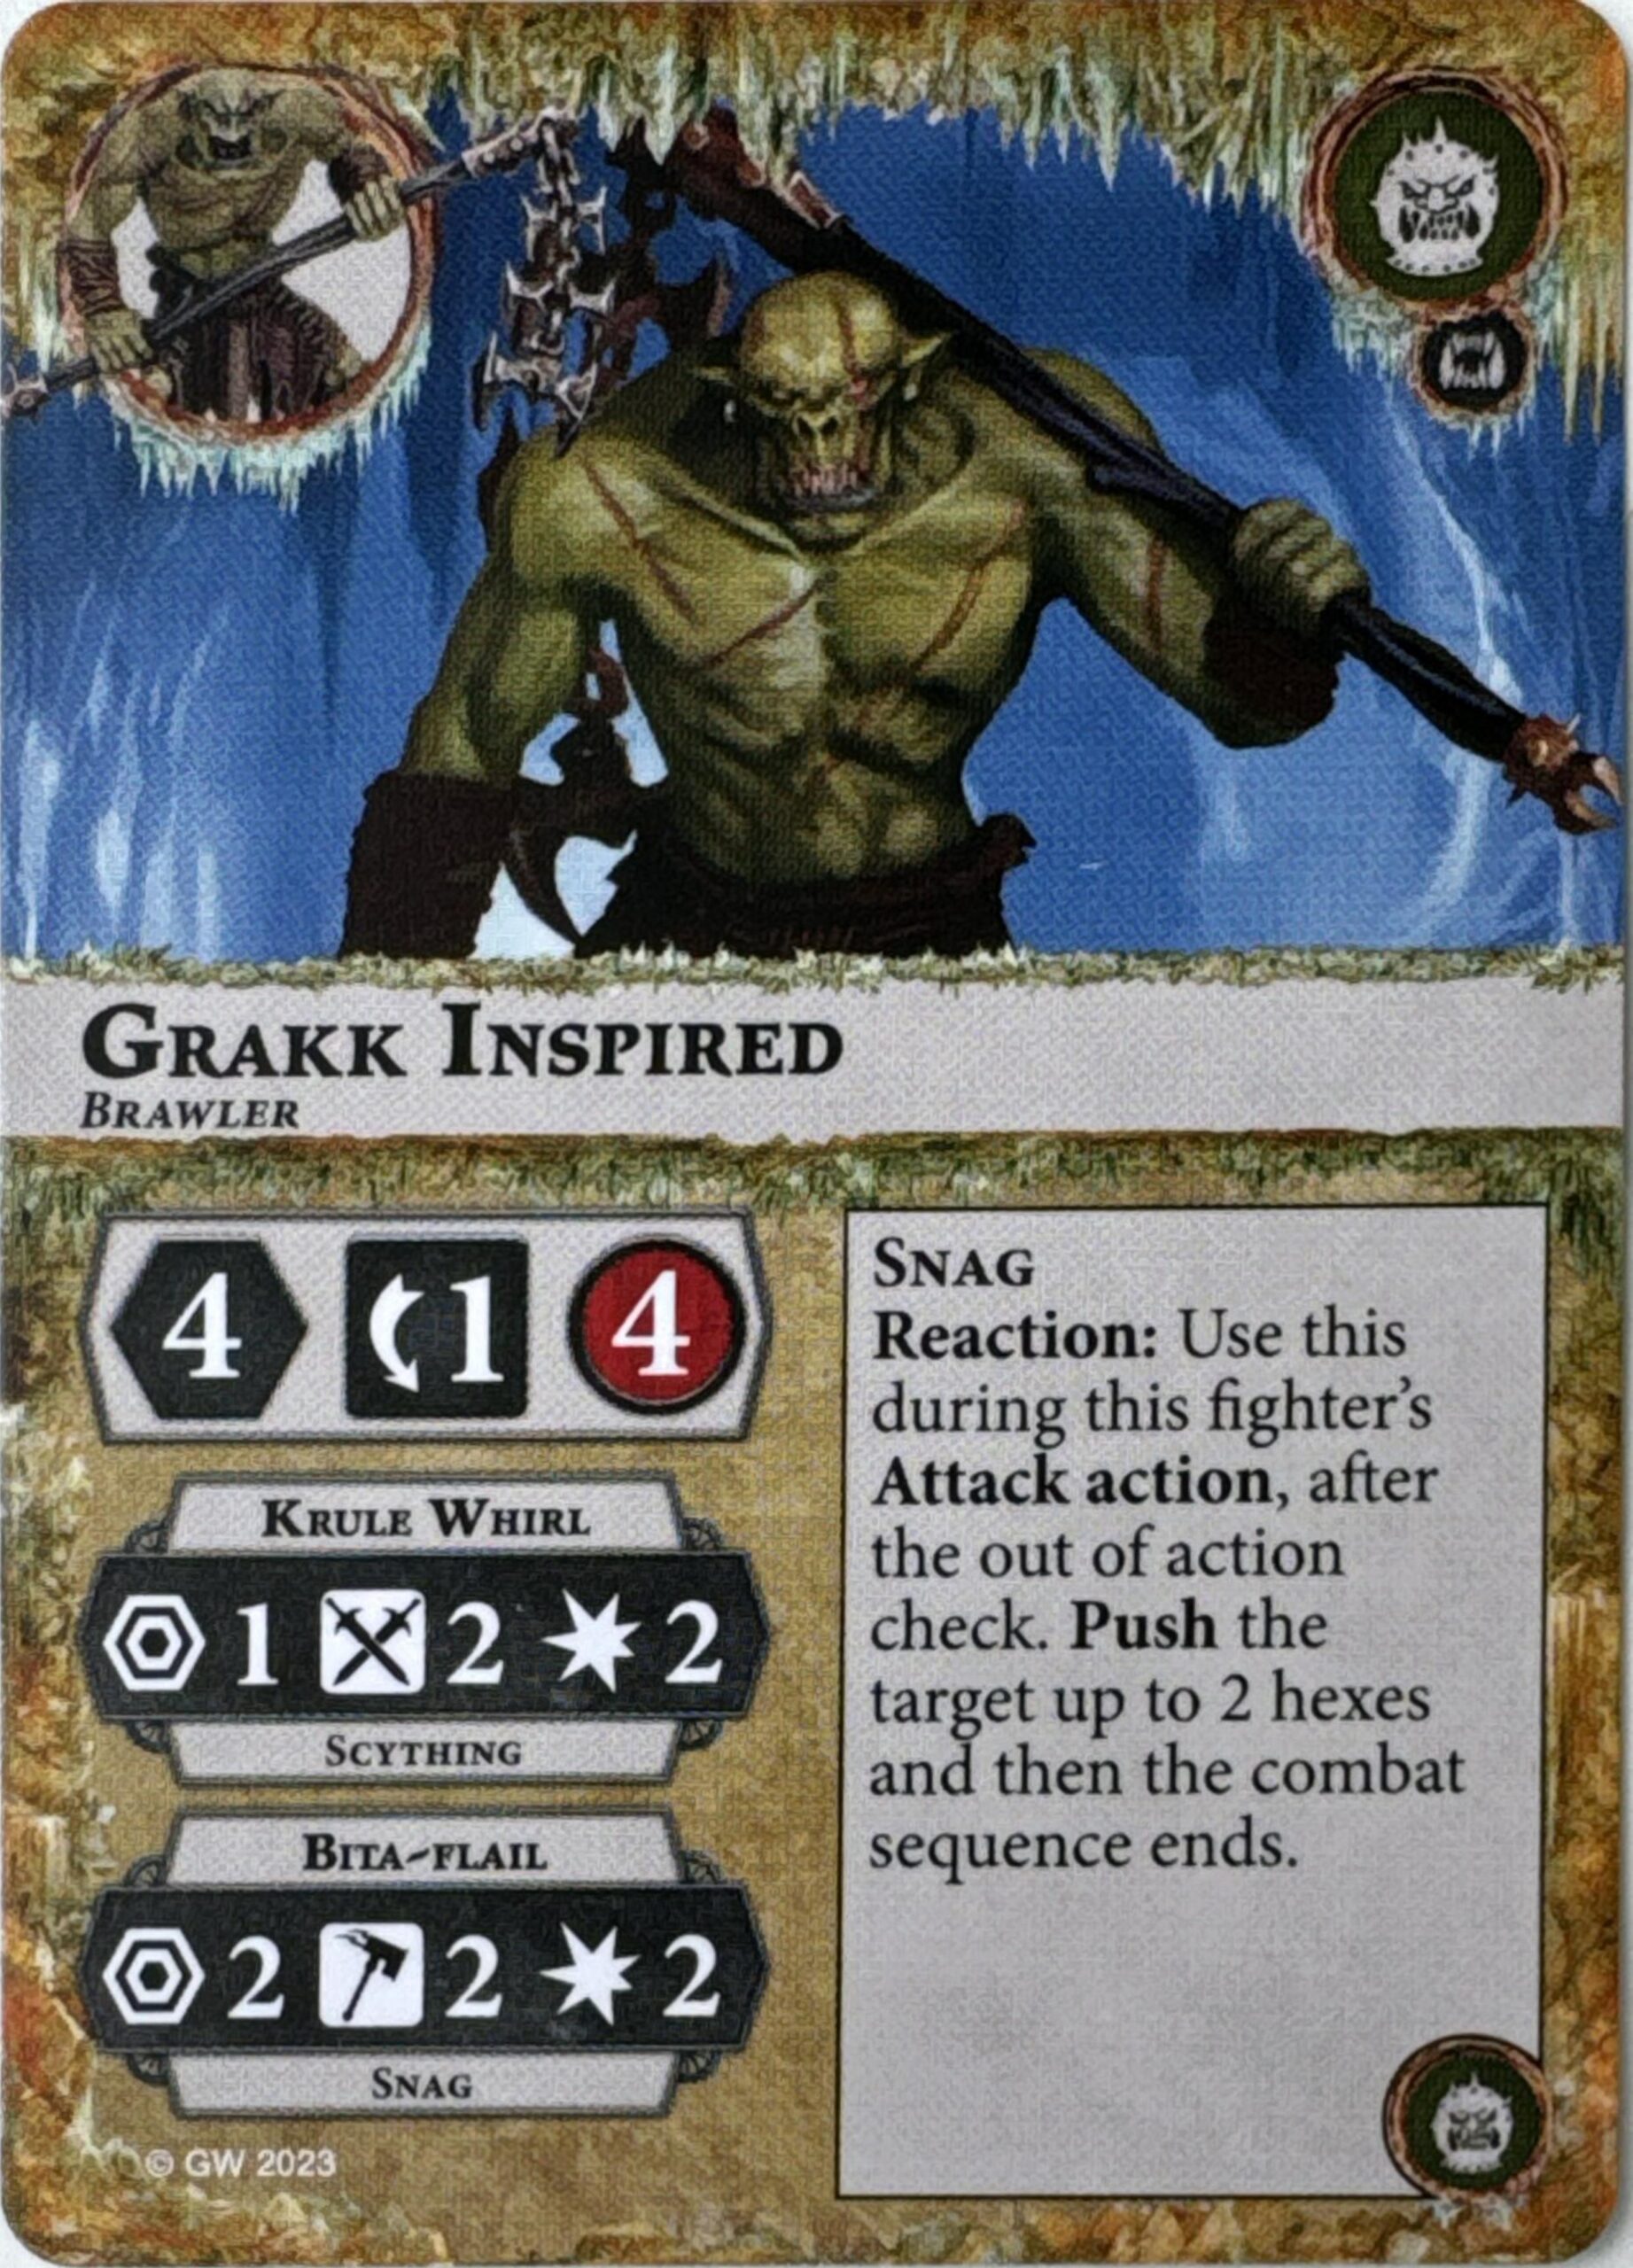
Lastly, we have Grakk da Hook, the fastest of the set at 4 Move, 1 Dodge, 4 Wounds. While you do suffer a slight defensive penalty for the movement, I think the tradeoff is worth it. He’s also a brawler instead of a hunter. His attack profile sits at 1R/2S/2D with the Snag keyword, which is similar to the abilities of Tammael and Hadzu in that it allows you to push the target of your attack instead of simply driving them back. This is always a neat little trick to get around fighters who can’t be driven back, but the accuracy of this particular fighter is definitely baking in Hurrk’s support. Definitely going to need some type of dice manipulation if you want to get mileage out of this fighter, but the disruption potential is definitely there. If you do manage to make that Snag reaction, you get to inspire, getting an accuracy bump from swords to hammers, as well as tacking on a 1R/2S/2D scything attack. Furthermore, your reaction goes from a 1-hex push to 2-hex, which, combined with that accuracy bump, makes for a pretty neat control piece. He may end up being the hardest to inspire, but if you manage to pull it off, he probably gets the most added value for it. I think setting up extra dice and supports to land that critical attack will be key to getting not only the most out of this fighter, but possible even the warband as a whole.
Our Favorites
- Mark: Daggok
- Aman:
- Zach: Hurrk
- George: Daggok
Objectives

Our first objective is Aspirin’ Killaboss, a 1-glory end phase for your leader both surviving and being inspired. A bit odd they made this a dual objective considering they have already ruled that the fighter in question would need to be surviving to score this anyway, but, in any case, this one is just alright. As I mentioned in the previous section, you are likely relying pretty heavily on the reaction attack to get the leader inspired, which is not a great look given the poor accuracy there. It can feel particularly awkward on offset or longboard configurations given the low movement characteristics of the warband (making it difficult for him to pull off multiple attack actions).
Power Ceiling: 1, Consistency: 2
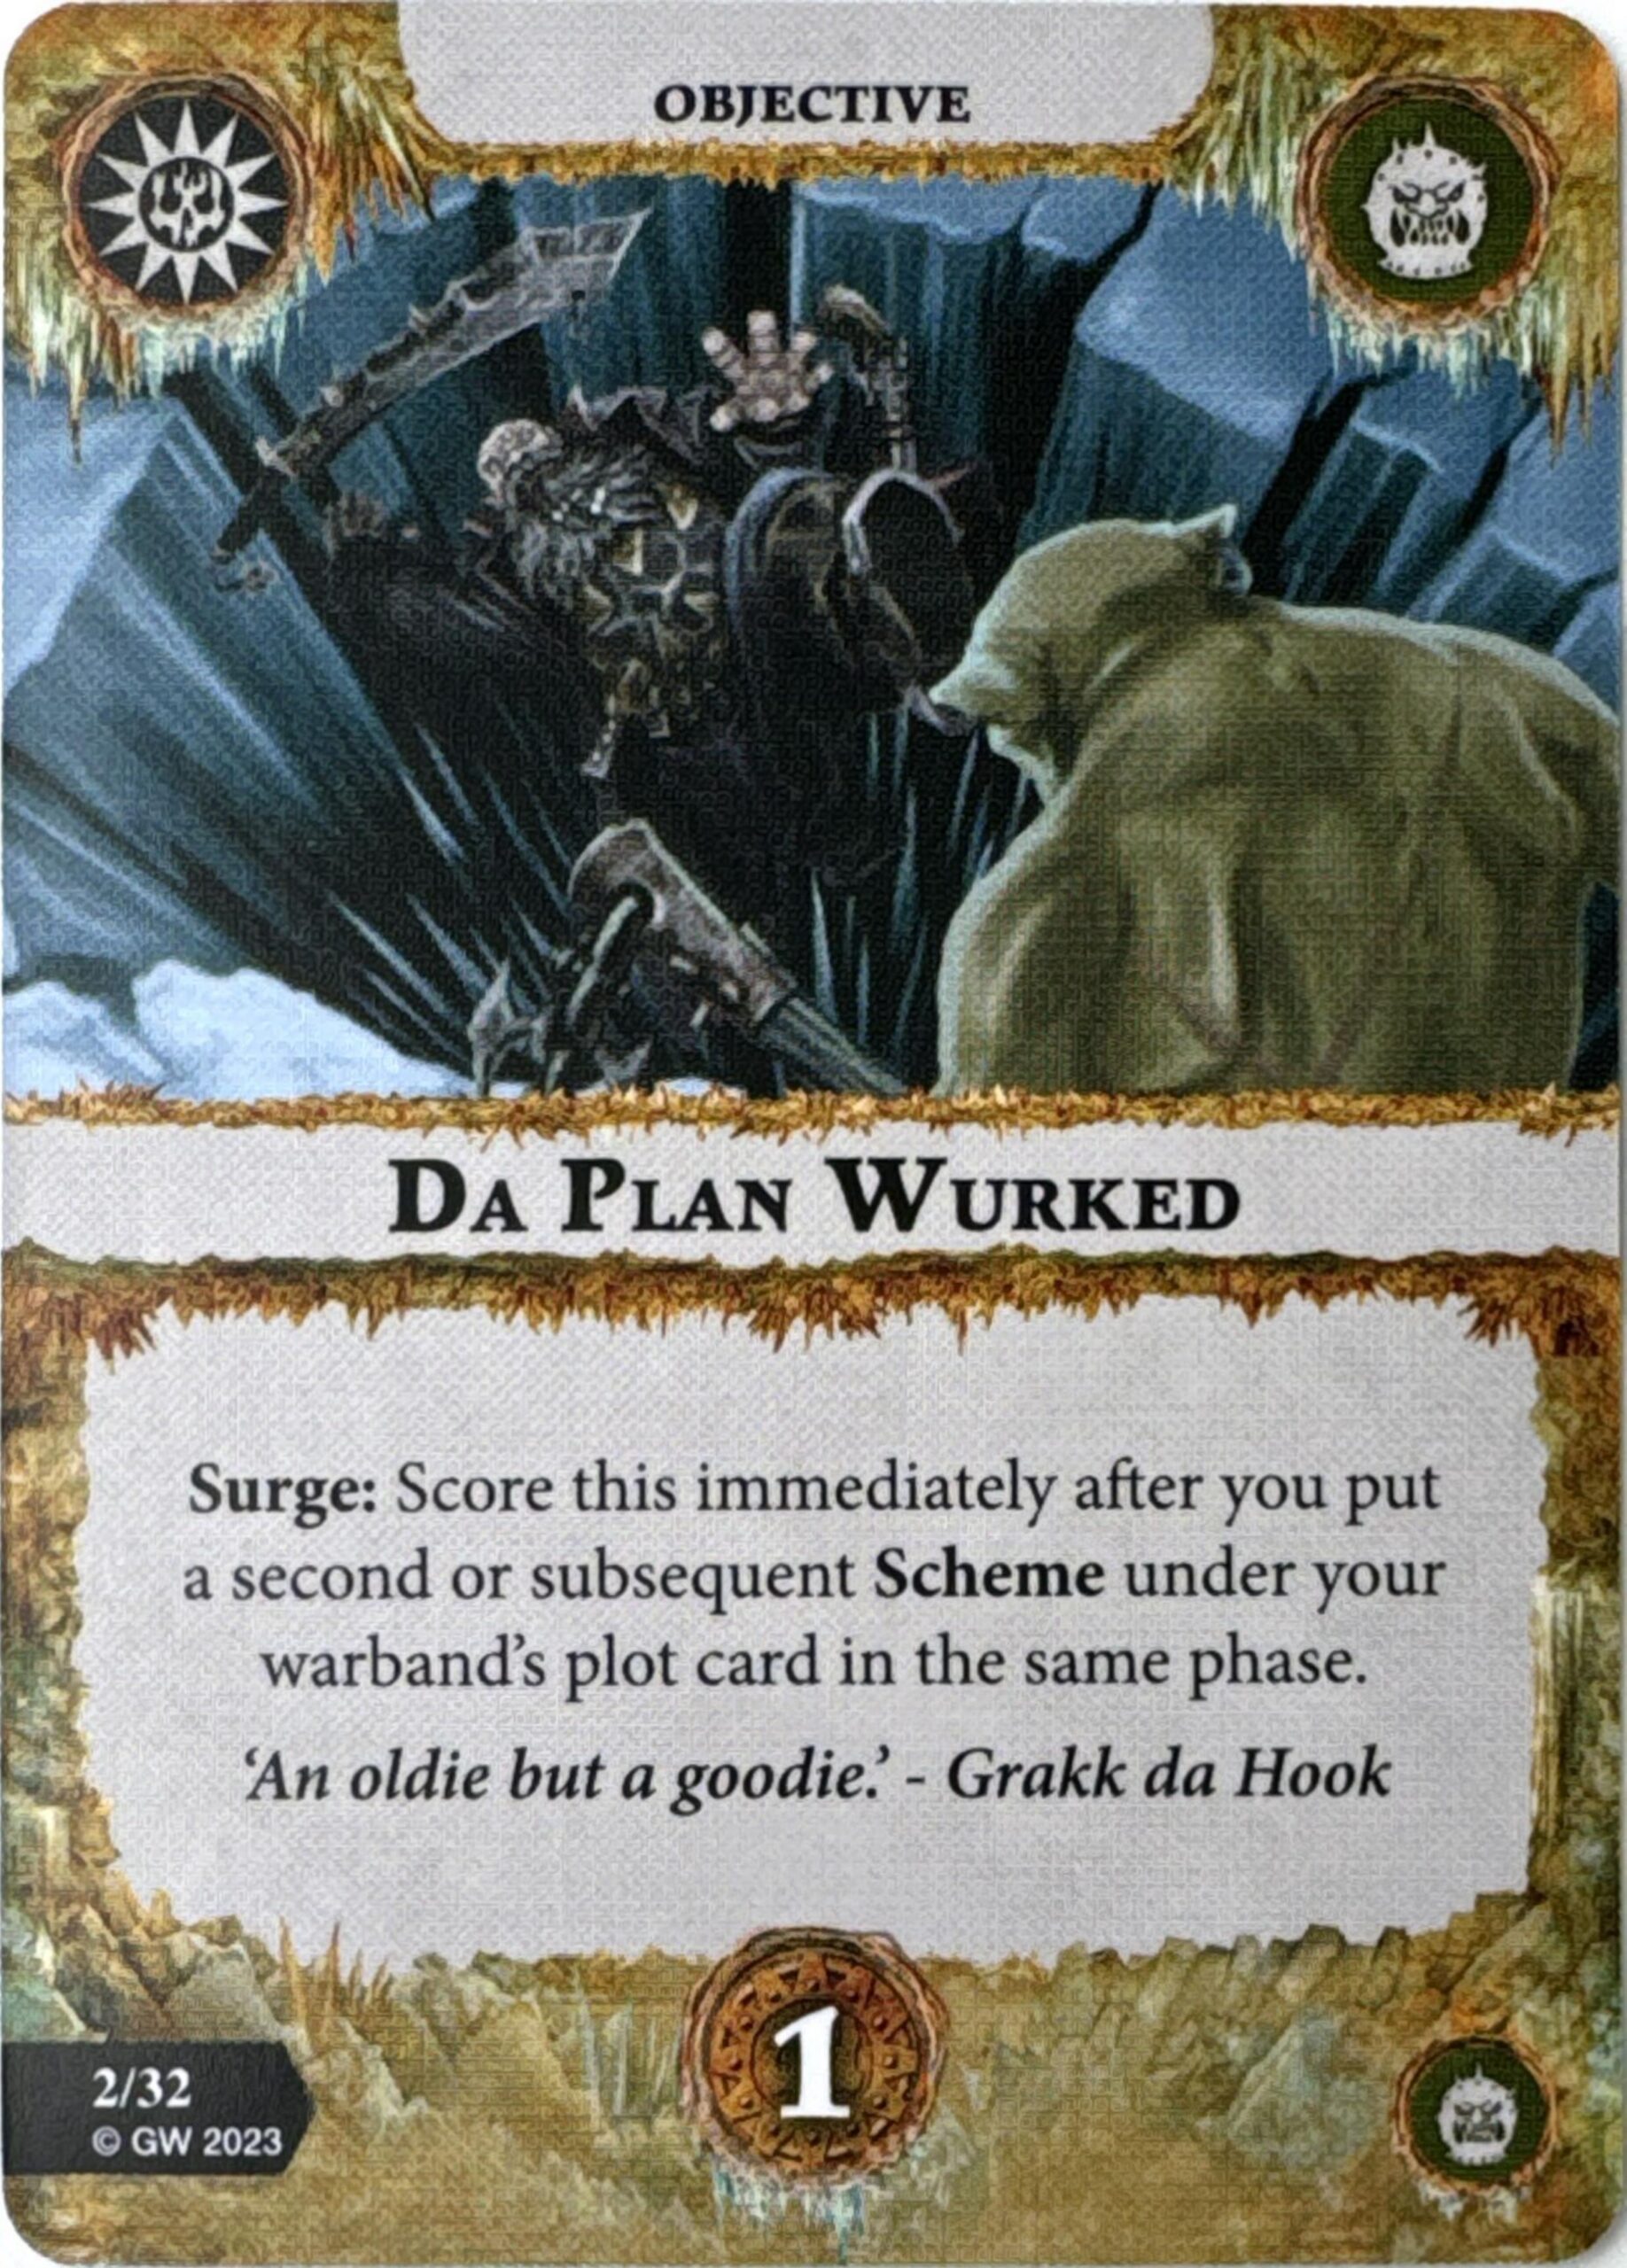
Next up is Da Plan Wurked, a surge for completing your second or subsequent scheme condition in the same phase. Given the internal synergy of the schemes with this and other objectives, on top of the decently competitive effects of the schemes themselves, this one is not bad at all. However, I do think it returns less value in Championship since you’re likely to be taking fewer schemes there due to the availability of stronger gambit options.
Power Ceiling: 2, Consistency: 2
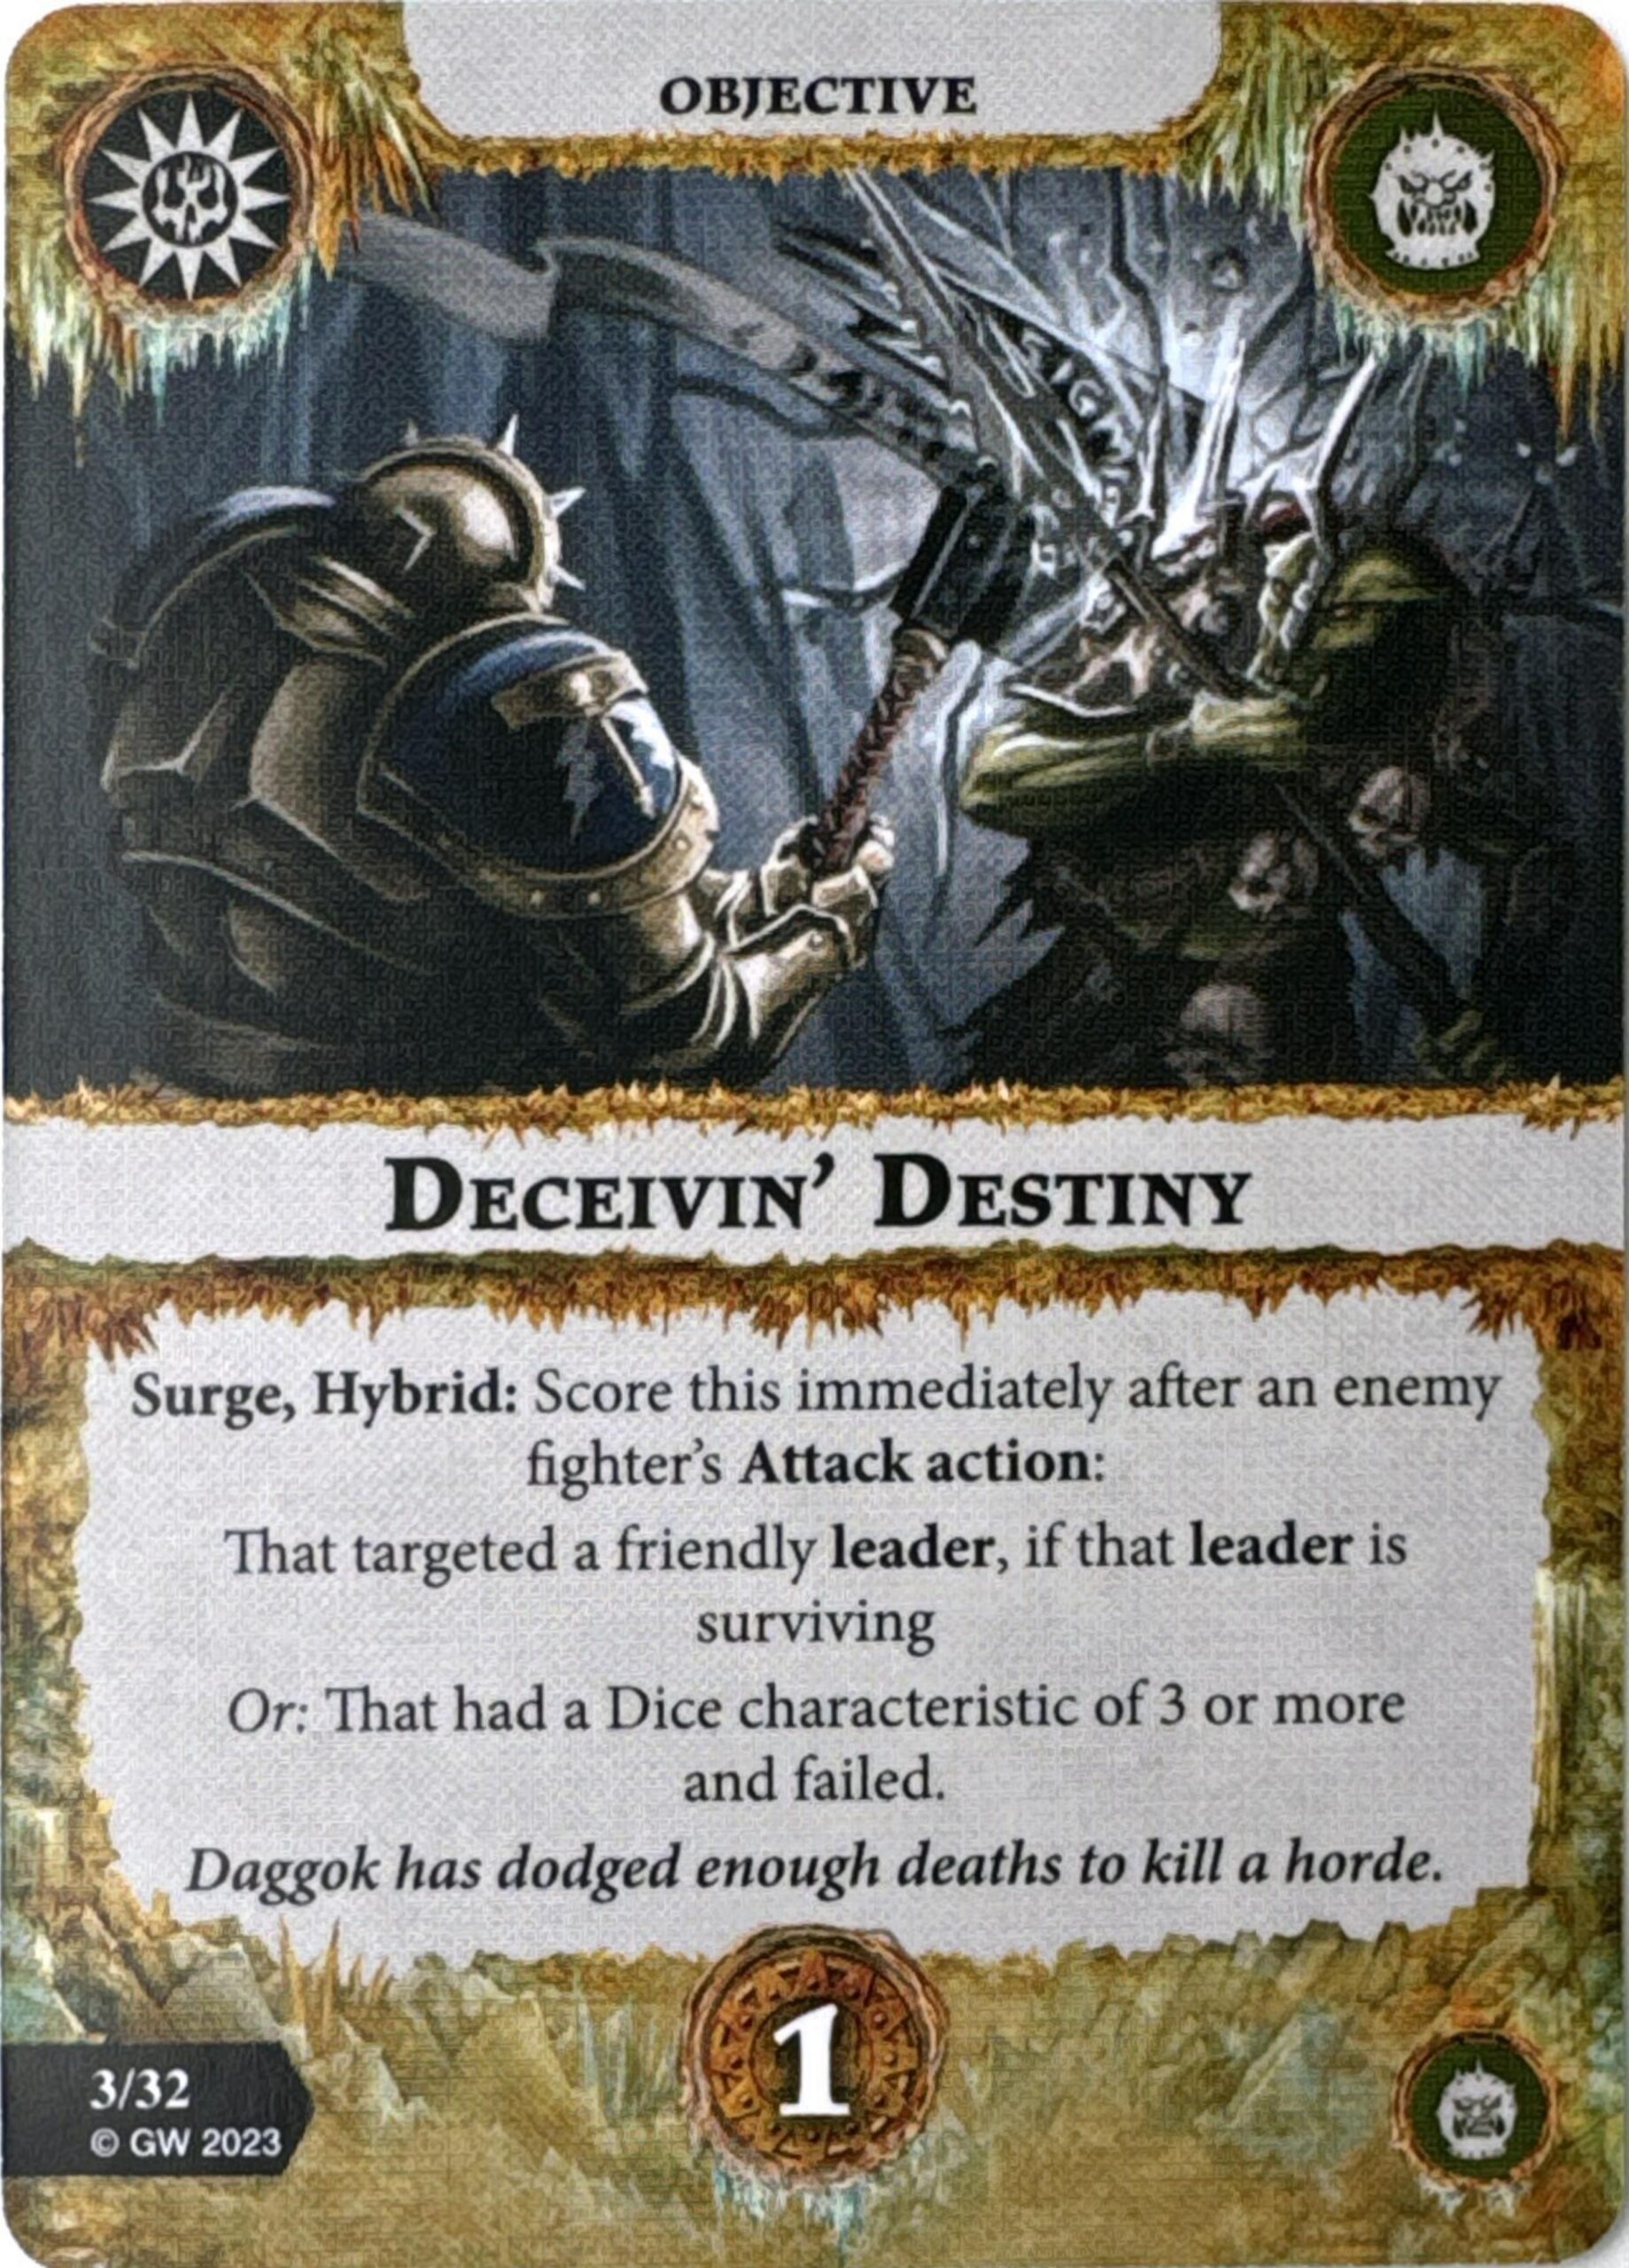
Deceivin’ Destiny follows a bit in the footsteps of cards like [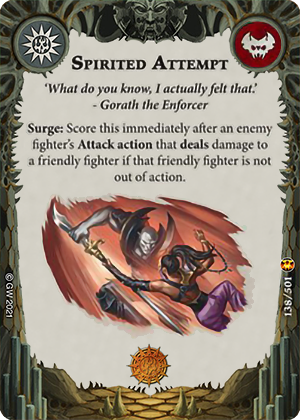 Spirited Attempt] or [
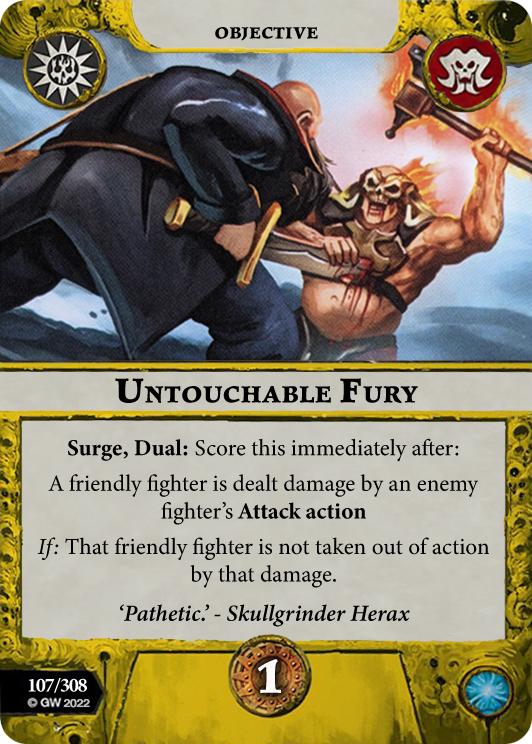 Untouchable Fury], scoring as a surge after an enemy’s attack action targeted your leader and the leader is still surviving, or targeted any fighter with a dice characteristic of 3 or more and failed. Obviously, this is not quite as trivial as the cards I just mentioned, but there is enough -Damage tech in the game right now that it’s very conceivable you could make it hard enough to kill Daggok in one hit that you could score this. The ubiquity of 3-Dice attacks has also risen as the seasons have worn on, so this condition, while not trivial, is a nice backup should your leader happen to bite the dust or not be quite so at-risk. In fact, since he generally seems to be the primary mechanical focus of the warband, you probably want to play cagier with him anyway. In the case where somebody whiffs an early attack, you get a ton of easy value here, just depending on matchup and game flow, the triviality may vary quite a bit.
Power Ceiling: 3, Consistency: 1
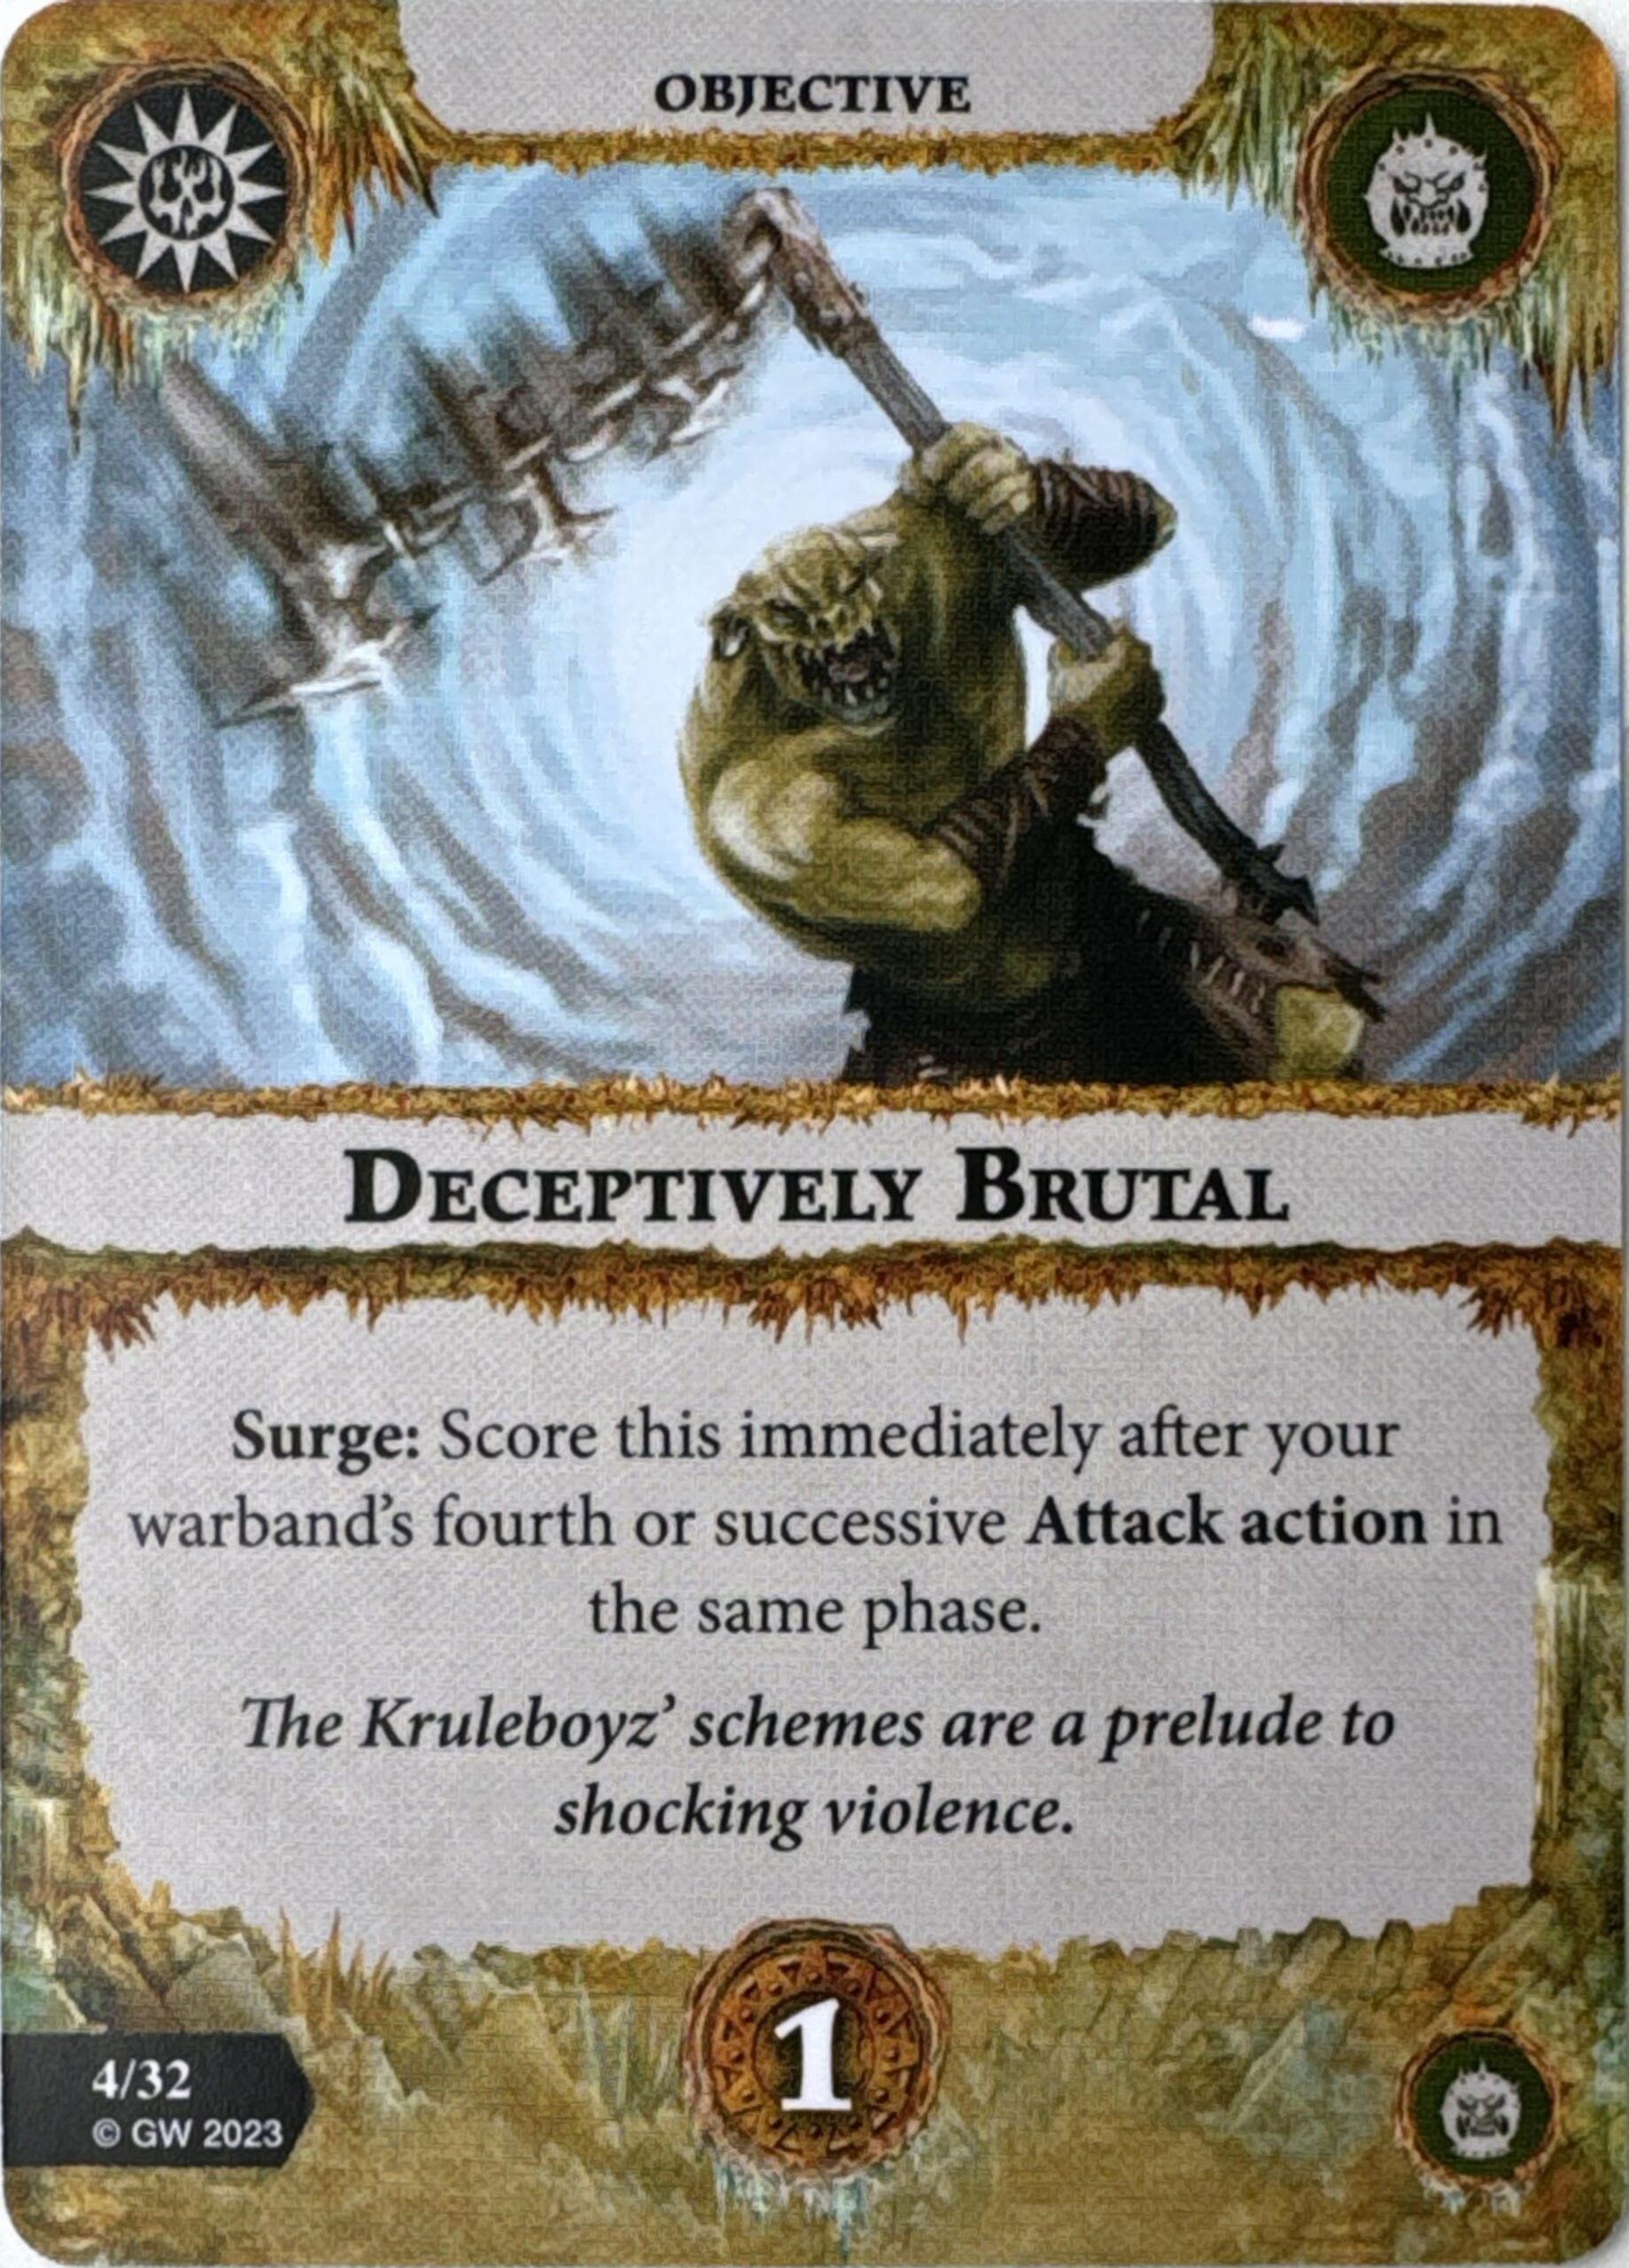
Deceptively Brutal is just [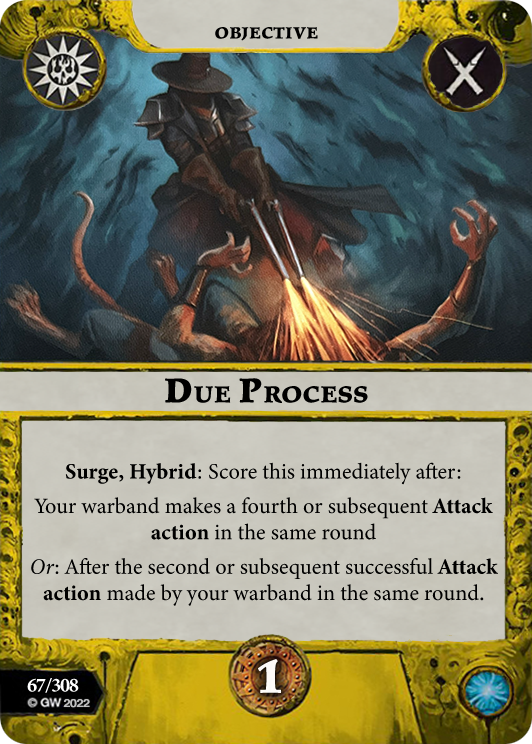 Due Process]-lite, scoring on your 4th attack (or subsequent, not sure why they used “successive” here) in the round. If you’re getting the most out of your leader, this should pretty much be scored just for playing the game. Between the reaction attacks and potential scything from Grakk, I like the odds of putting out at least 4 swings in a round. You could potentially throw in a Range 3 attack or such to help out, but it should be very doable in most interactive rounds. Just keep an eye on matchup and potential board deployment before deciding whether you should keep it in an opening hand.
Power Ceiling: 3, Consistency: 2

Deceptively Kunnin’ is our follow-up surge, scoring for your third or subsequent (again with the “successive,” still seemingly no change in meaning) reaction in the same phase. Before we even get to the power deck, you’ve already got 3 fighters with baked-in reactions on their cards, which is a great start. If you’re playing Voidcursed Thralls it’s very conceivable that you could use the movement reactions and the leader’s attack reaction to pull this off in a single activation. It’s no [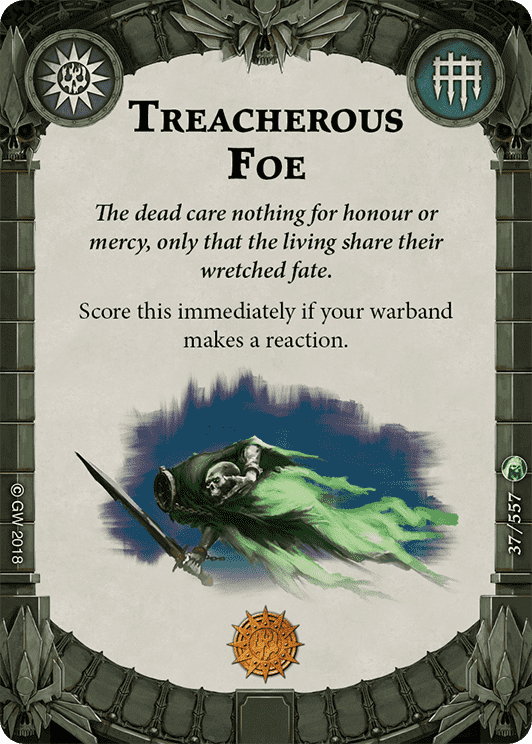 Treacherous Foe], but there are so many solid reaction cards in the game that a lot of warbands will be quite jealous about this as a surge.
Power Ceiling: 3, Consistency: 3
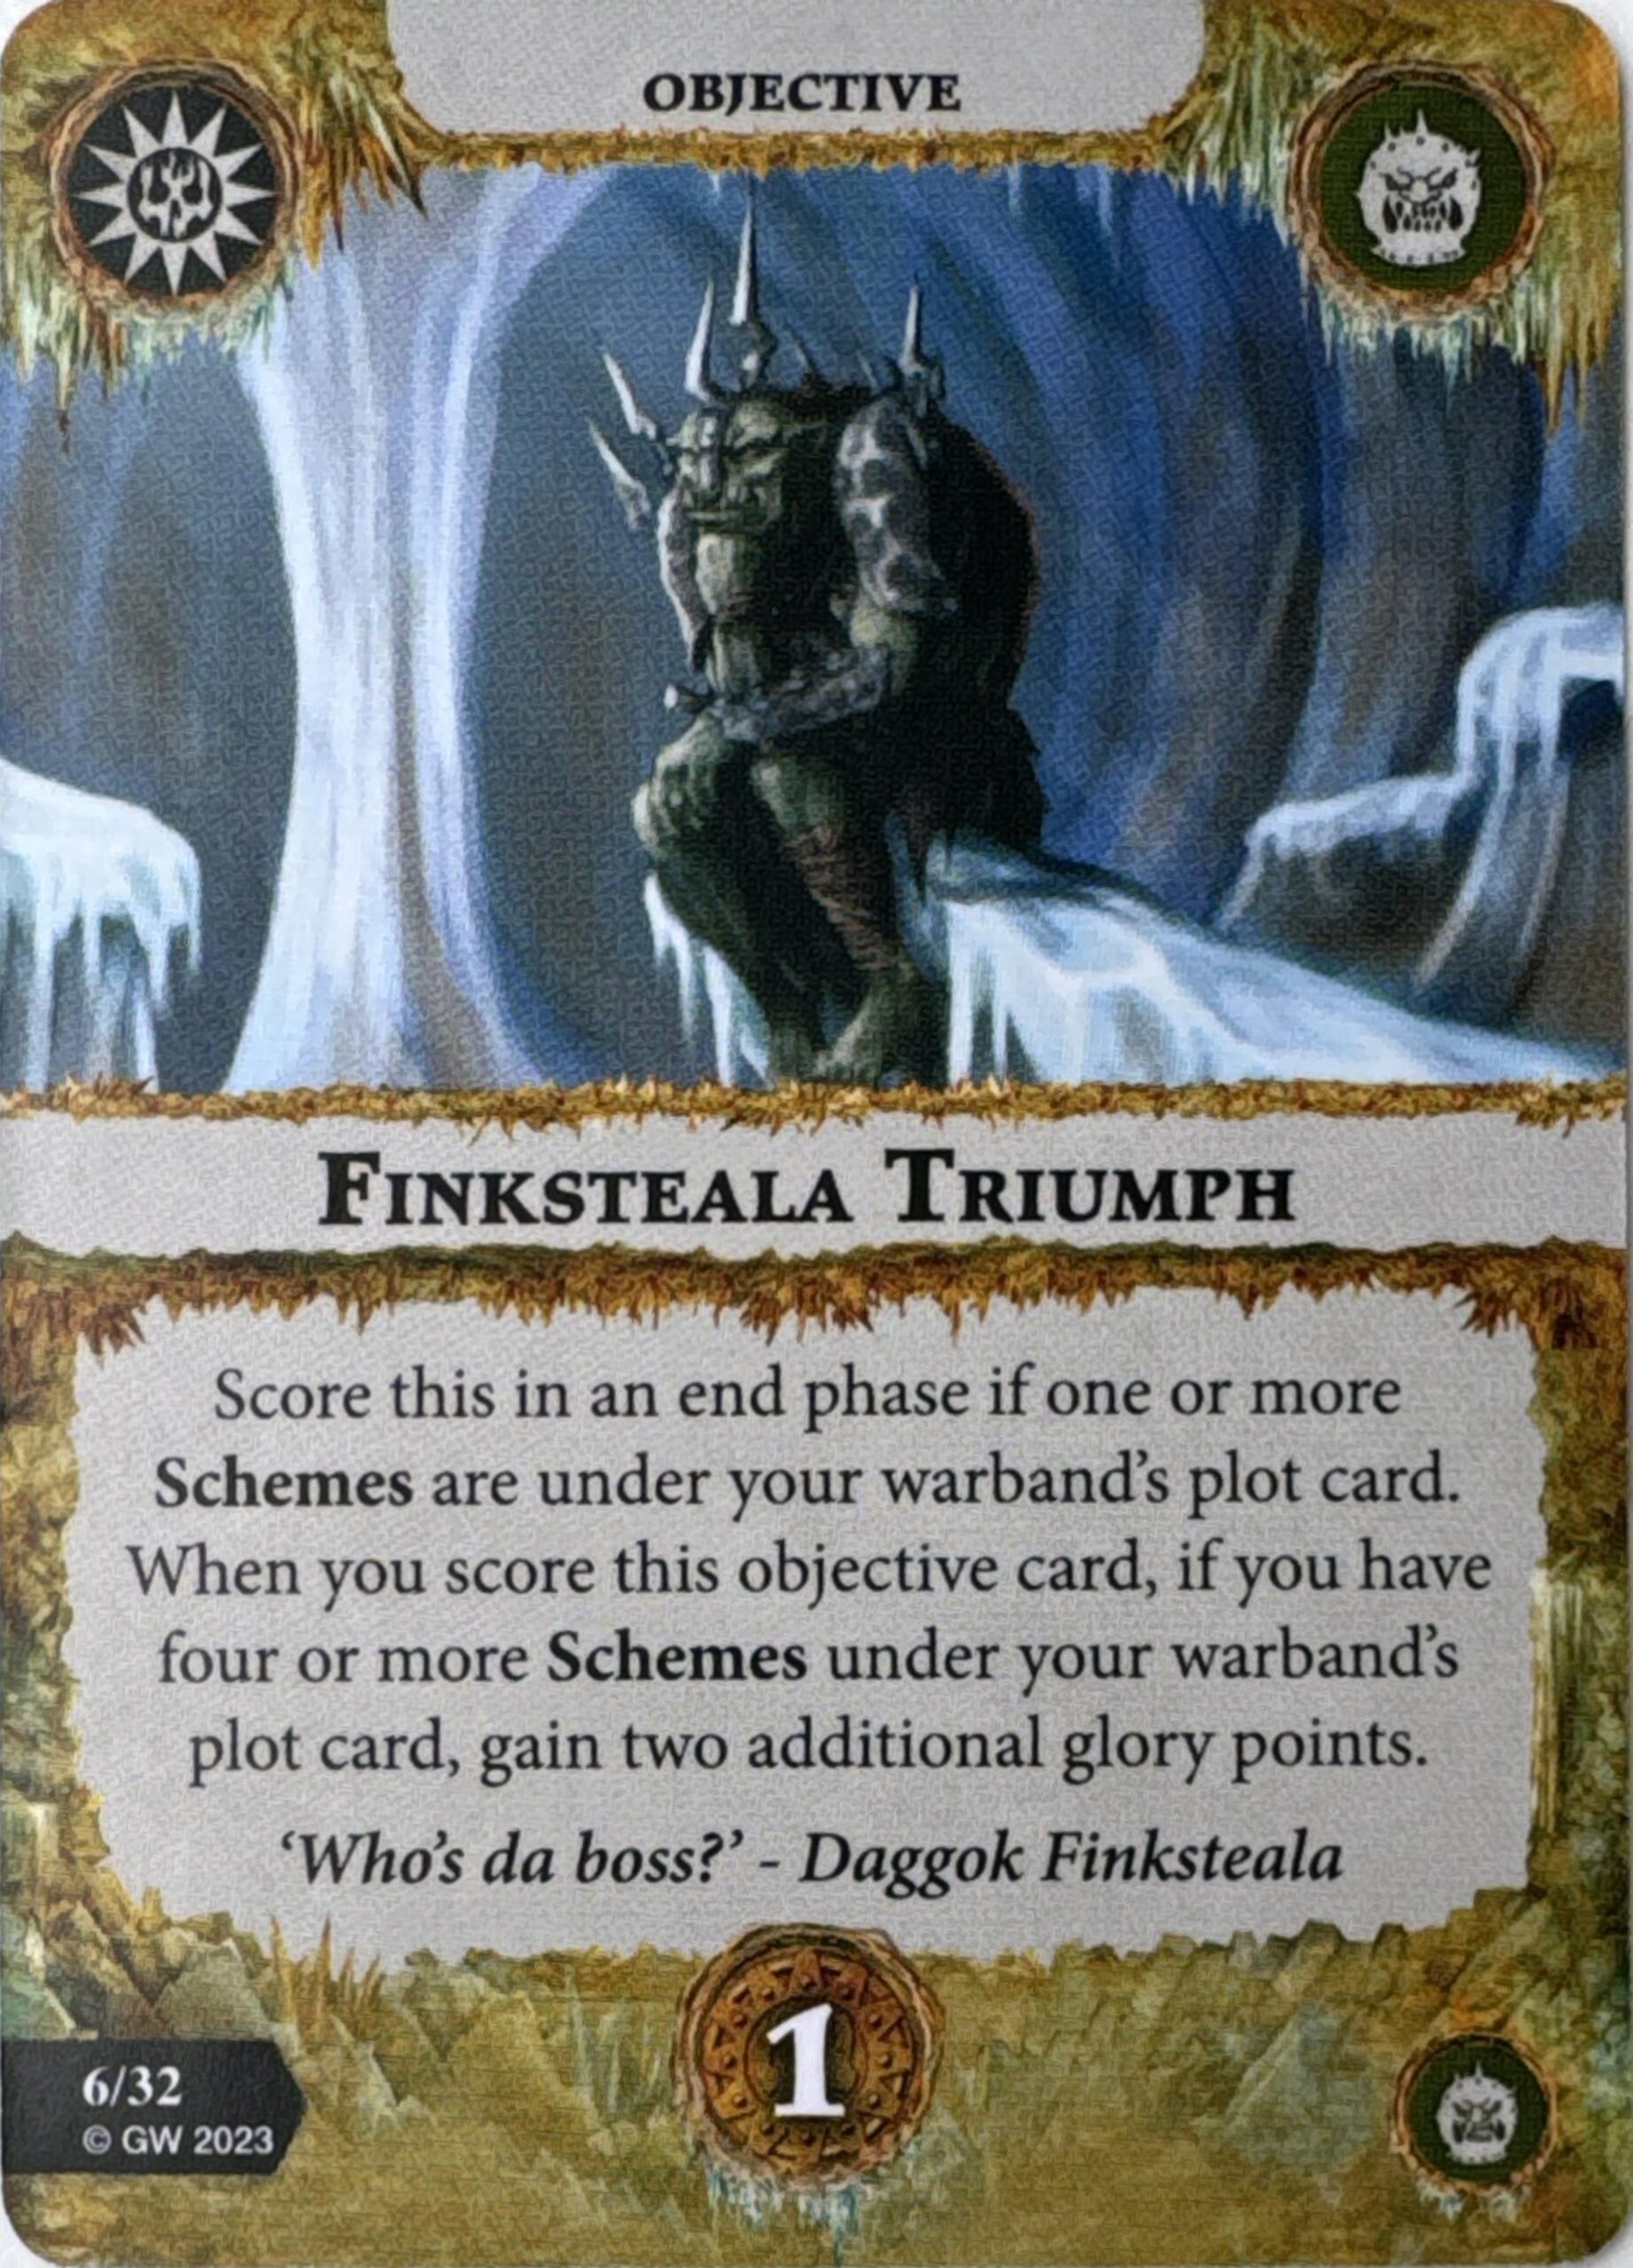
This warband’s 3-glory bomb has concealed itself as a 1-glory end phase in Finksteala Triumph. You can score this in the end phase for 1 if you have 1 scheme under your plot card, or for a whopping 3 glory if you’ve got 4 or more under there. I like the flexibility here, as you’re not going all-in on just hitting the 3-glory condition. Depending on the game state, you can hit the end phase and decide whether the cycling for 1 glory is worth more than pushing for the upside of 3. I do think you might want to take all 6 schemes if you’re playing for the 3-glory score consistently, but the upside is that scoring it for 1 should be practically automatic once you’re packing in that much support. I will ding it a bit just because I think you’ll generally be taking a hit on gambit strength in some cases to access the potential 3 glory, especially in Championship.
Power Ceiling: 2, Consistency: 2
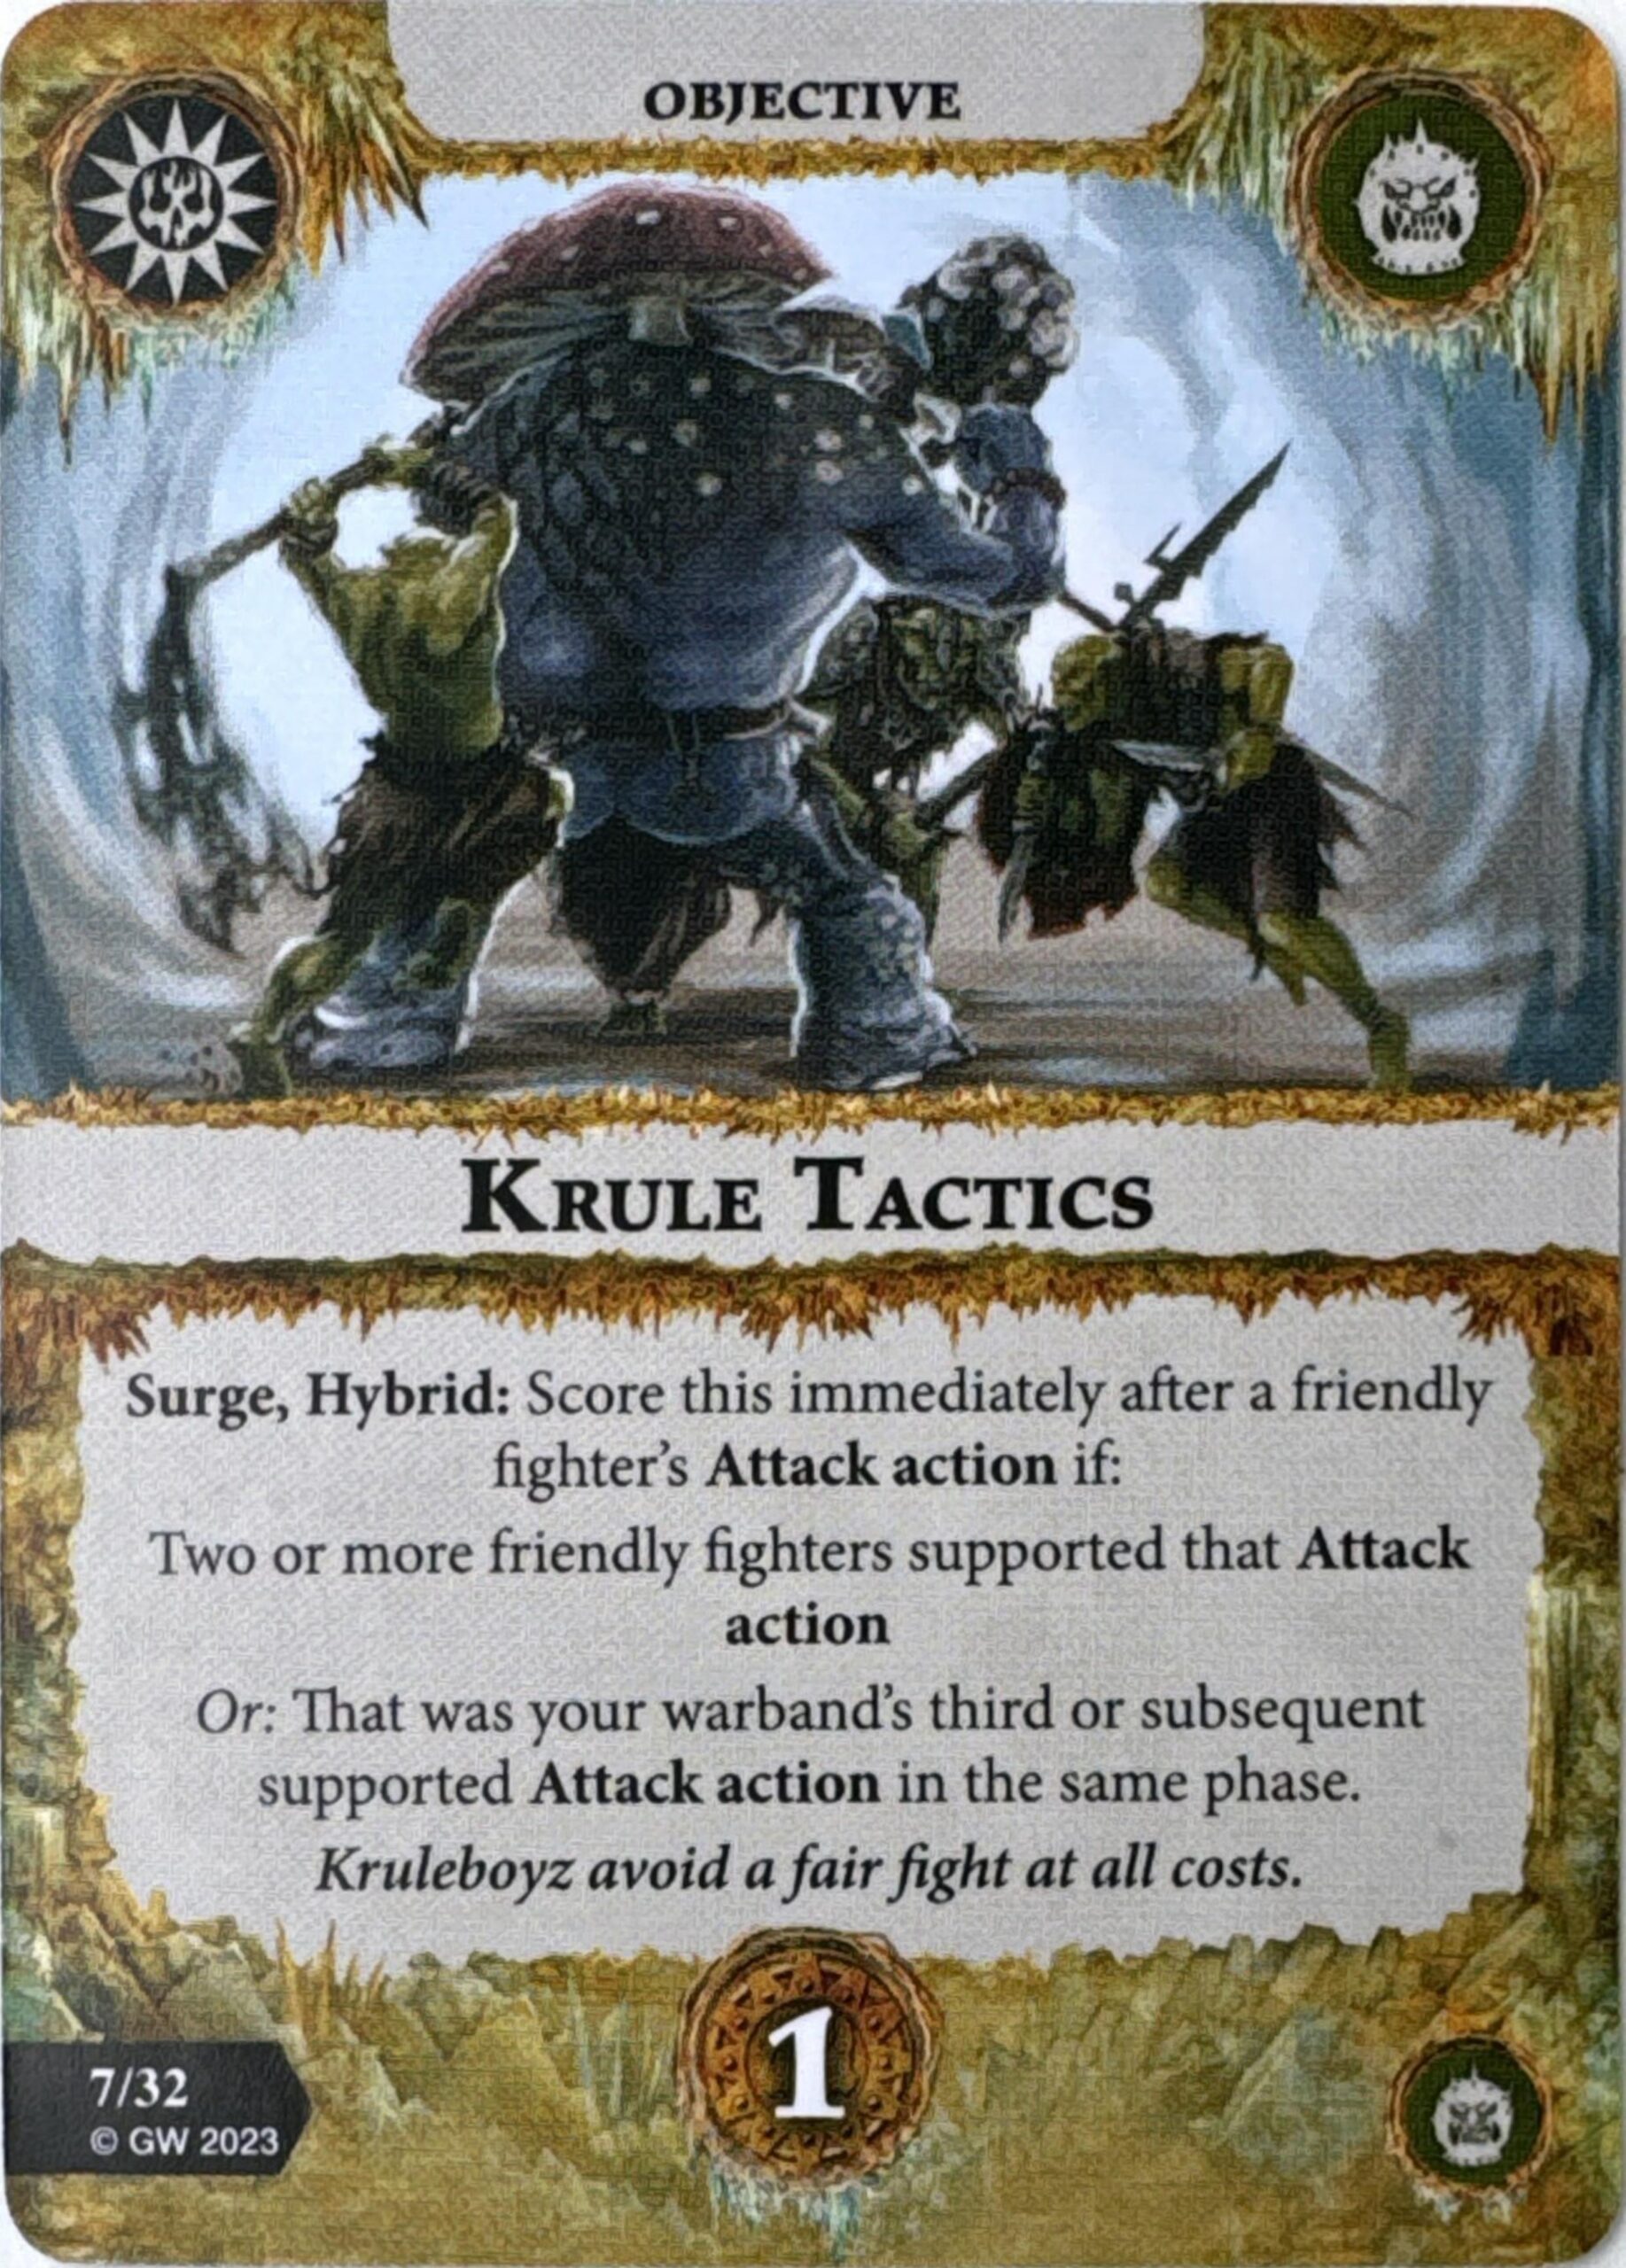
Krule Tactics is our next surge for either making an attack supported by two friendly fighters or making your third or subsequent supported attack in the phase. The most straightforward way to pull this off will likely be to have Hurrk’s support active, then use another fighter’s move action to trigger the leader’s attack reaction. For this reason, the VCT upgrades get yet another shoutout and almost singlehandedly make the first condition here the one you’re likely to be targeting. That being said, the second condition is definitely still doable, especially considering cards like [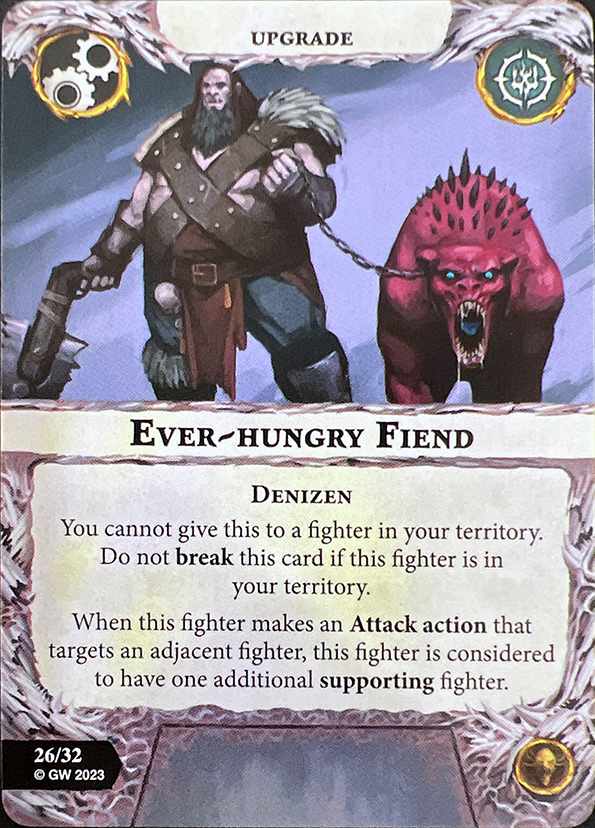 Ever-hungry Fiend] will count for the second condition (although notably not the first). While you don’t have the advantage of the minions from DKK to help score this, I think being agnostic to the success of the attacks themselves makes this card pretty solid.
Power Ceiling: 2, Consistency: 2
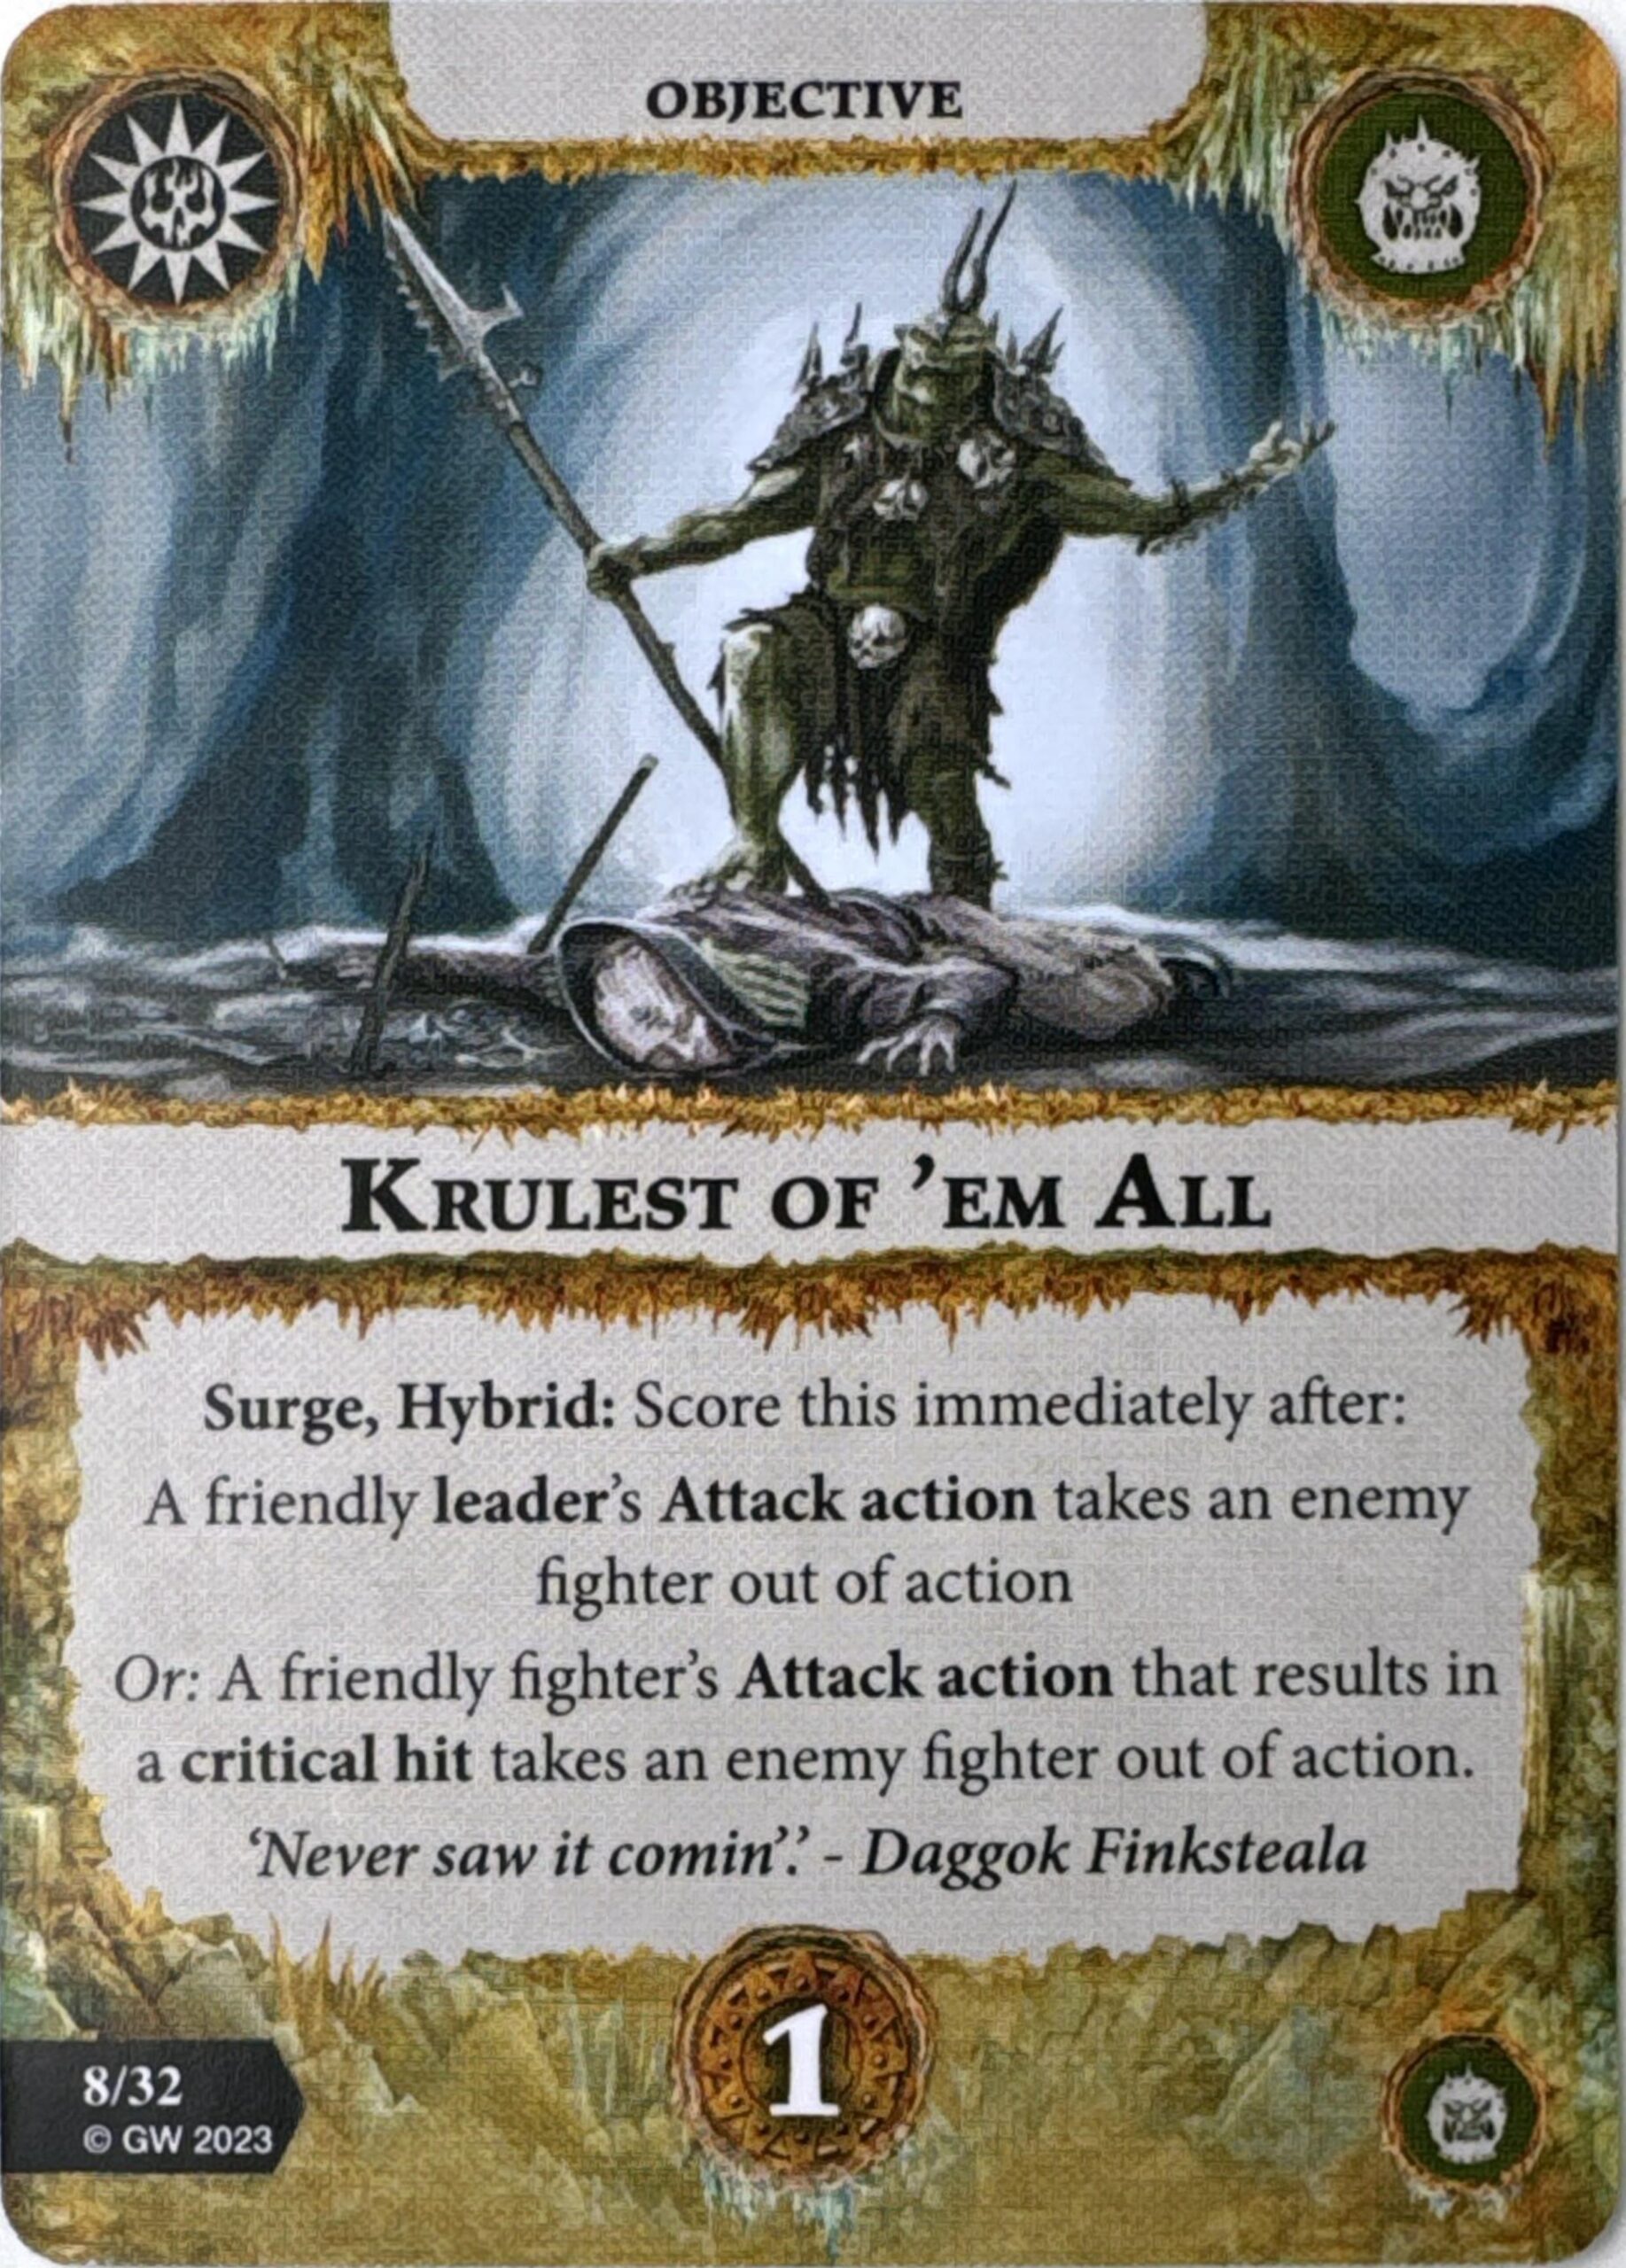
Our final surge is Krulest of ‘Em All, another hybrid which either scores when a friendly leader’s attack takes an enemy fighter out of action or any friendly fighter takes out an enemy on a critical hit. This is just a straight upgrade on the old [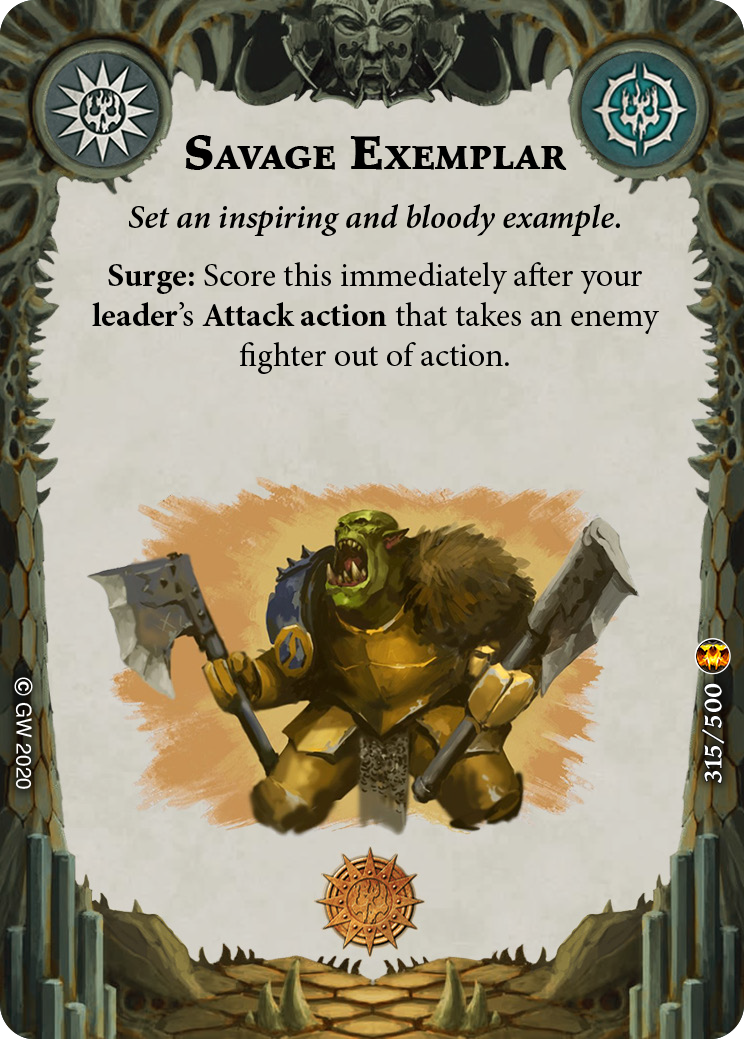 Savage Exemplar], which a lot of leader-centric warbands tended to enjoy back in the Direchasm days. While this warband is not quite so leader centric as the type of warband that used to take this kind of card, I like that it has the hybrid condition as a backup. It is still a kill surge though, so I’d likely be looking elsewhere before I reach for this one, if I can help it, especially in such an elite-heavy meta.

Kunnin’ Collector scores 1 glory in the end phase for an enemy leader being out of action. As an avid Clawpack enjoyer, I can tell you that this kind of card needs to be a pretty significant and active part of your gameplan. For only 1 glory payoff, I’m not loving this, especially for those games where you run into Mollog or such and this is likely to take a while.
Power Ceiling: 1, Consistency: 1
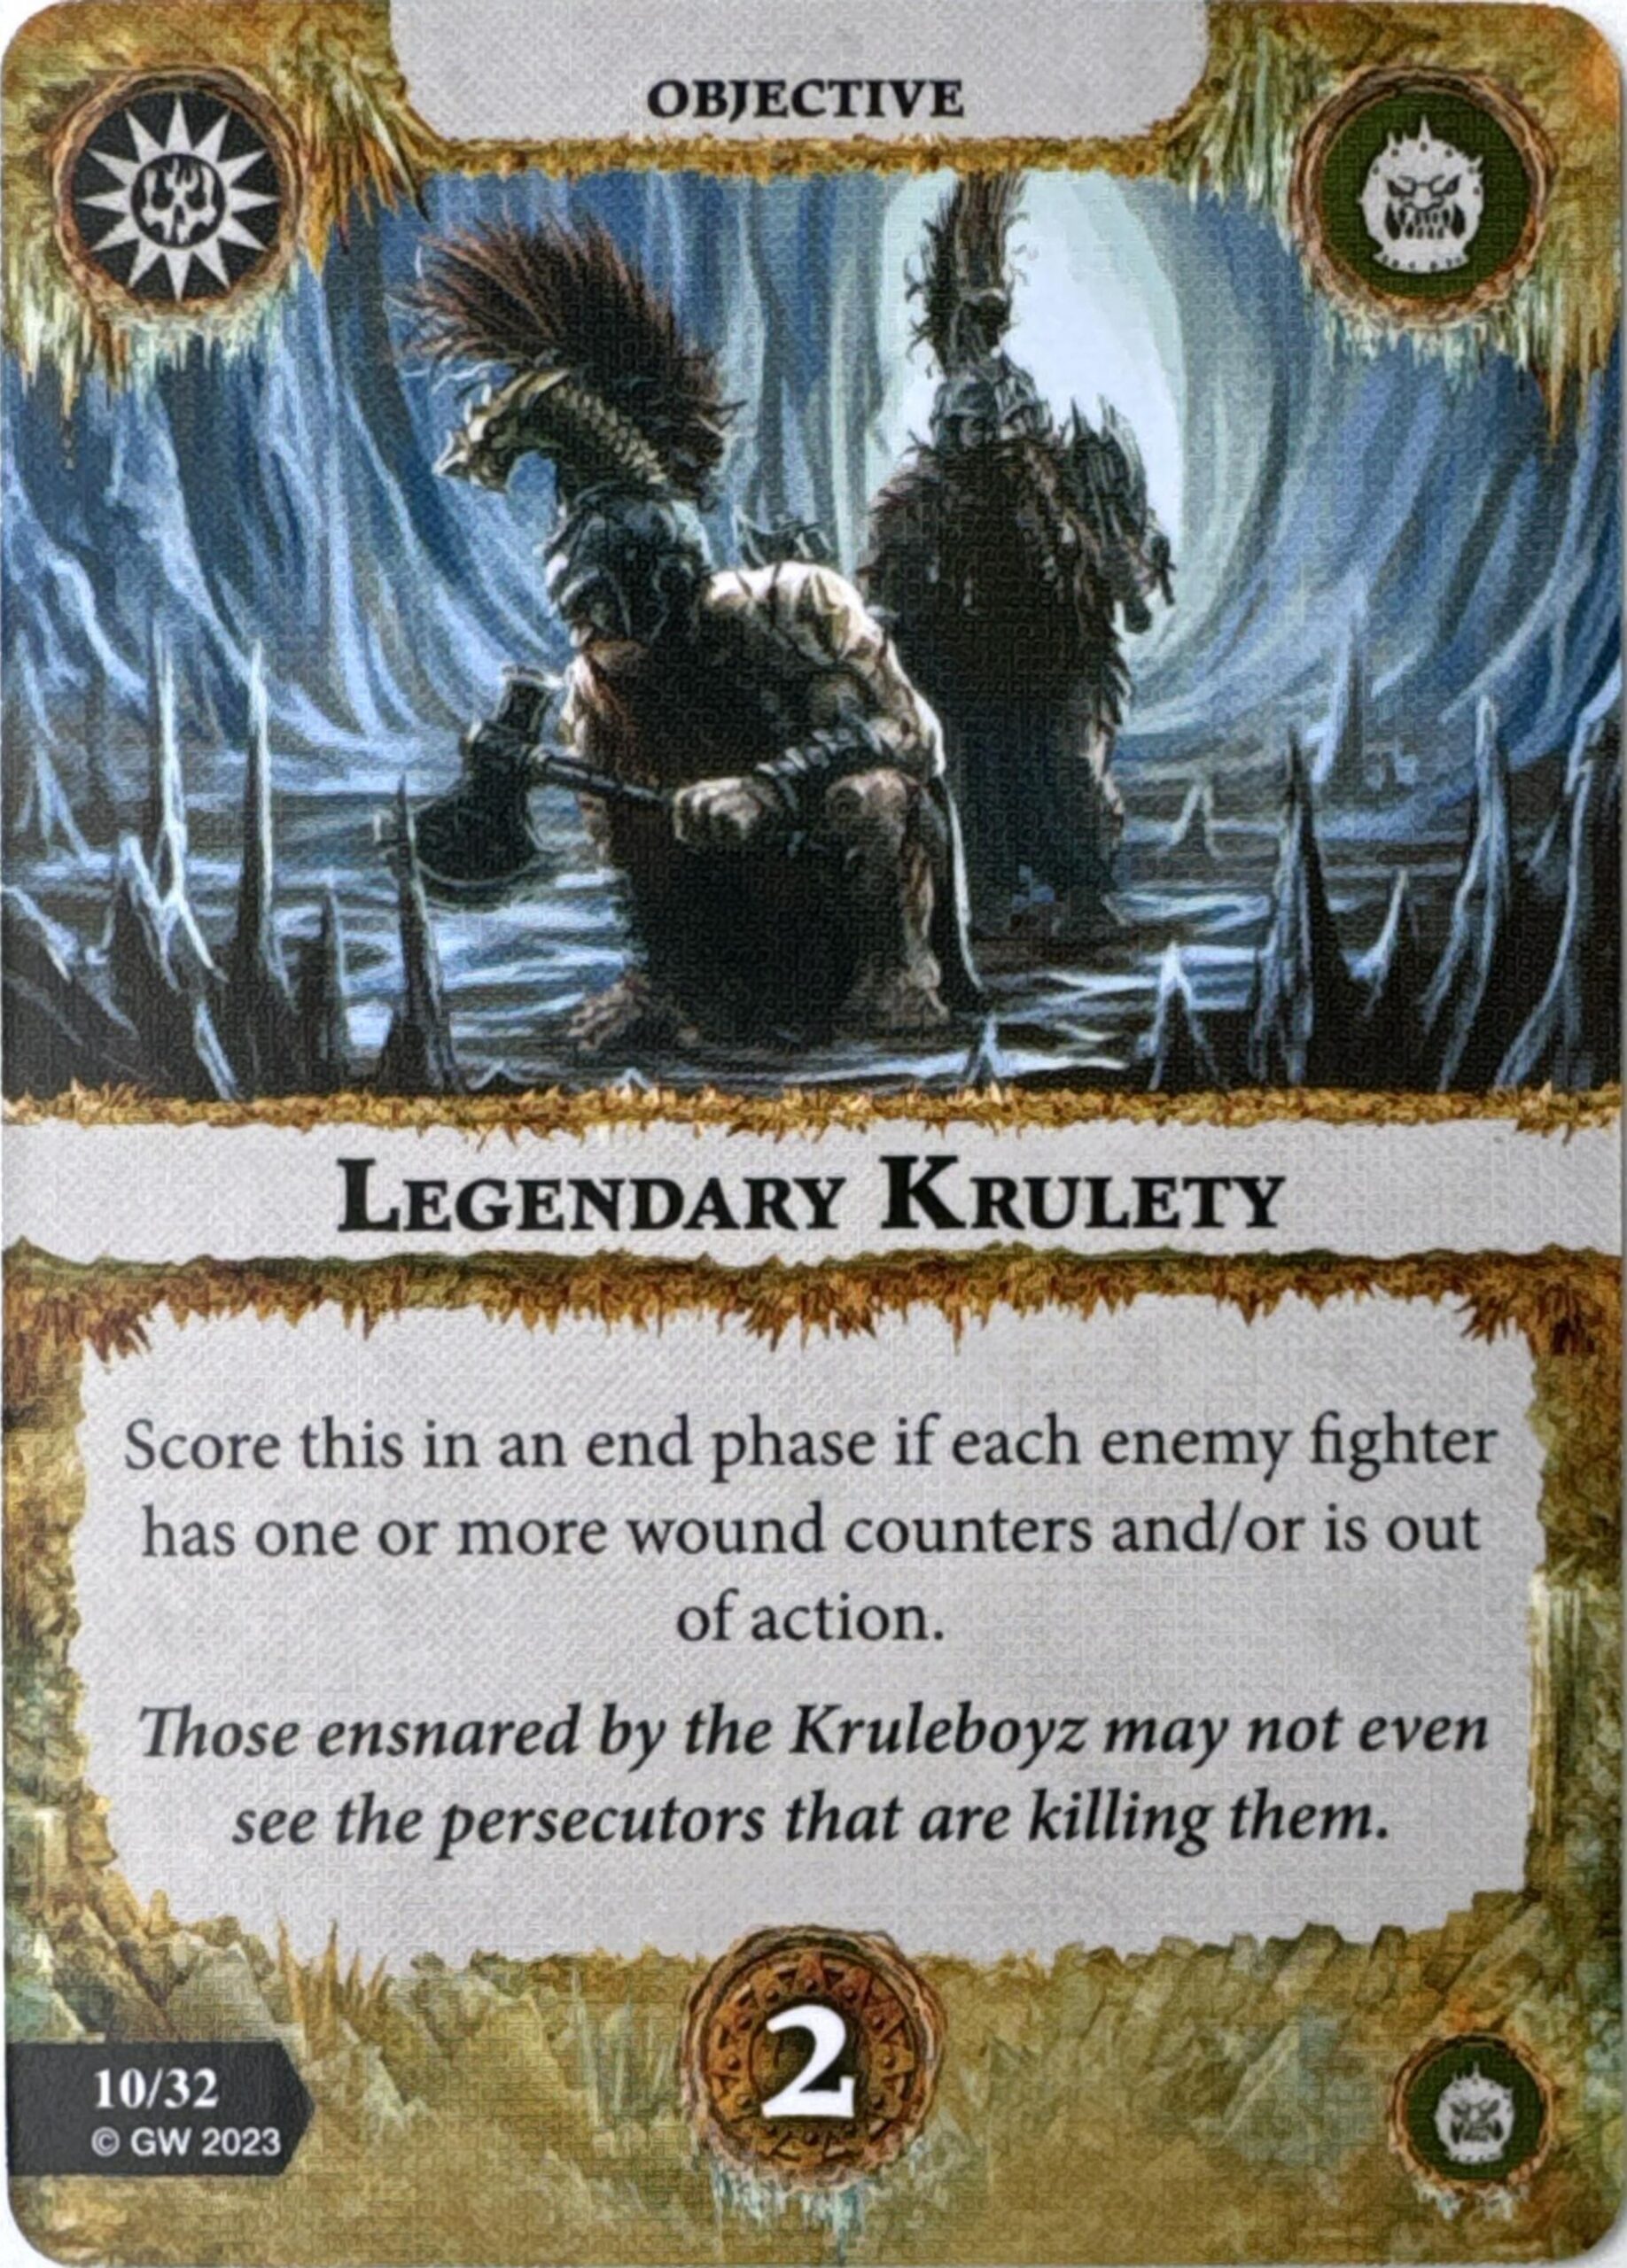
Legendary Krulety is our first 2-glory end phase card, scoring for each enemy fighter being out of action and/or being wounded. Talk about a meta call, yeesh. Cheating ahead a bit, the warband only has one ping gambit, and it is not all that great. To play this kind of card, you’d want to be pumping out Gorechosen-esque levels of ping damage, which is not likely to be the angle this warband takes given it lacks a wizard and the aforementioned in-faction cards. Yes, you could potentially take advantage of something like a Stormcoven matchup or such, but I think this is a continued sign that they overestimated the efficacy of the leader’s attack reaction. Yes, good play could get you to throw out multiple extra attacks in a phase, but the accuracy on them is so poor that you can’t be relying on it consistently spreading the ping needed to score a card like this. You run into a horde warband like Hexbane’s Hunters and you’re going to have a heck of a time trying to score this.
Power Ceiling: 2, Consistency: 1
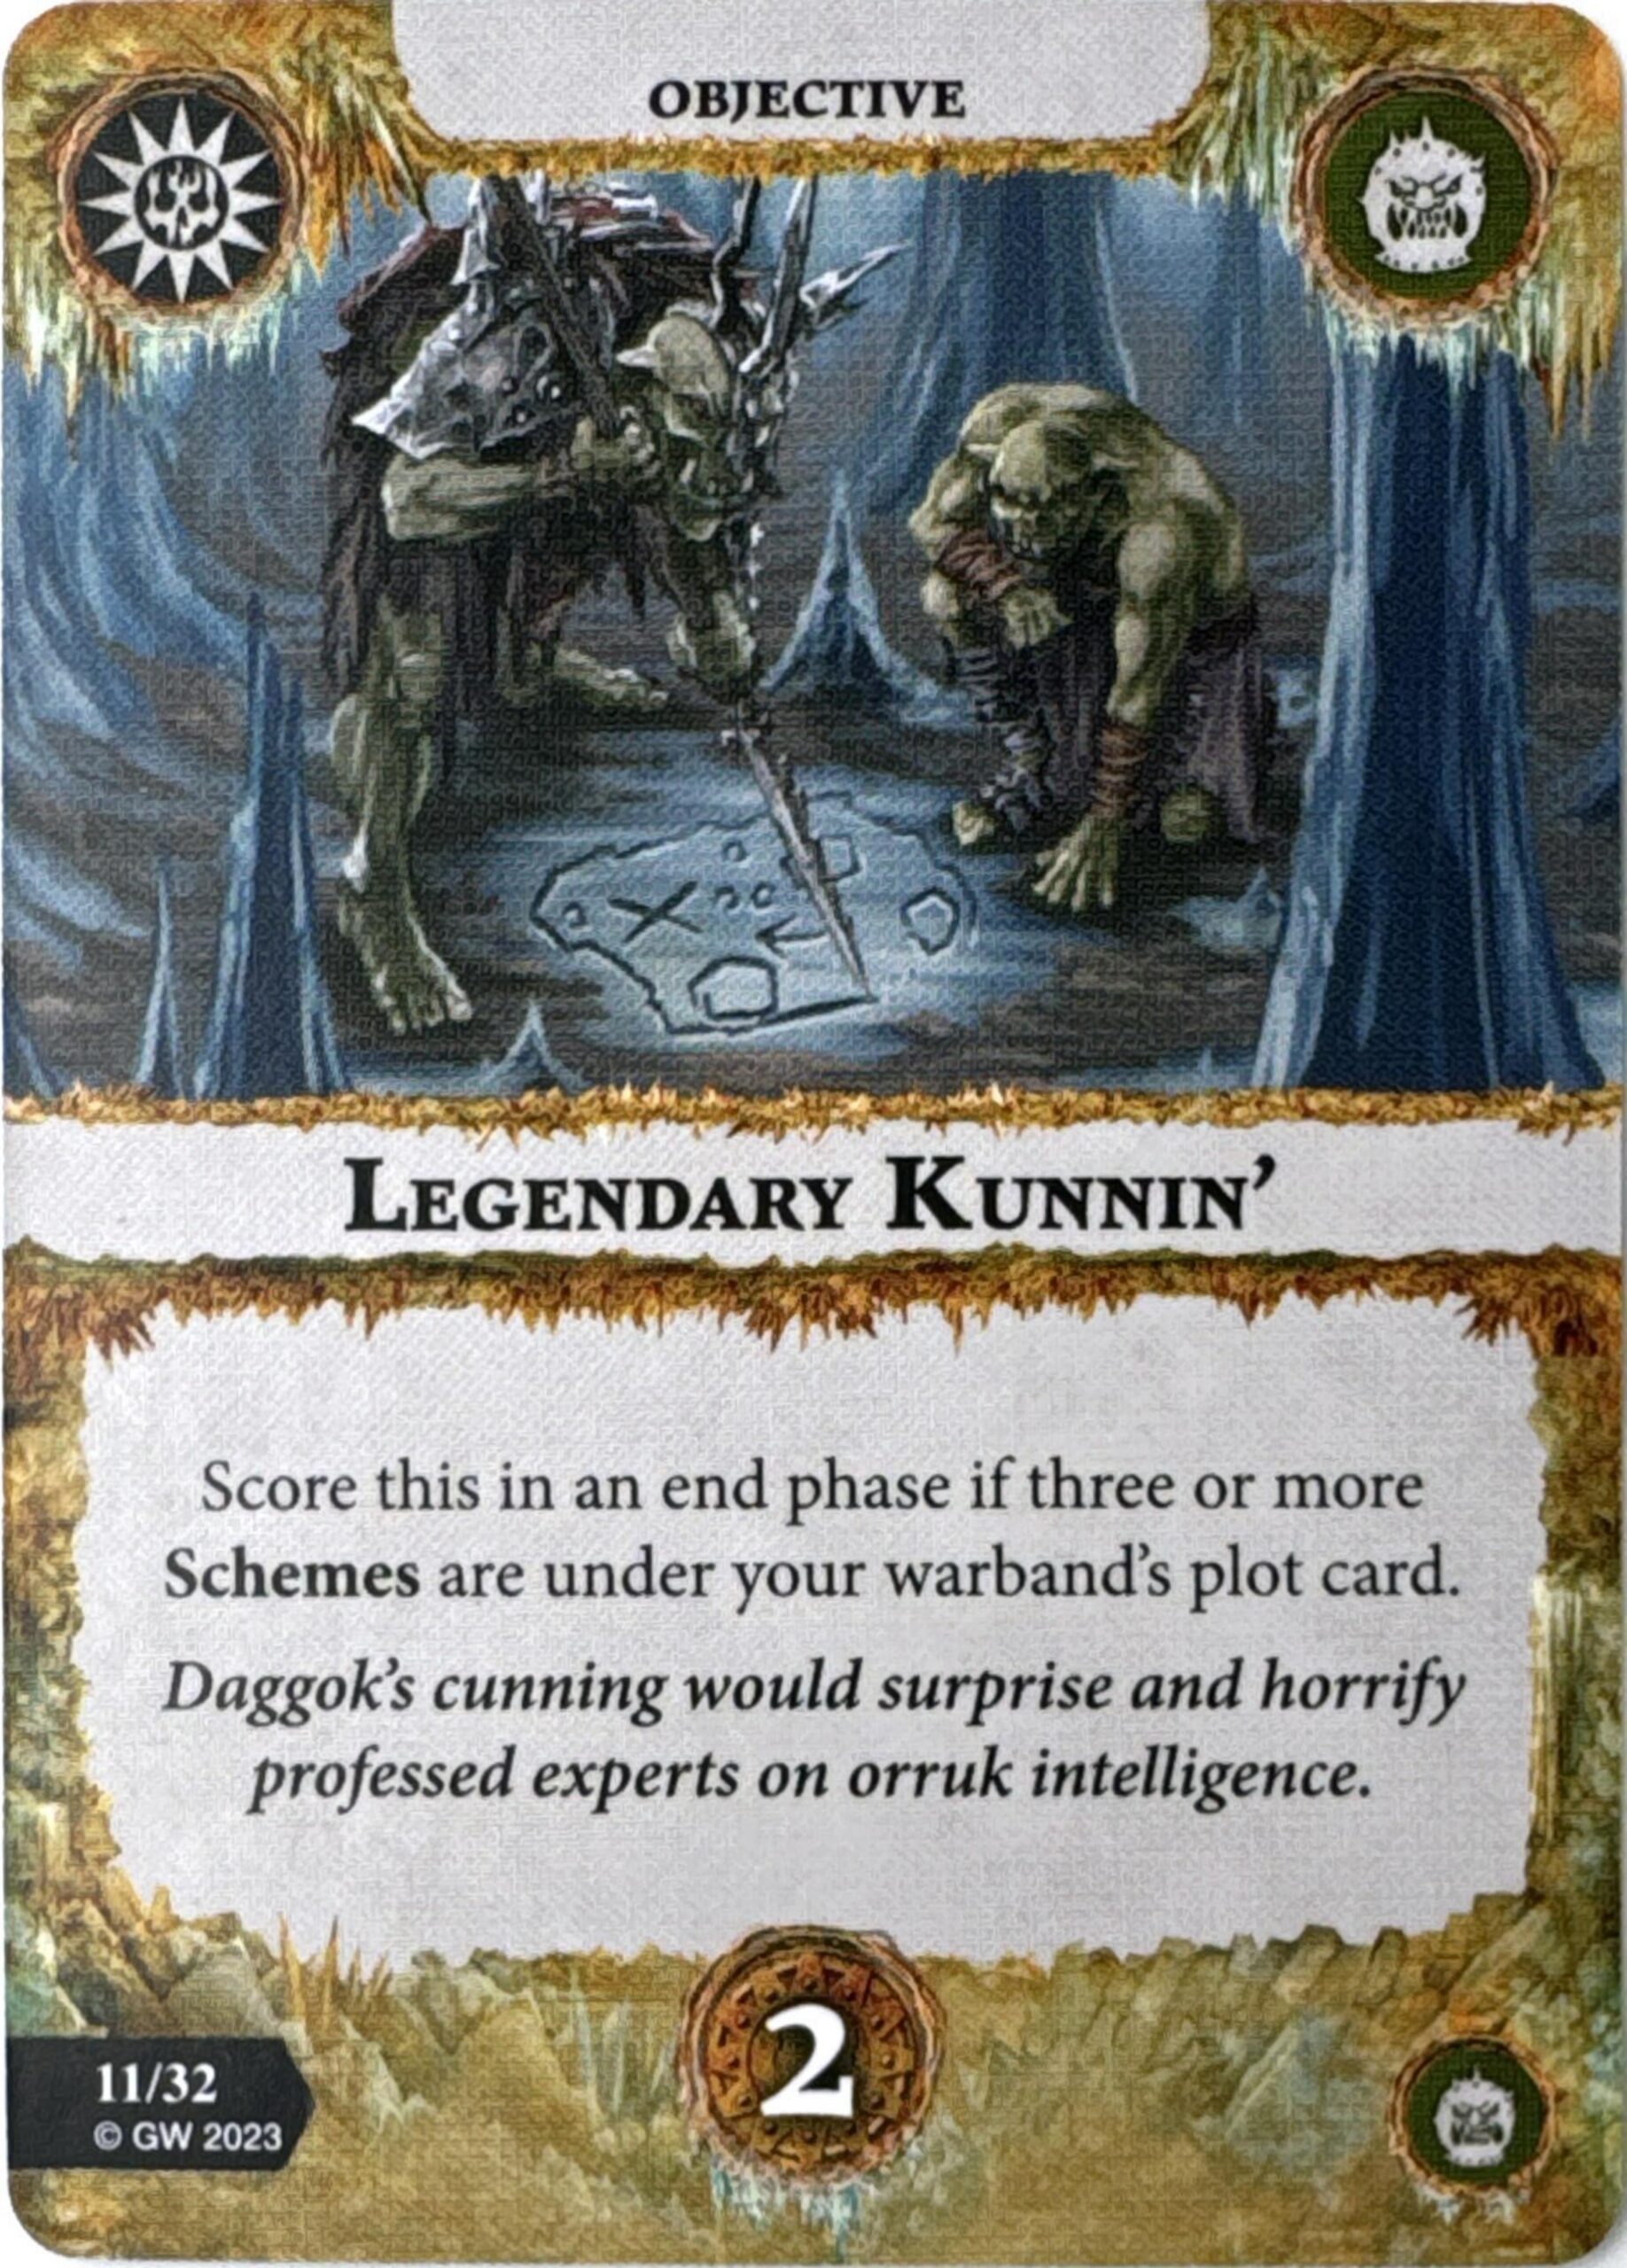
Back-to-back 2-glory scores here, we have Legendary Kunnin’, which requires you to have three or more schemes under your plot card. I like that they made the schemes more of a subtheme than a requirement, as this is just the 3rd and final card that requires them to score. If you’re running a deck that requires a lot of other gambits, you can simply omit some or all of these objectives without it feeling too bad. Alternatively, if you’re building for that strategy, all three slot in decently well. That being said, even if you take all 6 schemes, it’s a tough sell to say you’ll be able to score this one in the first round, which I prefer to be the case for all my end phases not worth 3 or more glory. It can definitely become trivial later in the game on those builds, and something you can even score while tabled, but you are pretty heavily at the mercy of your draw sequencing, and it again will demand a lot of gambit slots.
Power Ceiling: 2, Consistency: 2
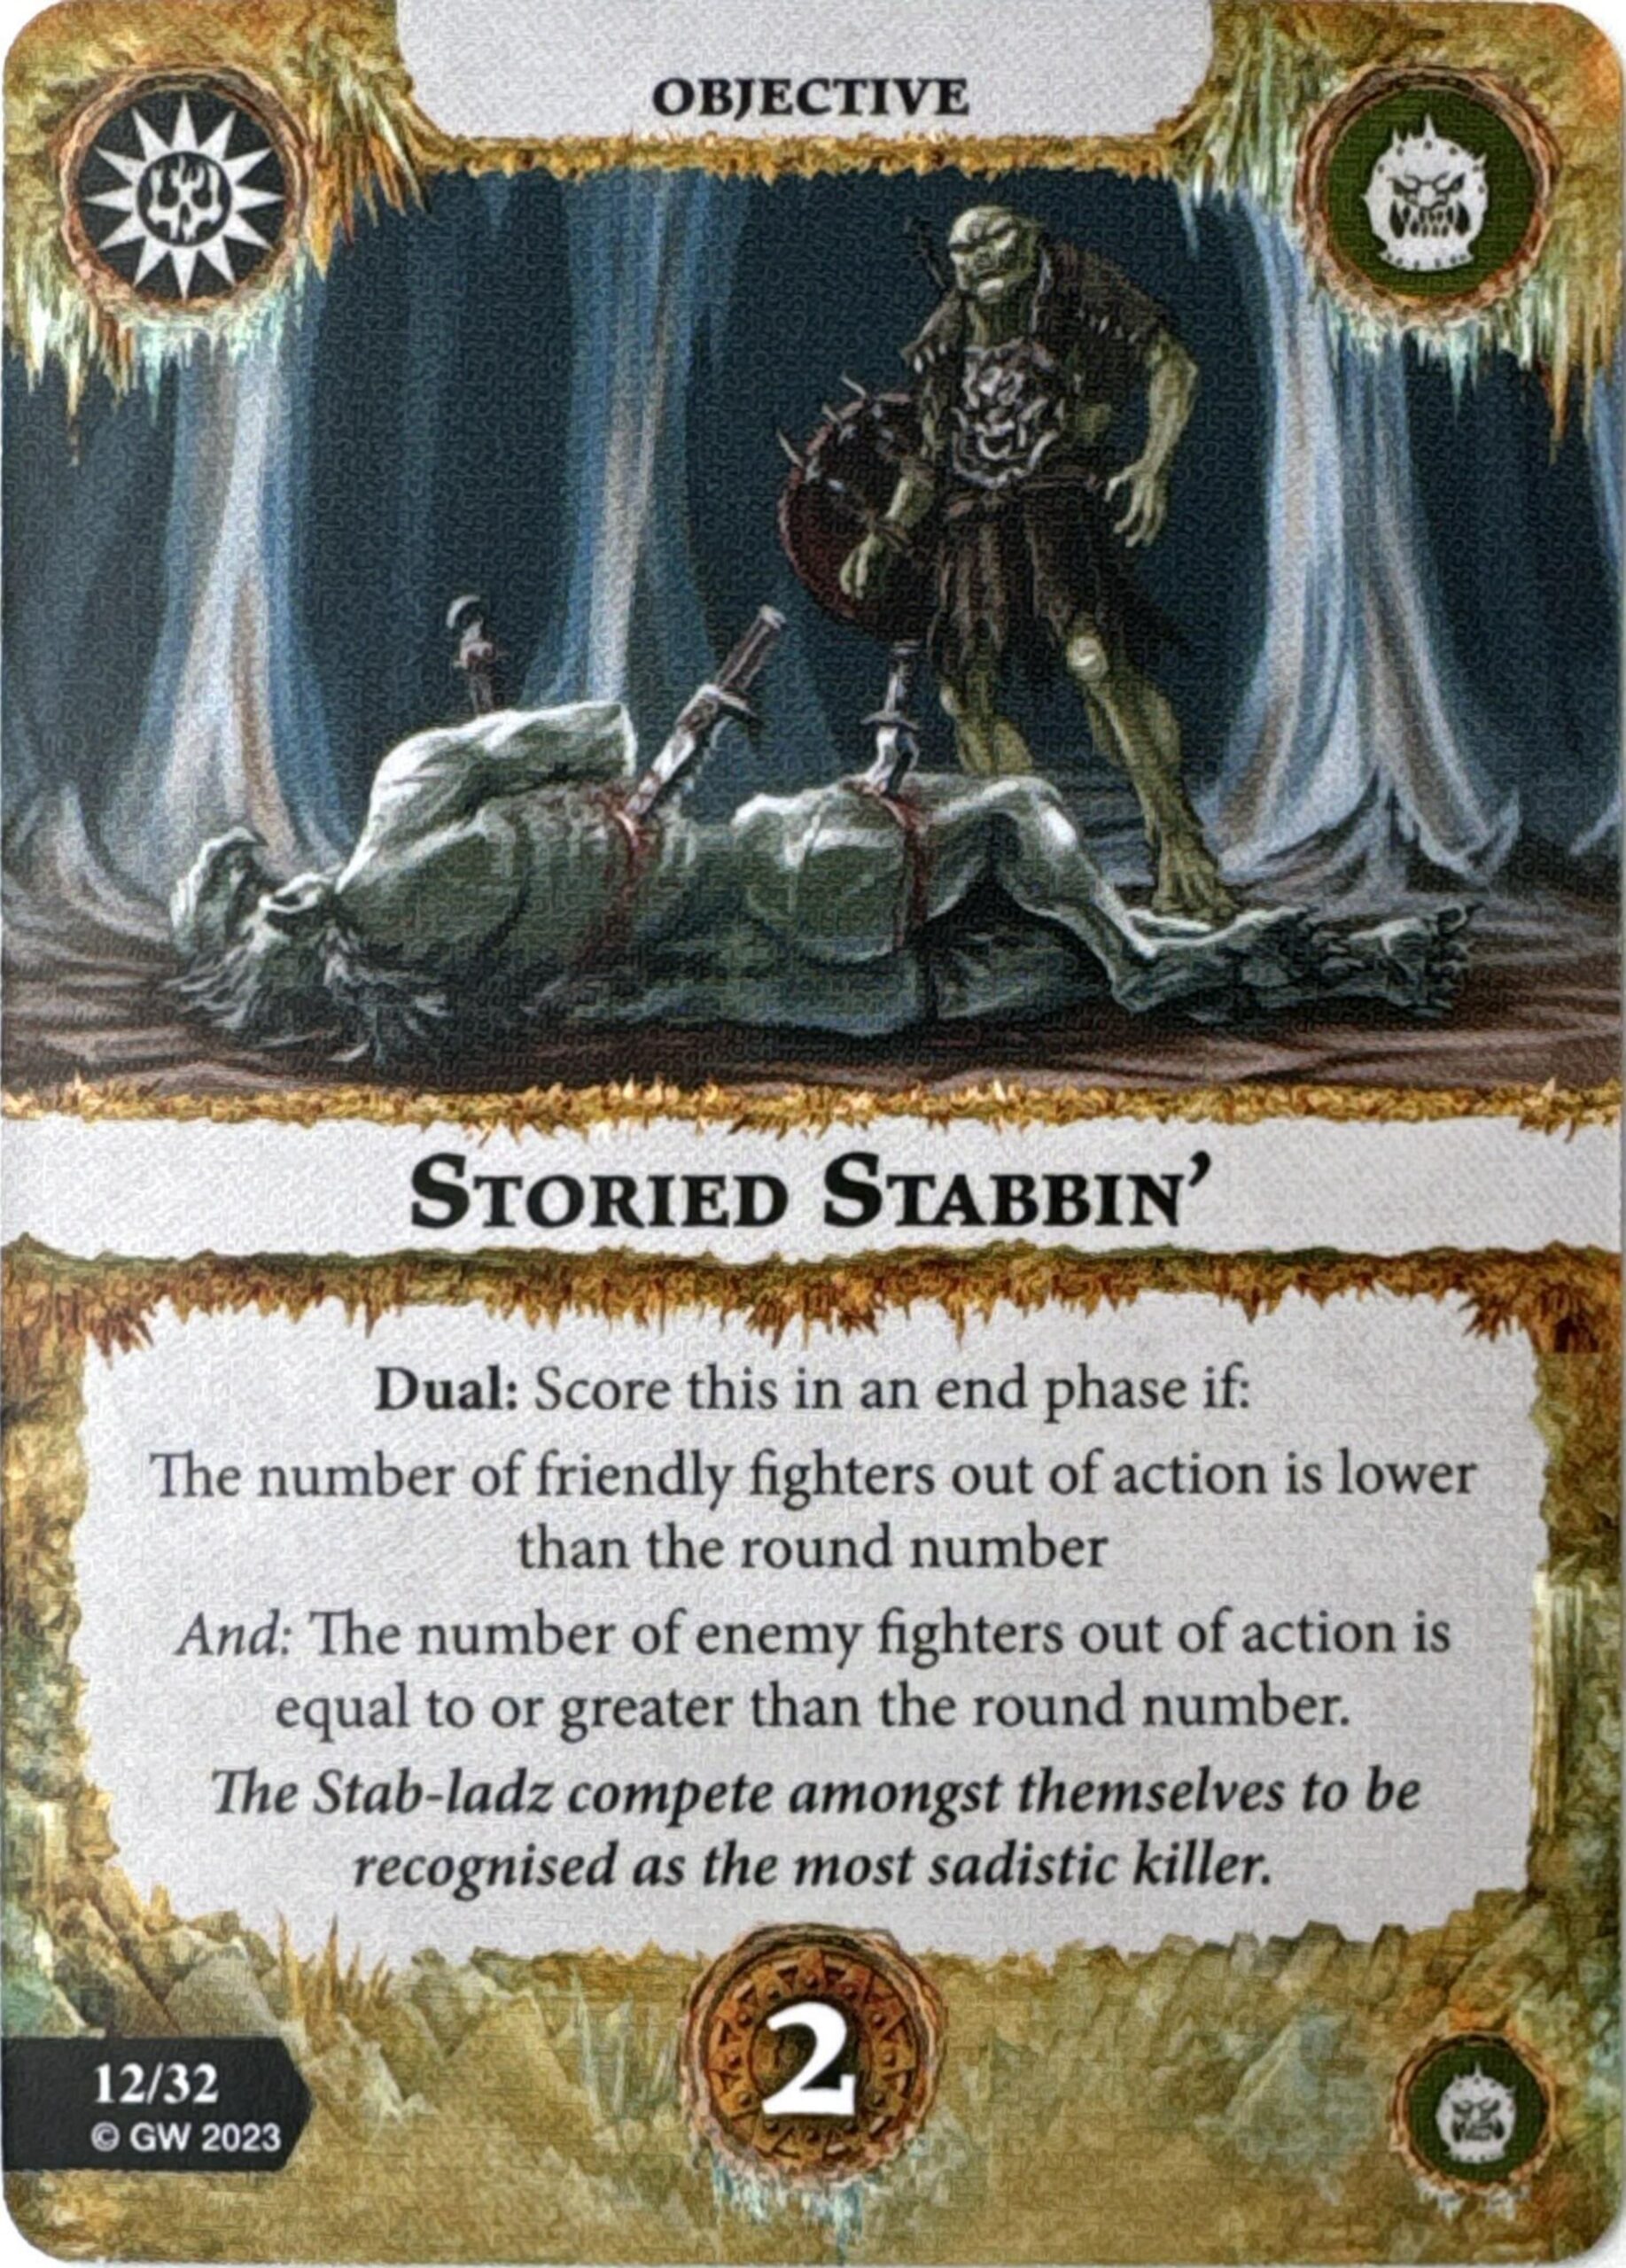
For three in a row (as well as our last objective in the set), Storied Stabbin’ is another 2-glory end phase! This one scores if you’ve got fewer friendly fighters out of action than the round number and a number of enemy fighters equal to or greater than the round number. Given that the second condition is a commonly abandoned end phase card (and now just worse Rapid Strike), adding another condition on top of it is pretty rough, and I’m not even sure that one’s much easier. A lot of what the warband wants to do requires interaction, so it seems likely you’ll be losing a fighter per round. I’m just not sure how you pull off one of these conditions without bricking the other unless your dice are just really hot and your opponent’s are very not, which should mean you’re winning by a lot anyway.
Power Ceiling: 1, Consistency: 1
Our Favorites
- Mark: Deceptively Kunnin’
- Aman:
- Zach: Da Plan Wurked
- George: Finksteala Triumph
Gambits
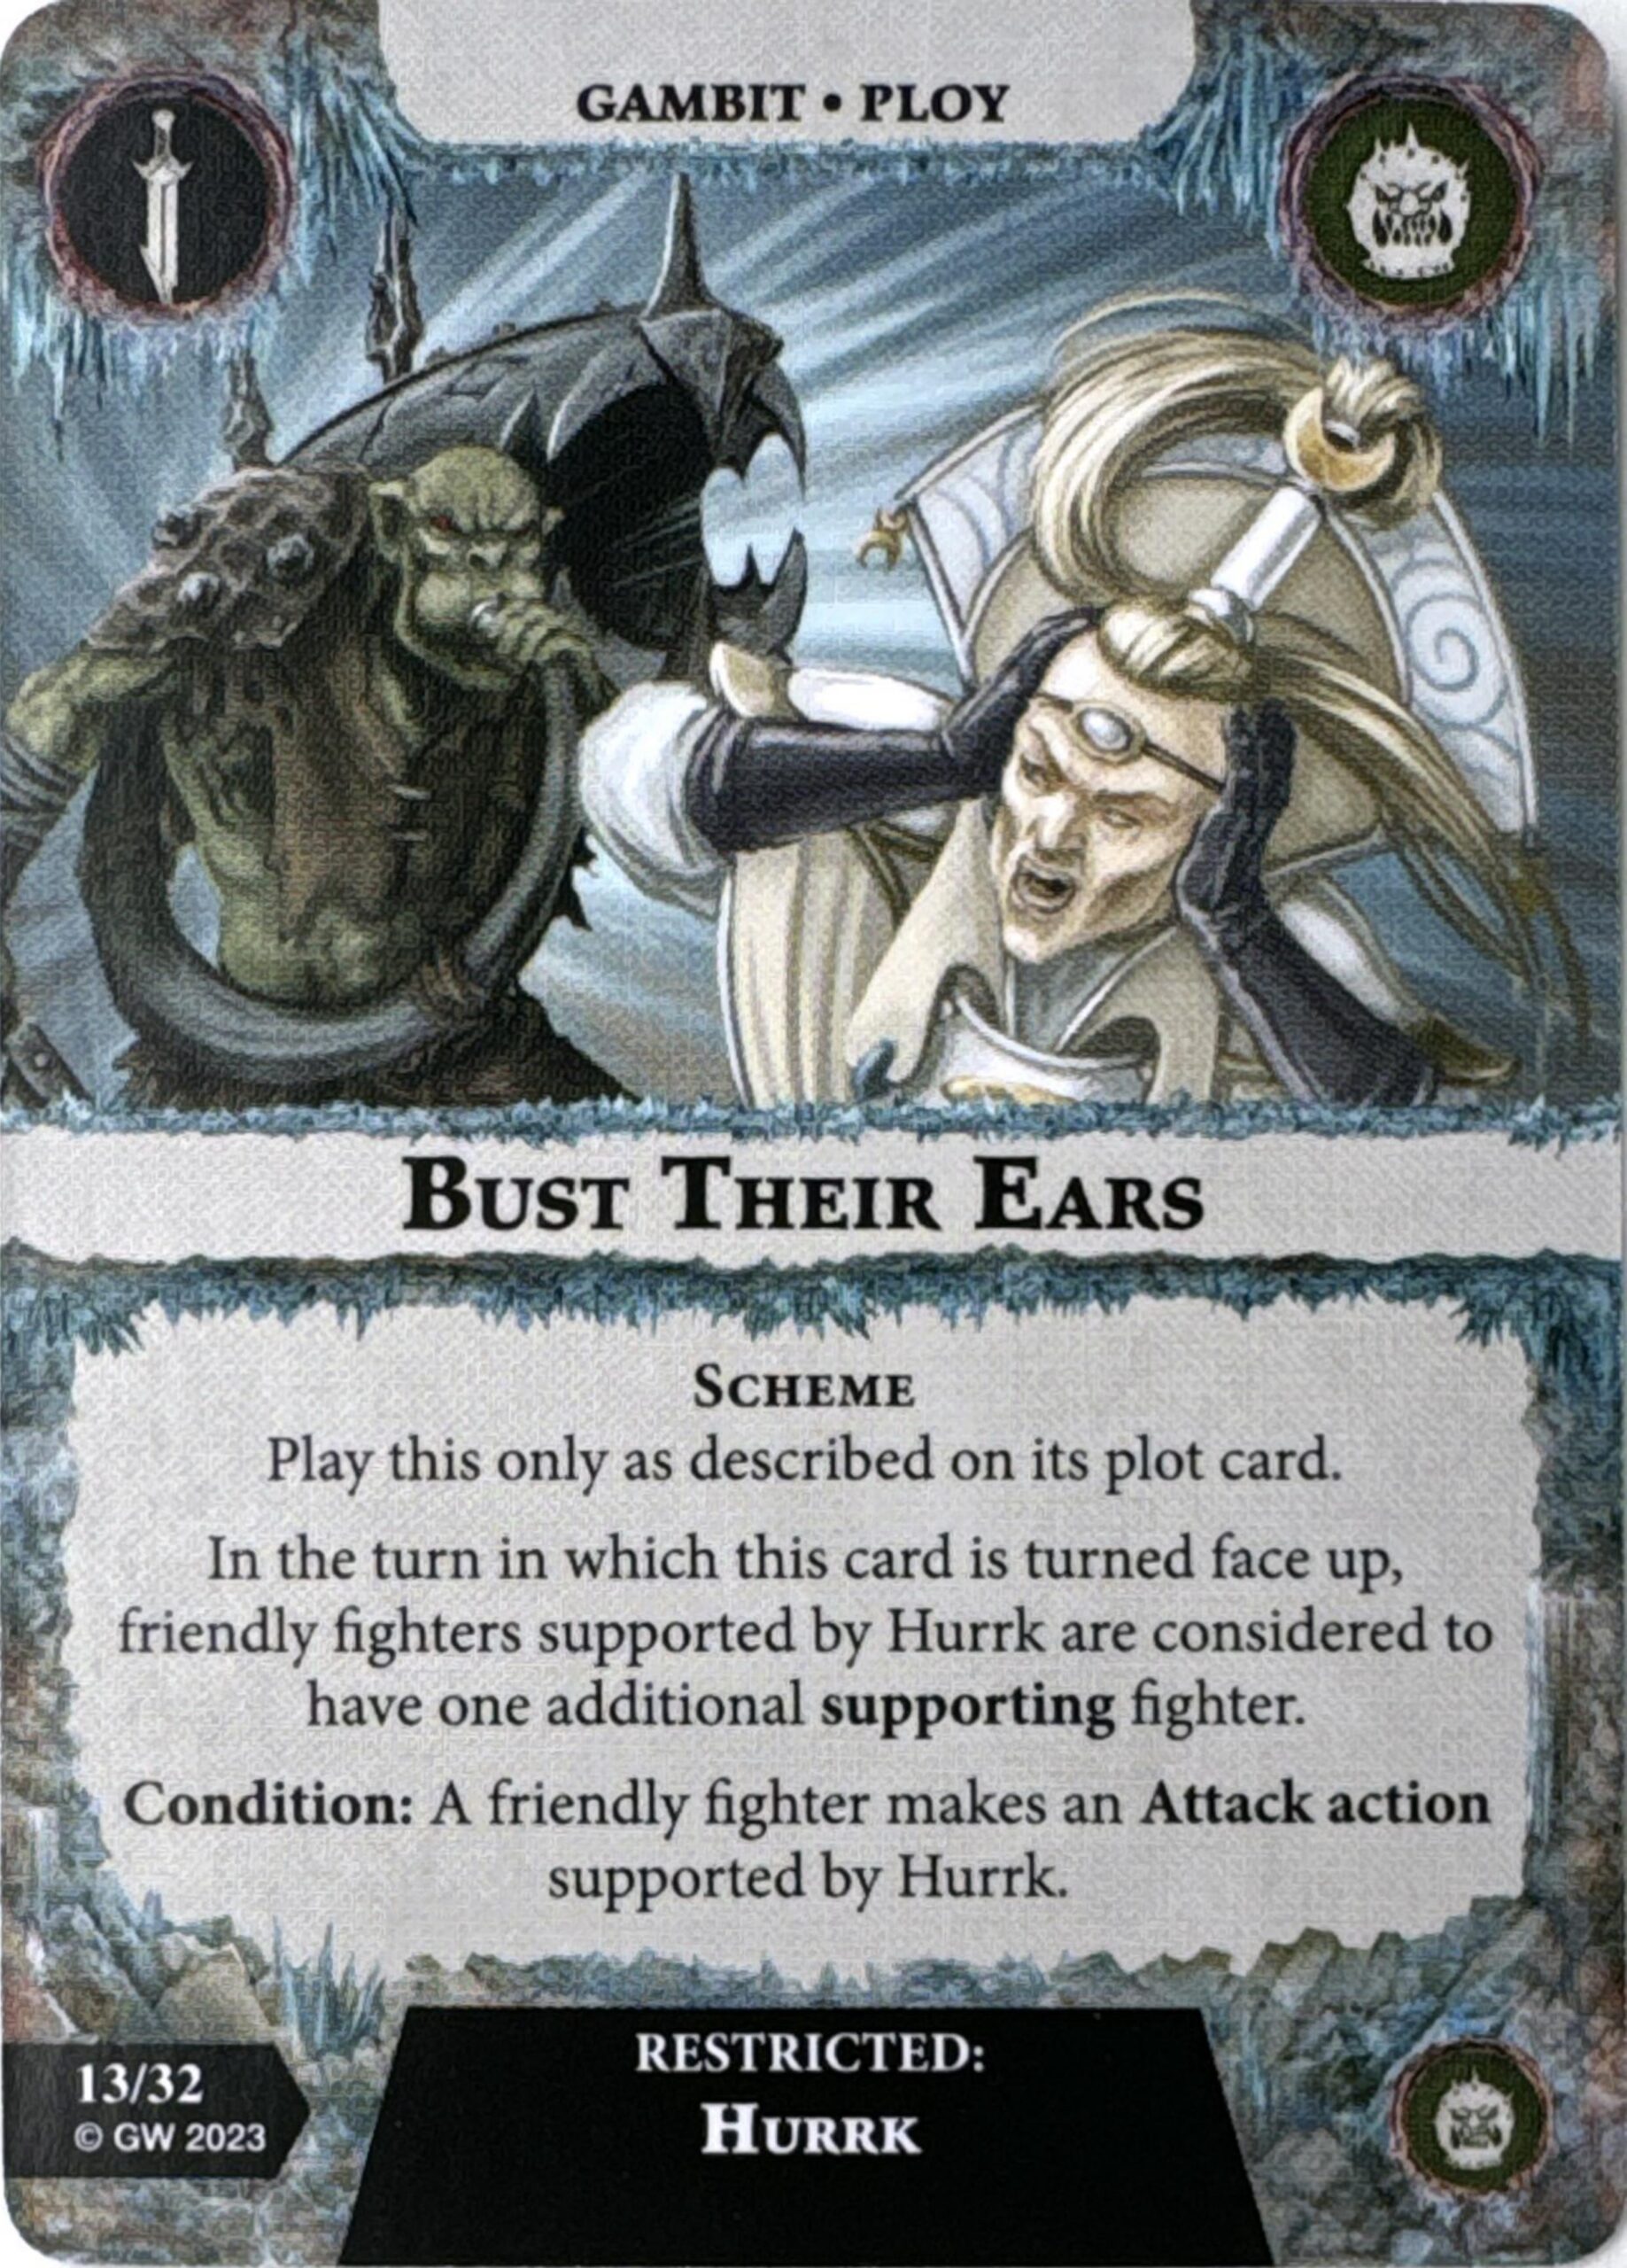
Our first gambit starts us off with a scheme in Bust Their Ears, where Hurrk blows his horn extra loud to count as two supporting fighters instead of one! In addition to being solid accuracy and defensive buffs, this is good tech to help out with Krule Tactics. You “score” it after making an attack supported by Hurrk, which obviously the extra accuracy helps with, so playing it and completing it should be a fairly quick A to B, assuming your positioning is good. The downside, of course, is what happens when he dies. Being that it’s a restricted card, you can still salvage it, which helps, but if you’re teching in for a lot of the scheme-dependent objectives, you kind of want them to be relatively trivial to complete. Not a bad card by any means, but I feel like it might be one that gets dropped in a lot of Nemesis builds and should almost never come in Championship, especially since there are so many good accuracy gambits these days.
Power Ceiling: 1, Consistency: 2
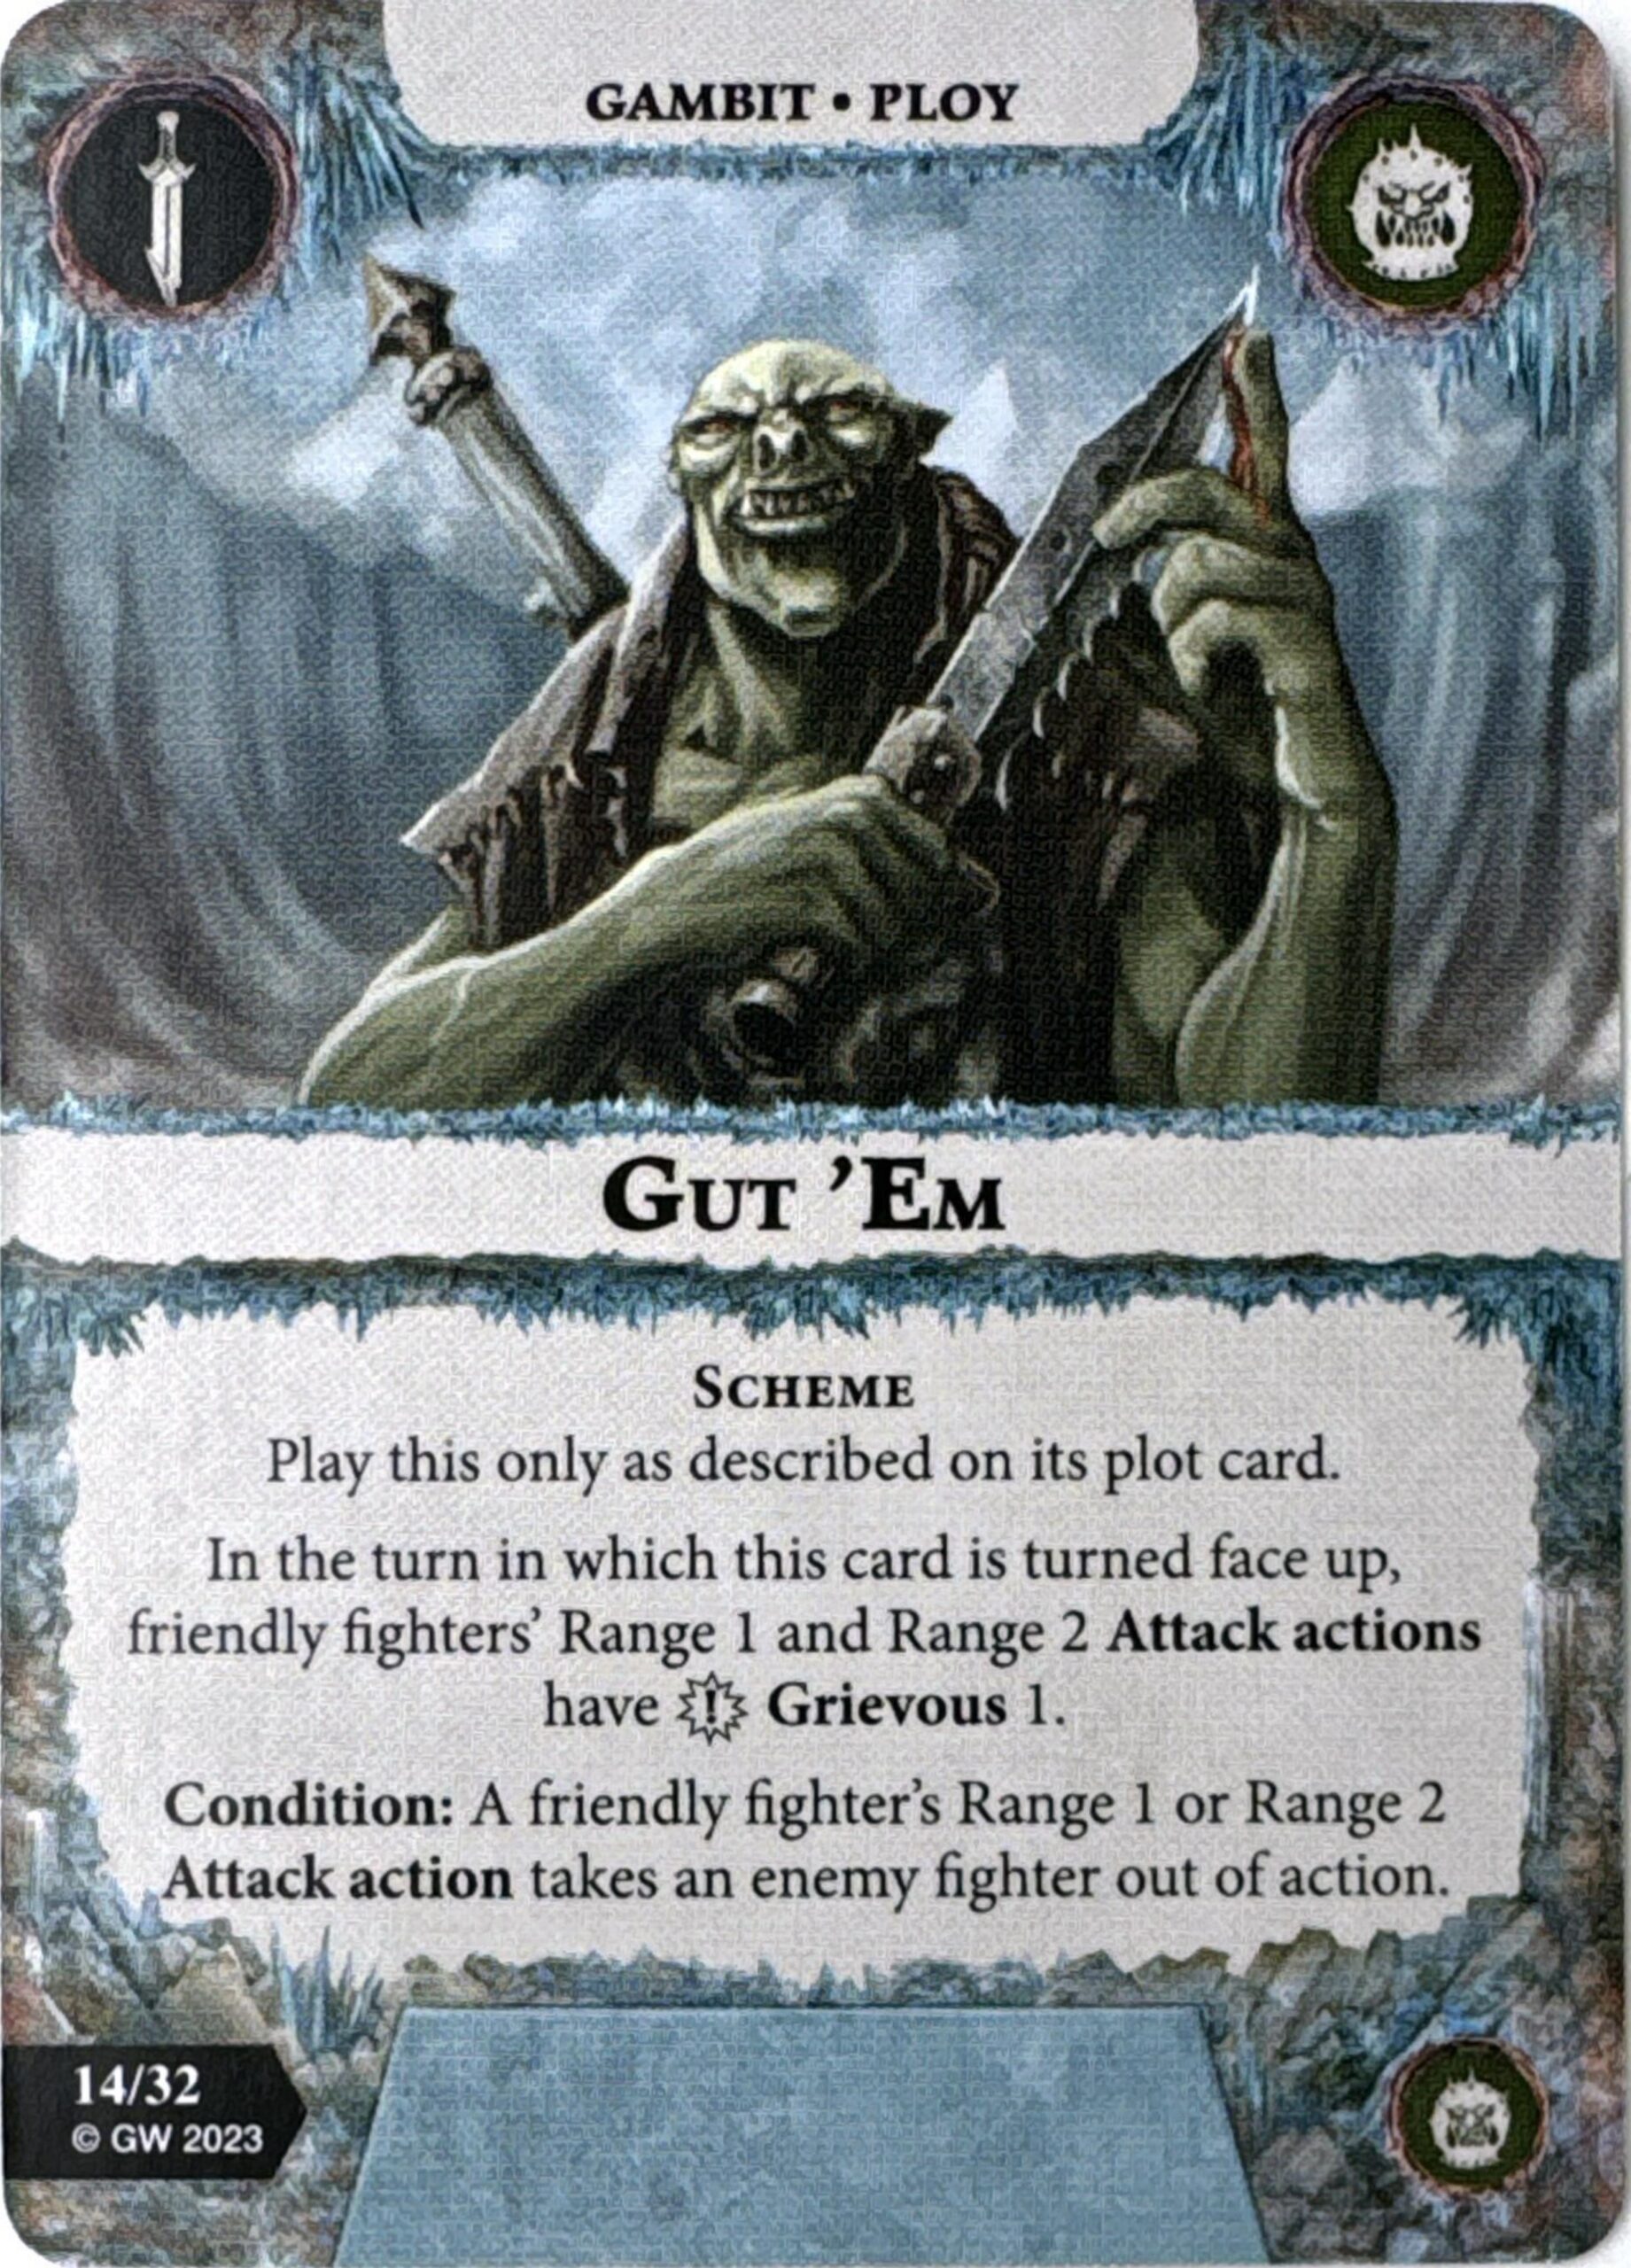
Next up is Gut ‘Em, which plops grievous onto your Range 1 and 2 attacks, which is not bad given that the warband I think is generally hurting for damage. It’s condition is to kill a fighter via Range 1 or 2 attack which, while you know how I feel about “kill surges,” is at least in line with the gameplan and what the card is trying to support. It’s so important these days to be able to put out that 3-Damage attack for changers, witch hunters, and the all-important 3 Damage + ping onto a 4-Wound guy and this at least gives you a potential way to get there. While not quite as good as something like [ Ferocious Blow], if you have any scheme synergy in your objectives, I think this is likely to make the cut.
Power Ceiling: 2, Consistency: 2
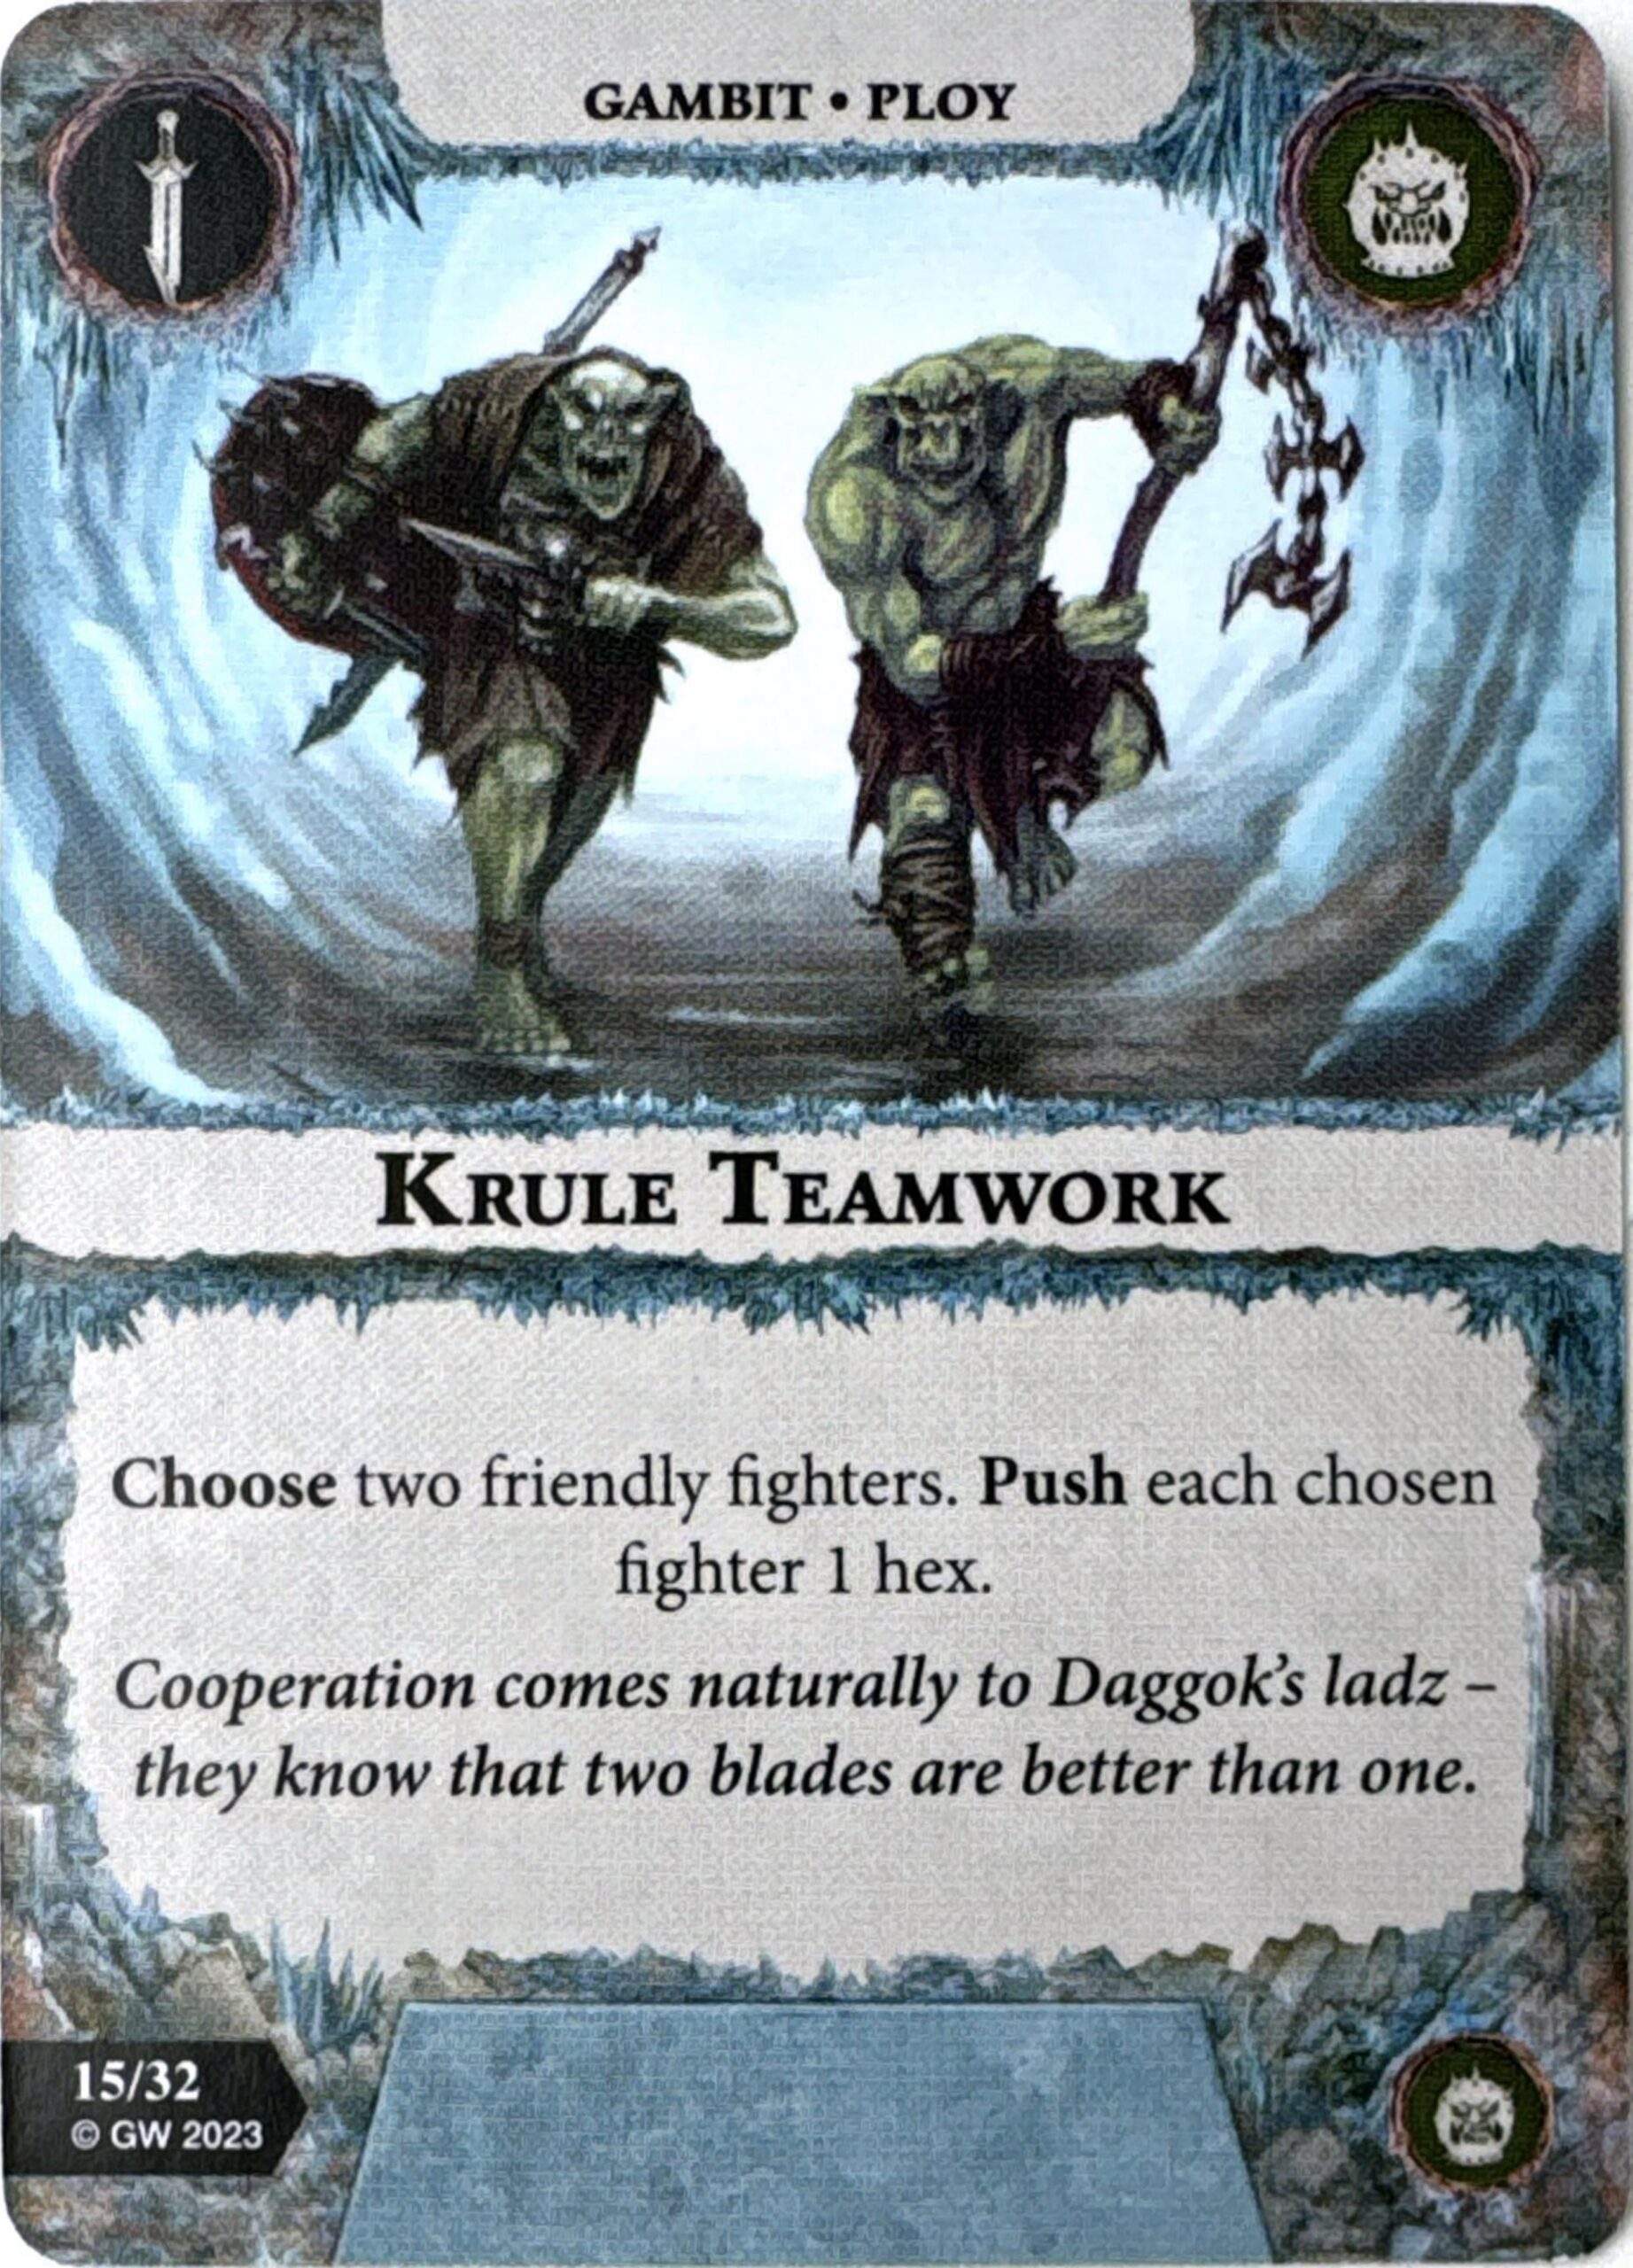
Next up is our first non-scheme gambit in Krule Teamwork, which is your classic double [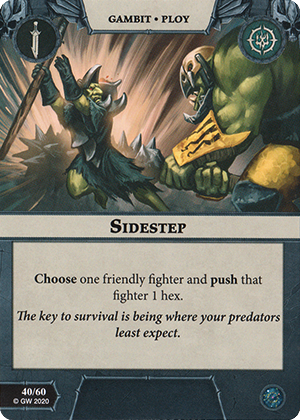 Sidestep]. These effects are almost always auto inclusions and I think this one is no different. However, one thing that ought to be pointed out is that it specifies “choose two,” meaning that you may not play this card if you only have 1 surviving fighter who is able to be pushed. Furthermore, you must push each fighter chosen, so make sure you have two fighters you actually want to push before you throw it down. Still a great card.
Power Ceiling: 3, Consistency: 2
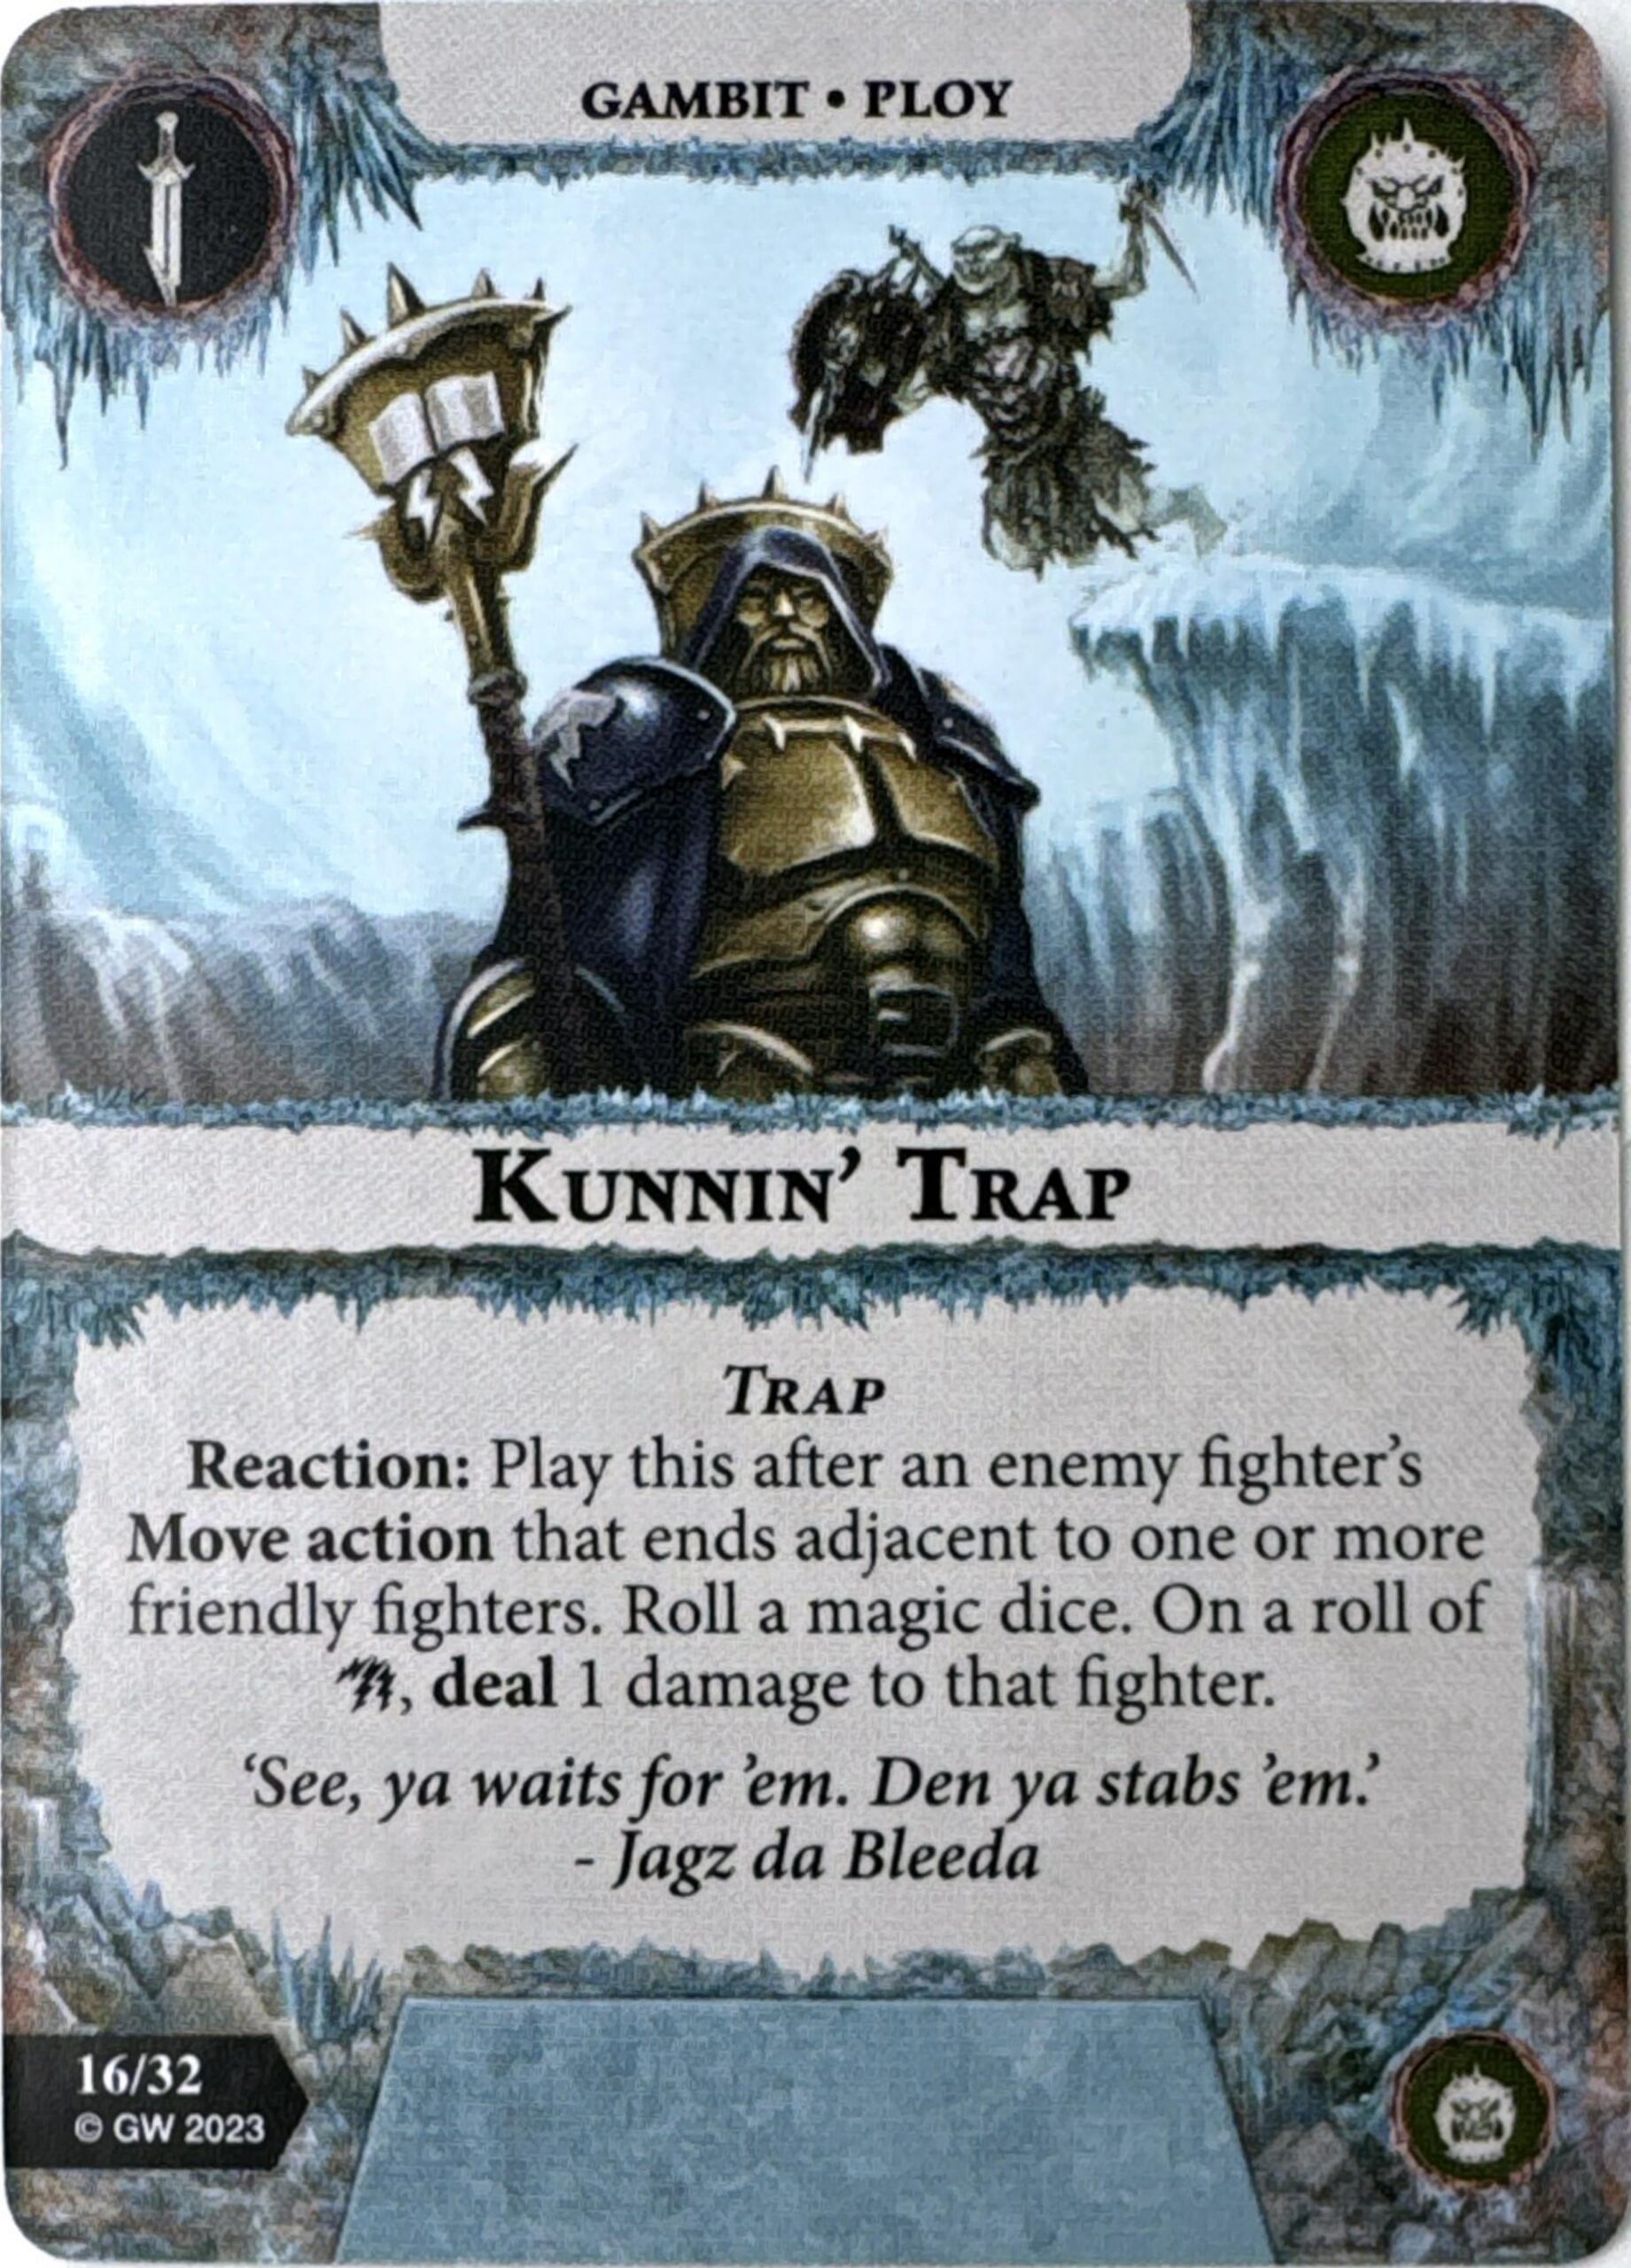
Kunnin’ Trap is a reaction to an enemy fighter’s move action that ends adjacent to one or more friendly fighters, dealing them 1 Damage on a straight 50-50. While [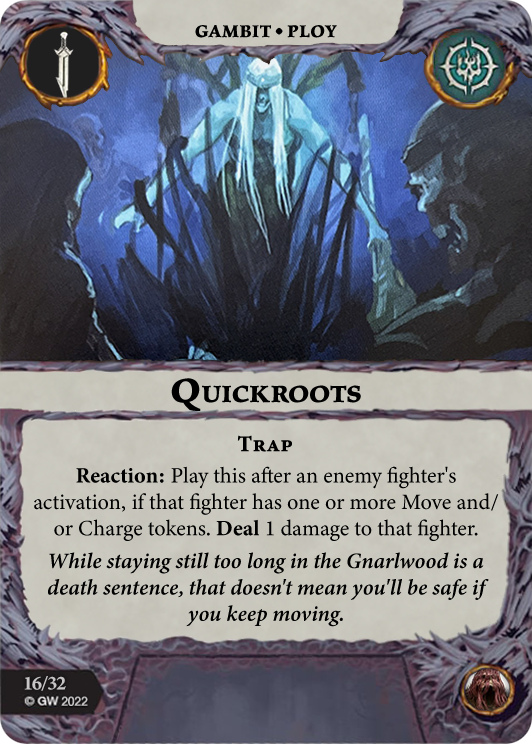 Quickroots] is obviously a very strong (and restricted) card, the fact that this both has a positional requirement and only works half the time is pretty brutal. Given this is their only faction ping gambit, as well as some of the earlier cards we’ve discussed that are relying on you putting out ping damage, I would’ve liked to see a little more oomph here. There are so many more reliable pings in the game right now, even unrestricted ones, so I think you will struggle to bring this in Championship, but may often find yourself also leaving it at home in Nemesis.
Power Ceiling: 2, Consistency: 1
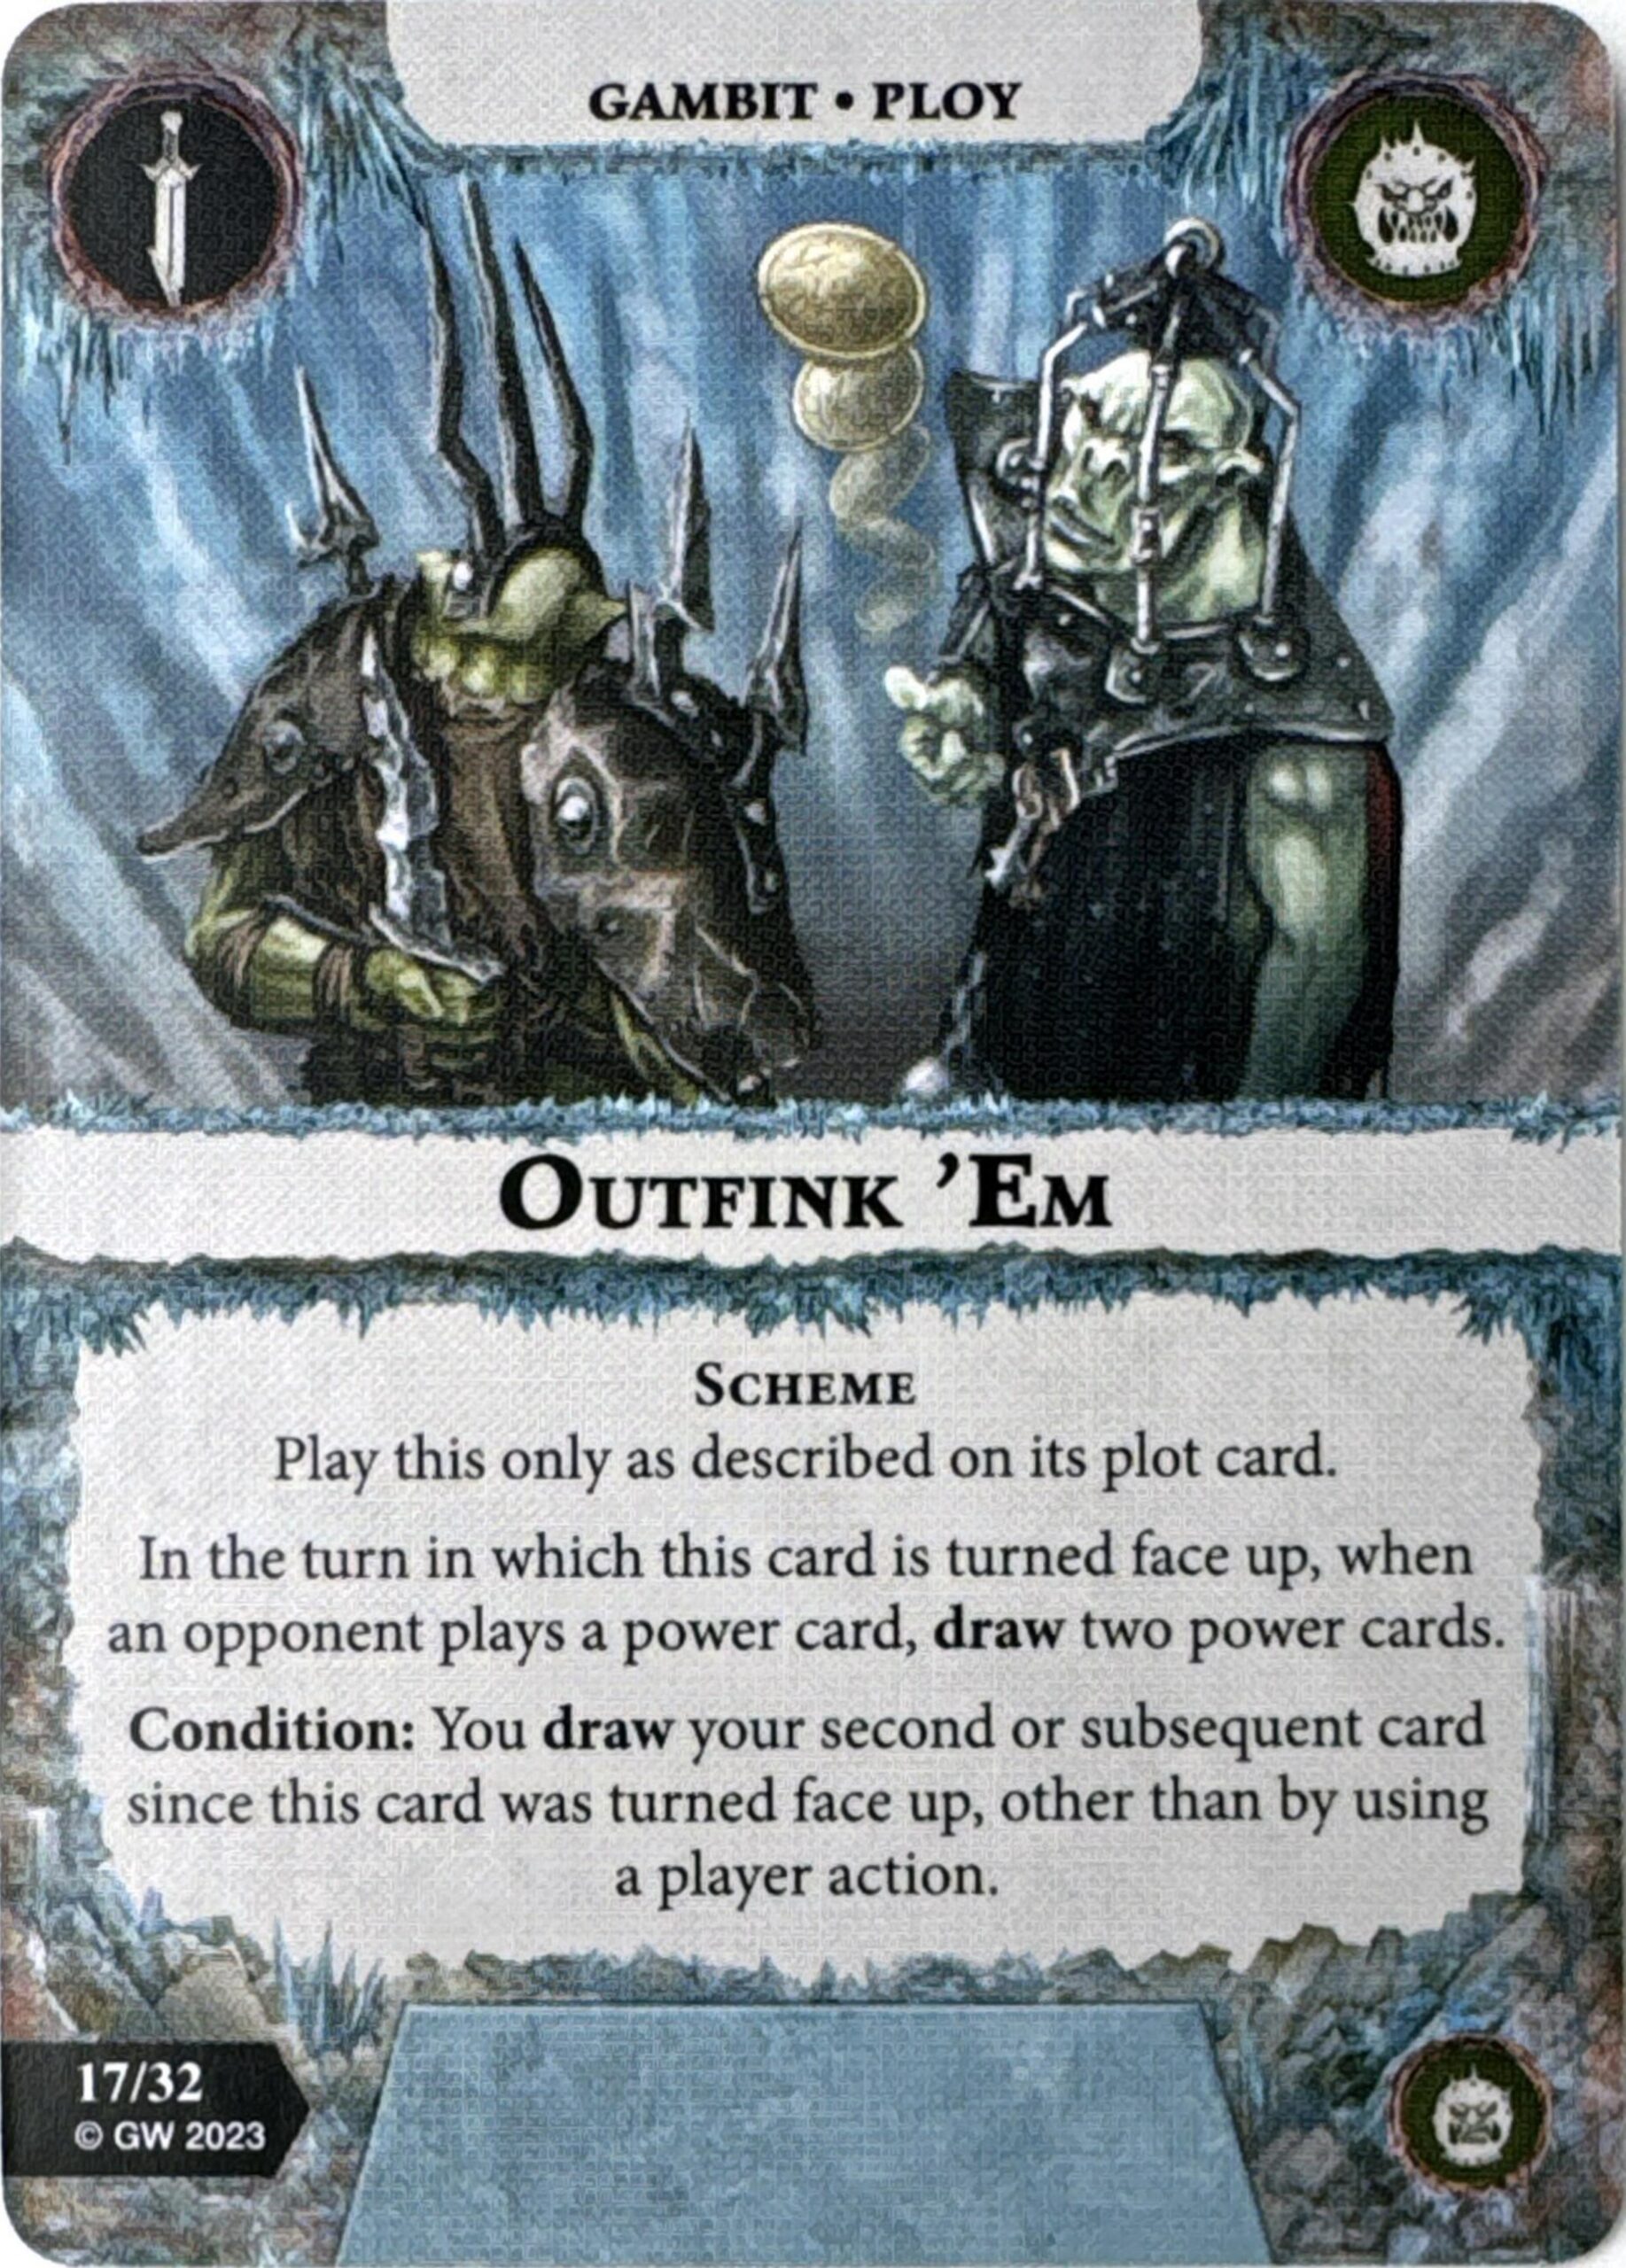
Our next scheme is Outfink ‘Em, which allows you to draw two power cards if your opponent plays one in the turn it turns face up. I think it’s easy to see a “Draw 2” effect and get really excited, but this one feels like a bit of a trap to me. Having attempted a good bit of [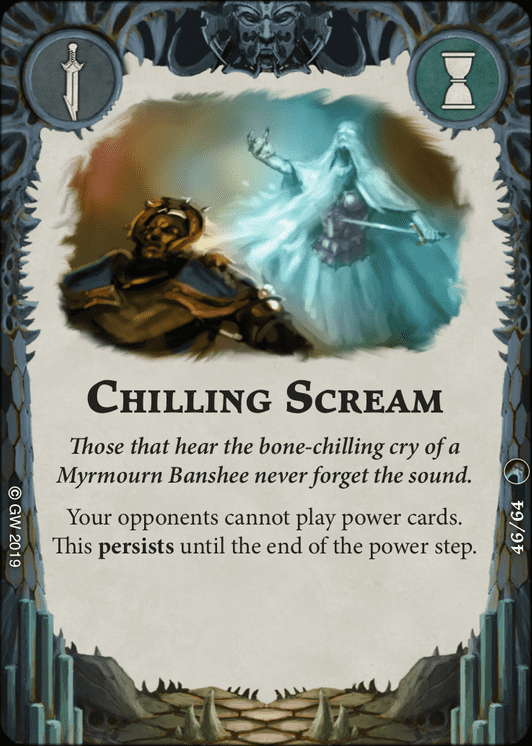 Chilling Scream] recently, I can tell you that it is often unpredictable exactly when your opponent is gearing up to drop a lot of cards in a power step, and that card takes root immediately. In this case, you have to predict which of your turns your opponent will get the most value out of playing their cards before even seeing what they end up doing in their next activation. Once they know you have this card in your deck, the second they see you place a scheme face-down, they can think about how to most efficiently play their cards in the rest of the current power step and next without having to potentially use them during your next turn. To not be all negative, one thing it can do which I quite like is capitalize off mid-turn reaction gambits such as [
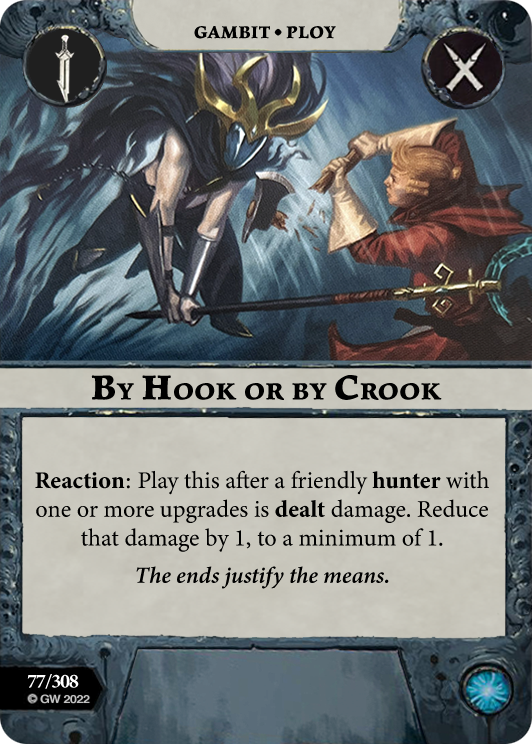 By Hook or by Crook], [
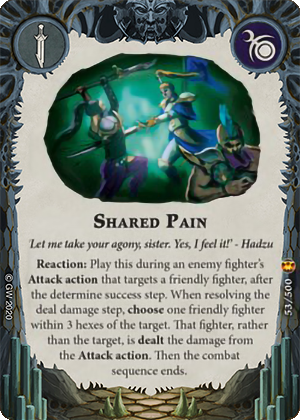 Shared Pain], etc. It can also help protect your positioning late in a round. If, for instance, you are taking the last activation of the round and planning to score some positional objectives, playing this card can disincentivize your opponent from disrupting you with push gambits or allow you to draw into pushes of your own to counteract their disruption. Still, the effect only works while it is open information, meaning your opponent gets to weigh the balance of what happens if they let you draw 2 (and complete the scheme) vs. the value of playing that power card or cards in that specific turn, then choose the lesser of the two options for you. If they know you are playing the “complete X number of schemes” objectives, I just worry the correct decision will almost always be to just forgo playing cards until the draw effect fizzles, leaving you with an incomplete scheme that very few other cards in the game can actually help you finish off. I’m sure you might get a better feel on situations where you get the most value out of this card as you get more reps, but my gut feeling is that the game is a bit too fluid to be consistently making that evaluation correctly.
Power Ceiling: 3, Consistency: 1
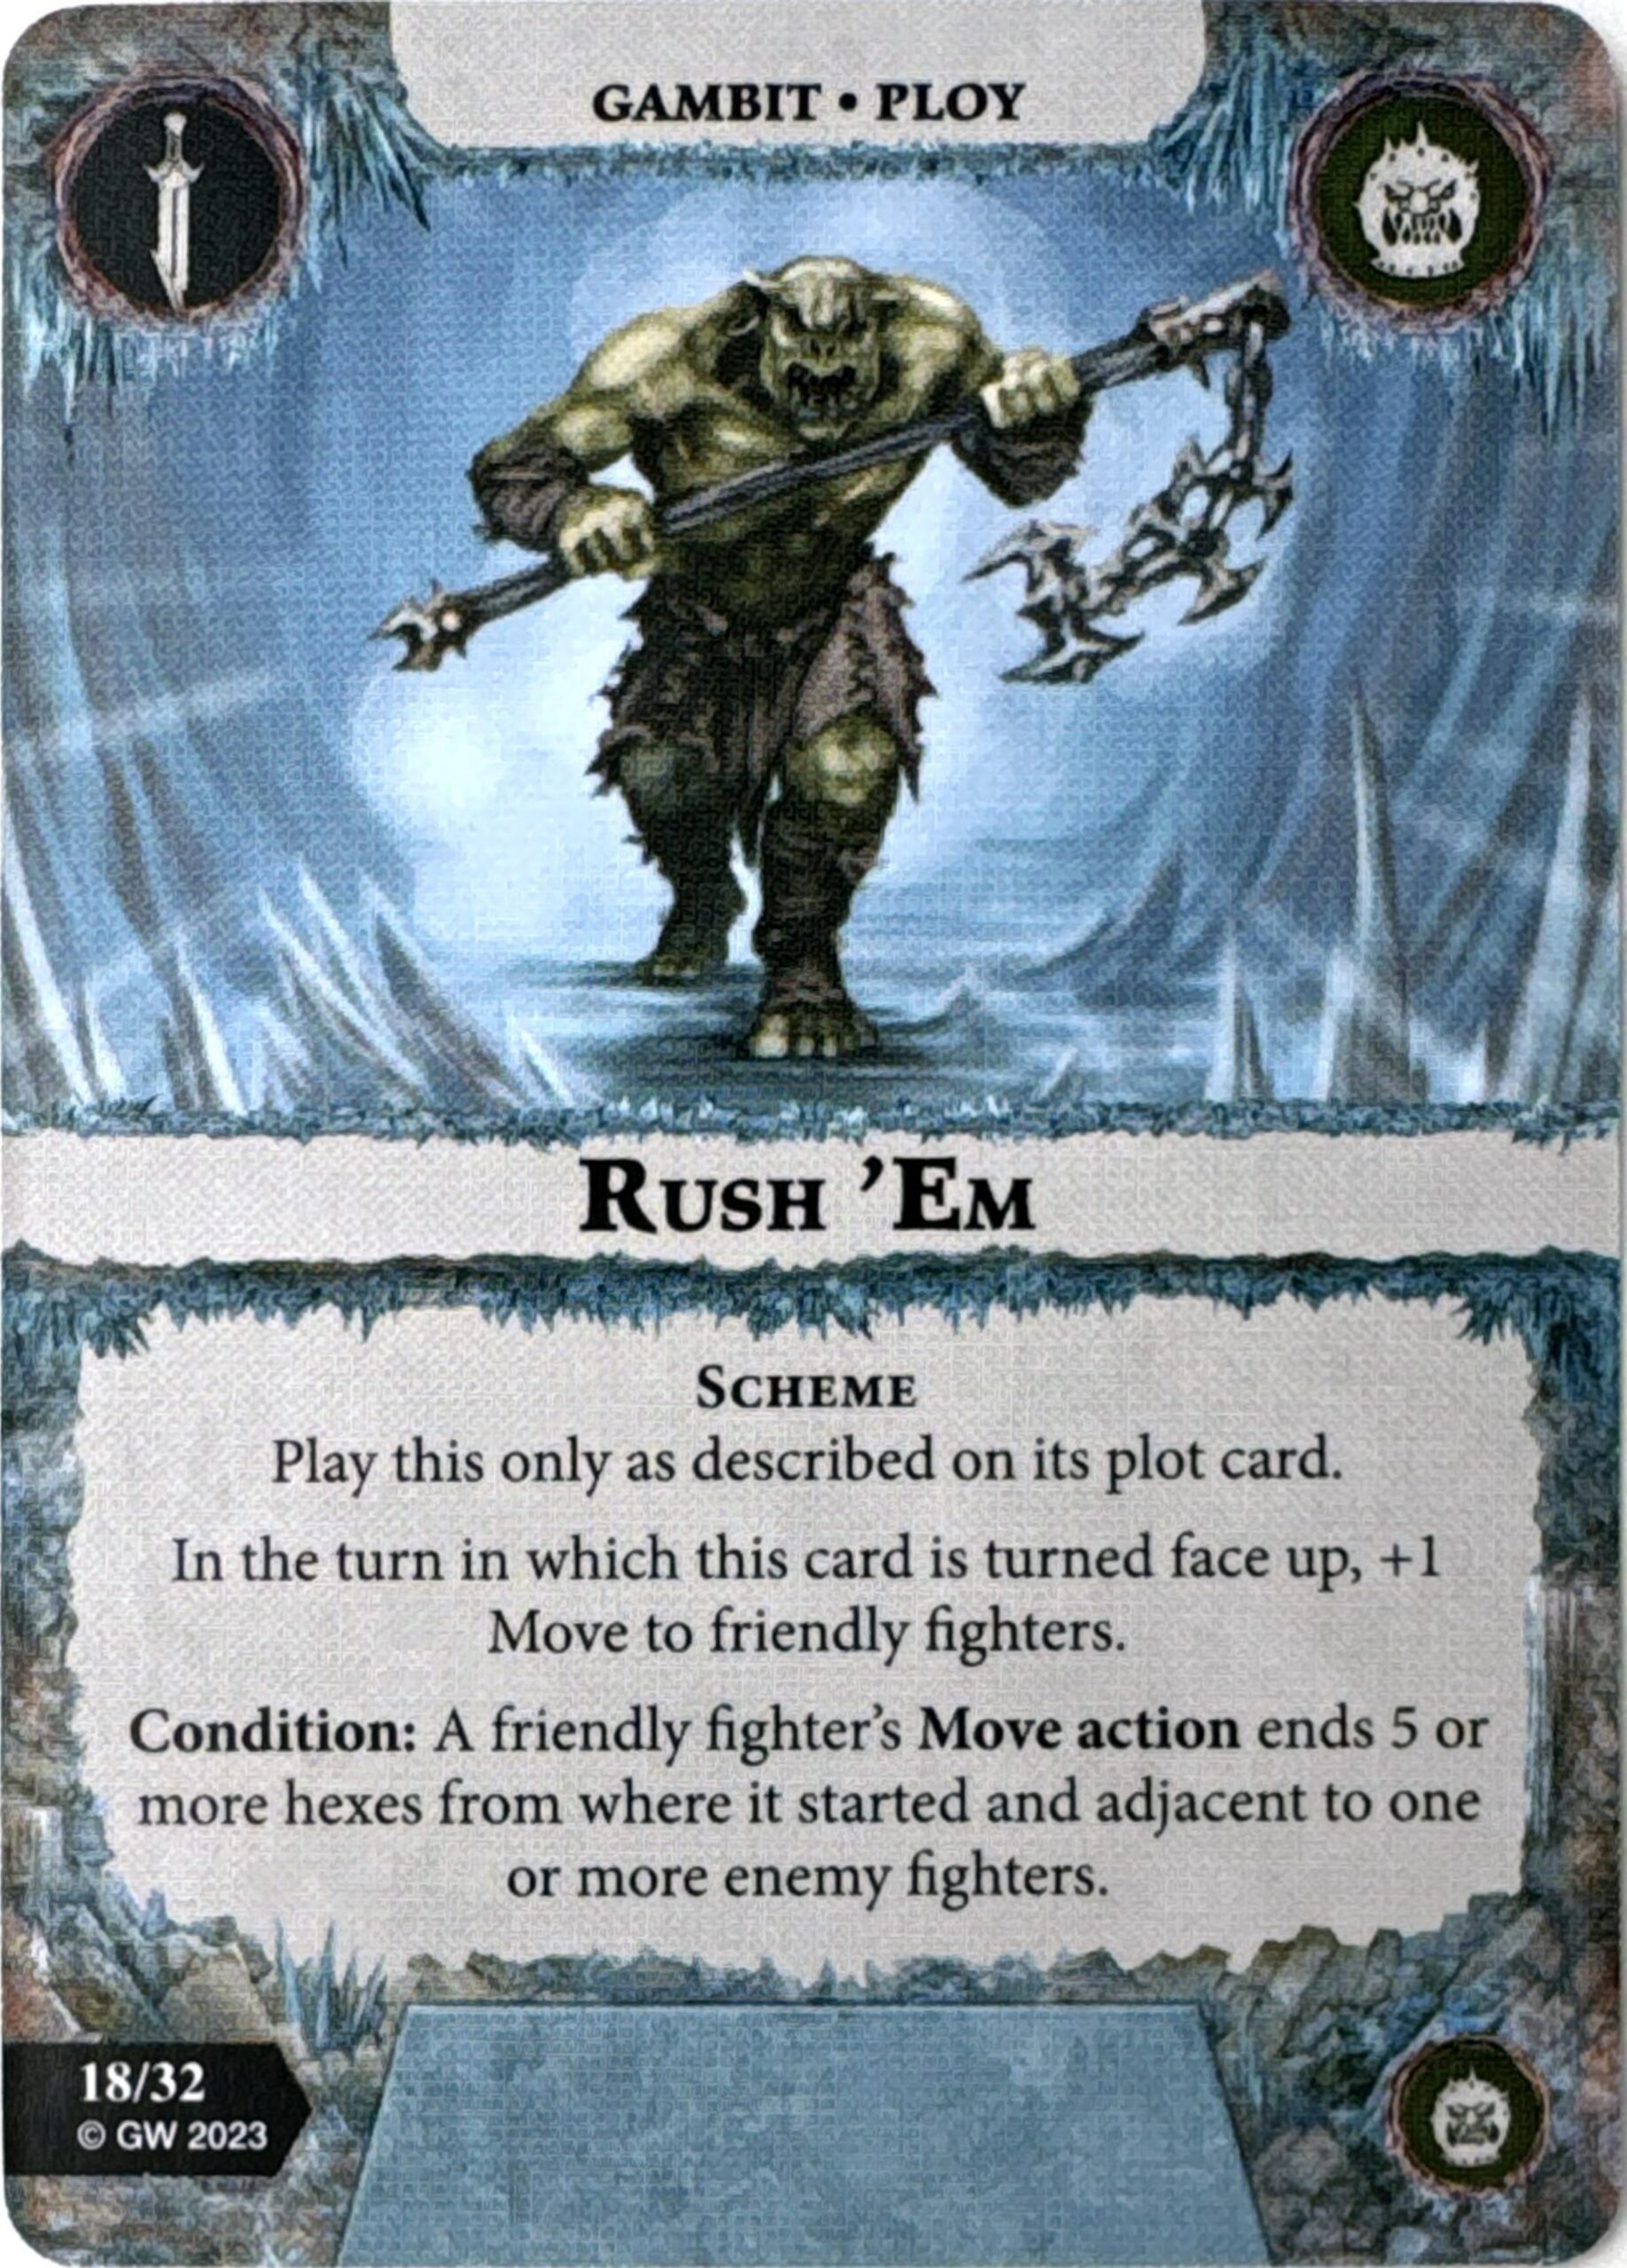
Rush ‘Em is about as straightforward of a scheme as you’re likely to encounter, giving you +1 Move to all friendly fighters in the turn the card activates, meeting the scheme condition if you make a move action that ends 5 or more hexes and landing next to an enemy fighter. Another good synergy with VCT here given that this applies to the activation, any reactions, and the power step, meaning you could potentially pump out something on the order of 4 move actions all at +1 hex. This also plays nicely with cards such as Tread the Path. That being said, only one of your fighters starts the game at 4 Movement, so, while I think the effect has merit, I think the condition could be surprisingly tricky. If the goal is simply to get value out of the move, VCT is the way, as I mentioned, but if your bigger plan is to actually complete the scheme, you’re going to get a lot better results with Breakneck Slaughter. Moving 5 hexes in a straight line and landing where you want to be (while also being next to an enemy fighter) is actually a surprising number of boxes to check. That’s not to say it can’t be trivial with, for example, thoughtful initial deployment of Grakk, just a warning that I wouldn’t necessarily rely on completing the scheme in the same turn it gets flipped, which would mean you’re trying to do it later without the +1 move benefit. I think you skip this in Championship, but it’s fine in Nemesis, especially if you really need the scheme scoring support.
Power Ceiling: 2, Consistency: 2
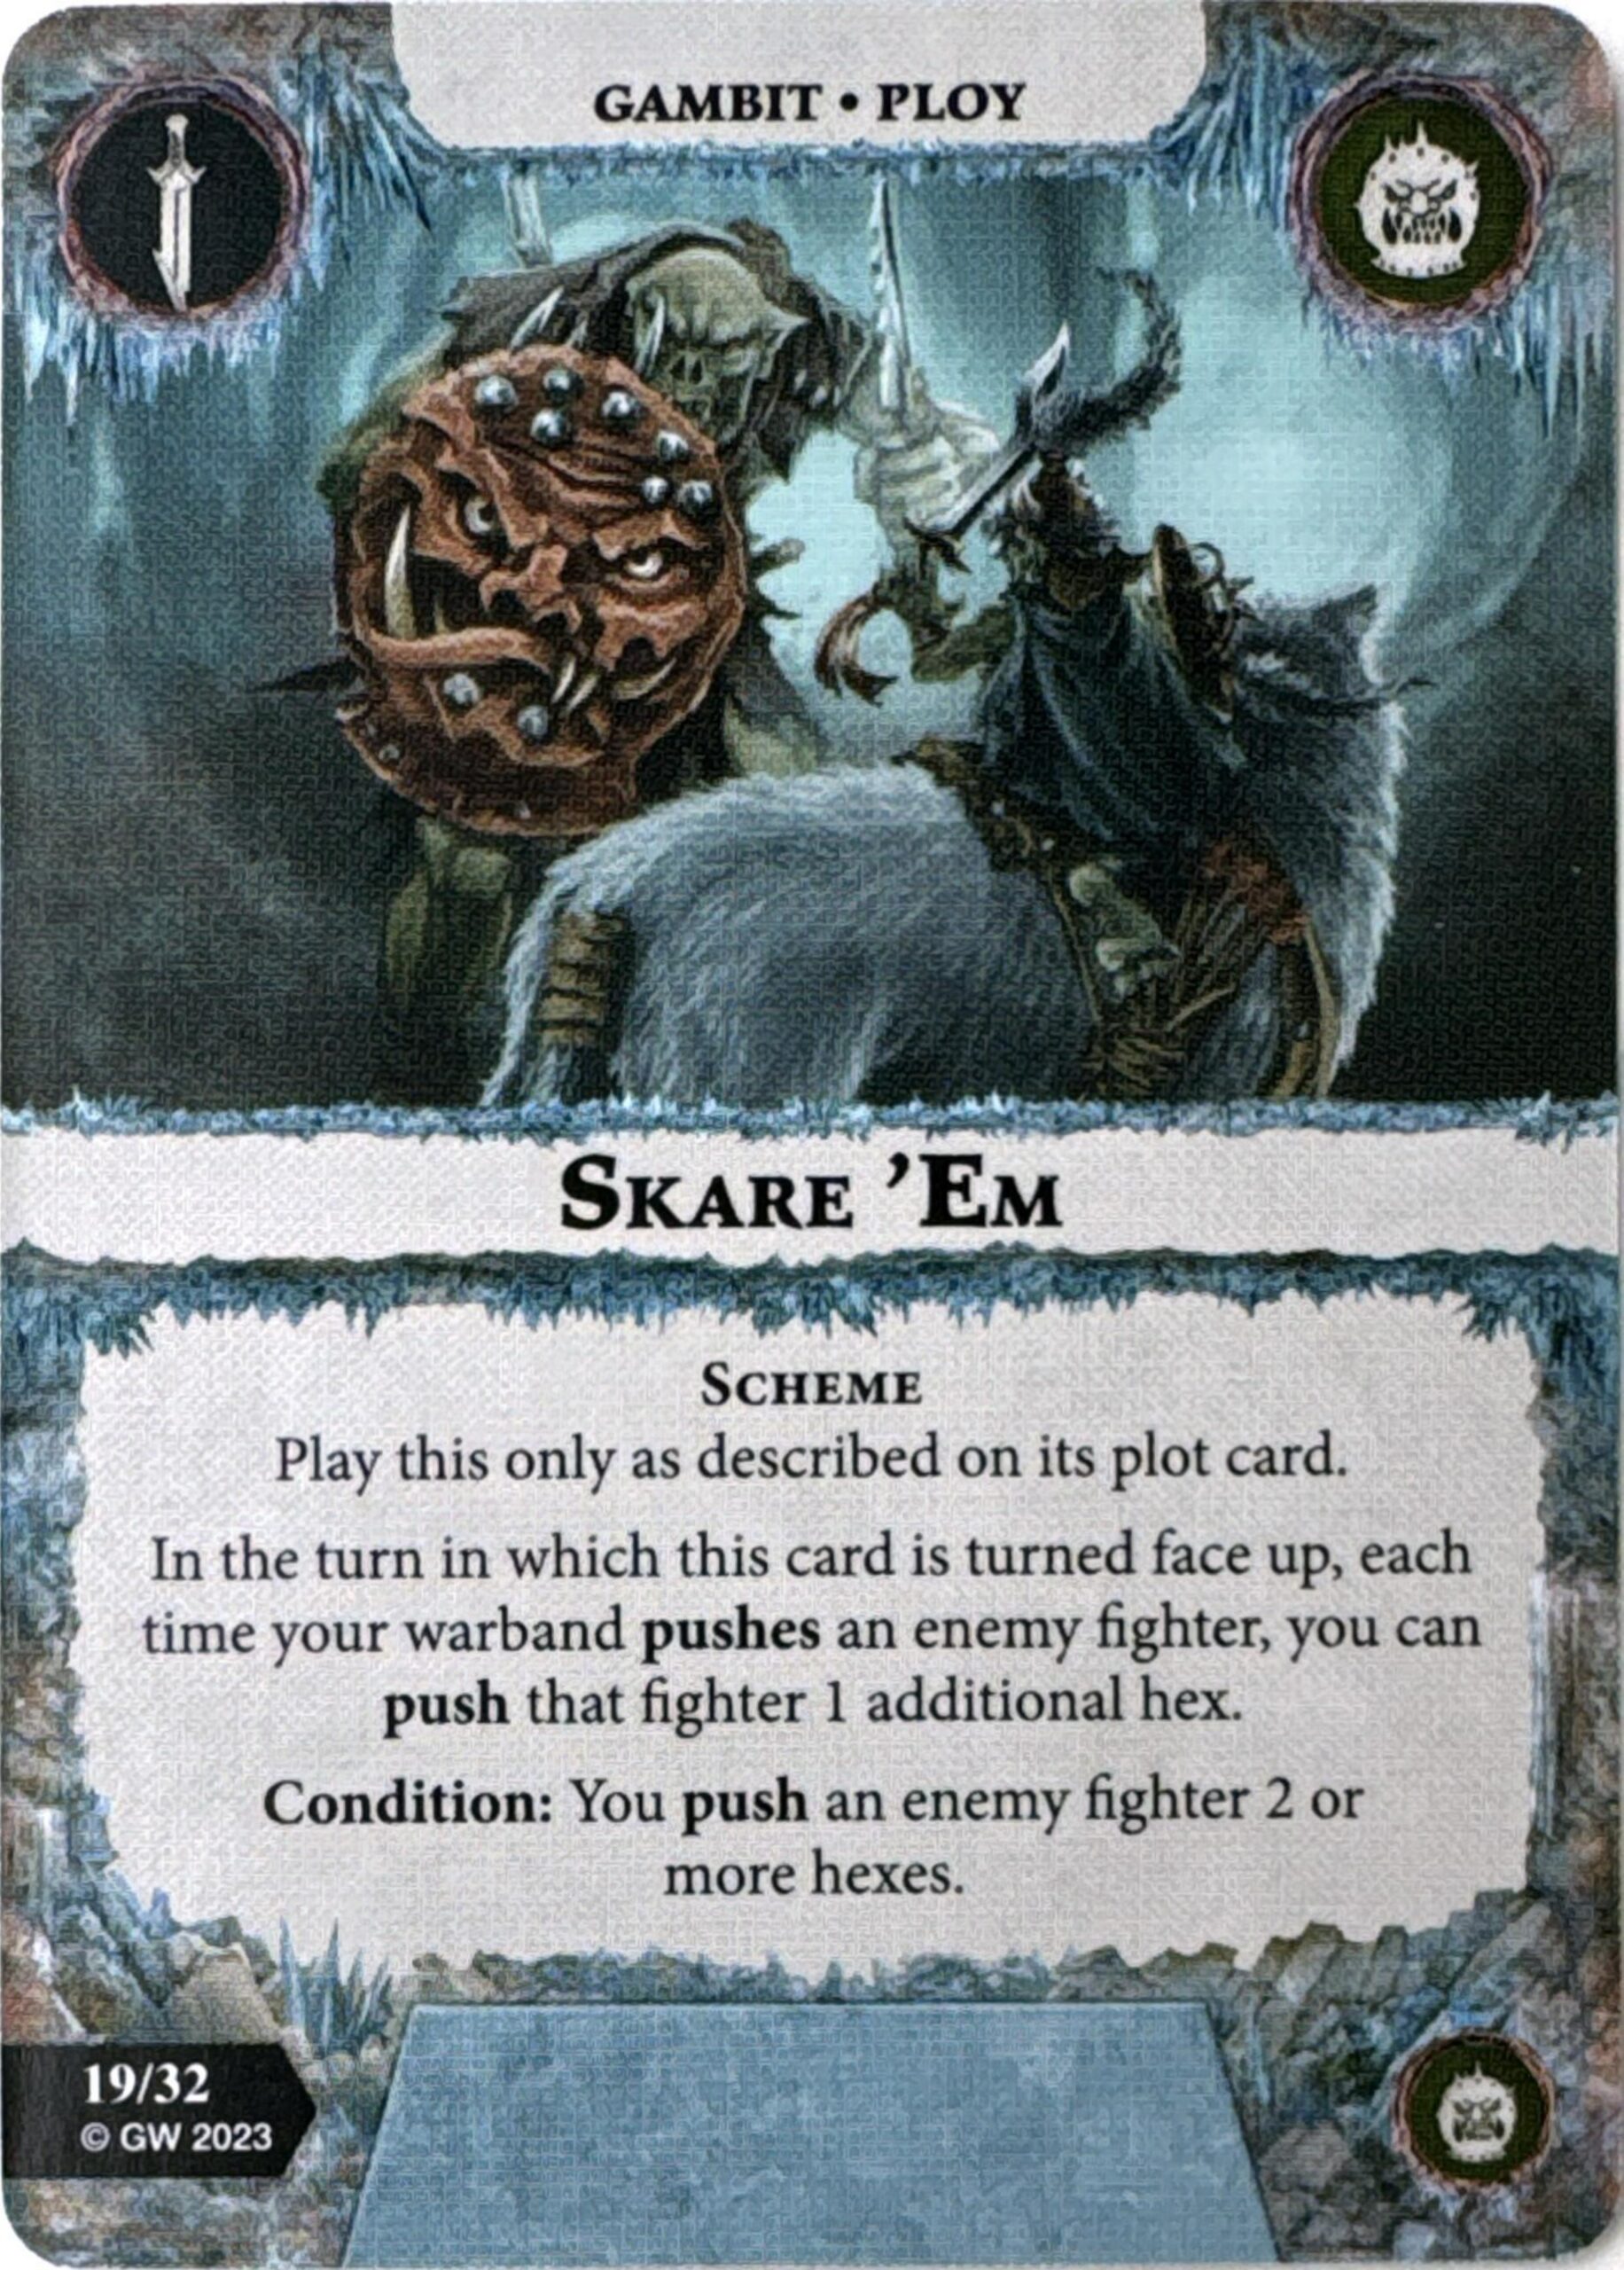
Skare ‘Em is next, allowing to push an enemy fighter an extra hex when you push them in that turn. I like this one a lot actually. The most obvious instance where this will be useful is taking that extra hex of push on driveback, which notably (I think) would not have to be in the same direction of the initial push. Even if you miss the attack during the activation, presumably you would also be taking this card along with something like [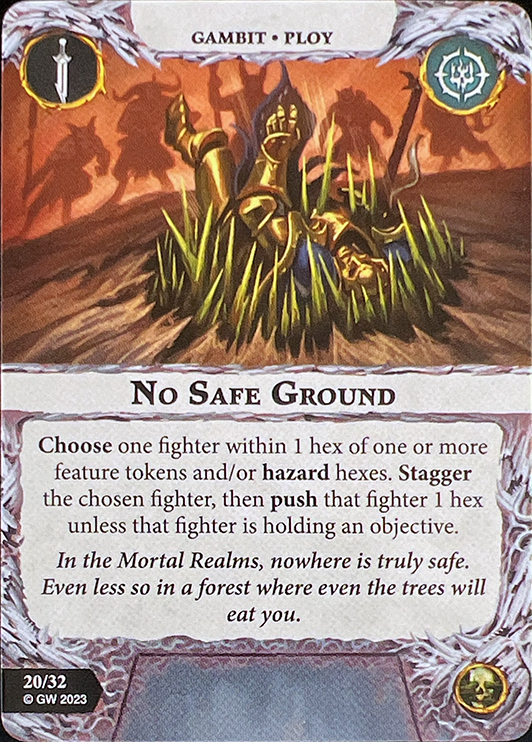 No Safe Ground], so you can simply drop the scheme and then plan to use your push tech in that power step. This is especially powerful in scenarios where you are taking the last activation of the round, as your opponent might have 1-hex pushes to counter your disruption that no longer fully compensate. This one may also have the most reliable condition of the schemes we’ve covered so far, as you will know ahead of playing the card whether or not you have that enemy push gambit in hand, meaning you’ll likely have the ability to force the condition out. Just be careful around the “cannot be pushed” cards floating around in the game these days, particularly [
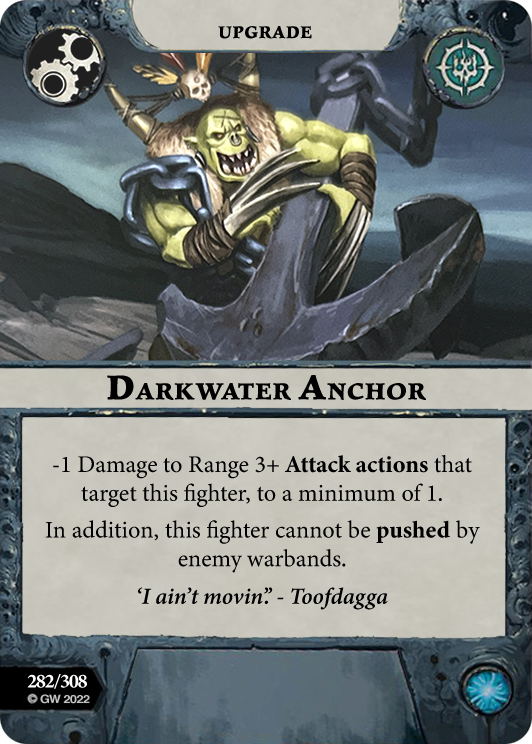 Darkwater Anchor], which is everywhere (at least in Championship).
Power Ceiling: 2, Consistency: 3
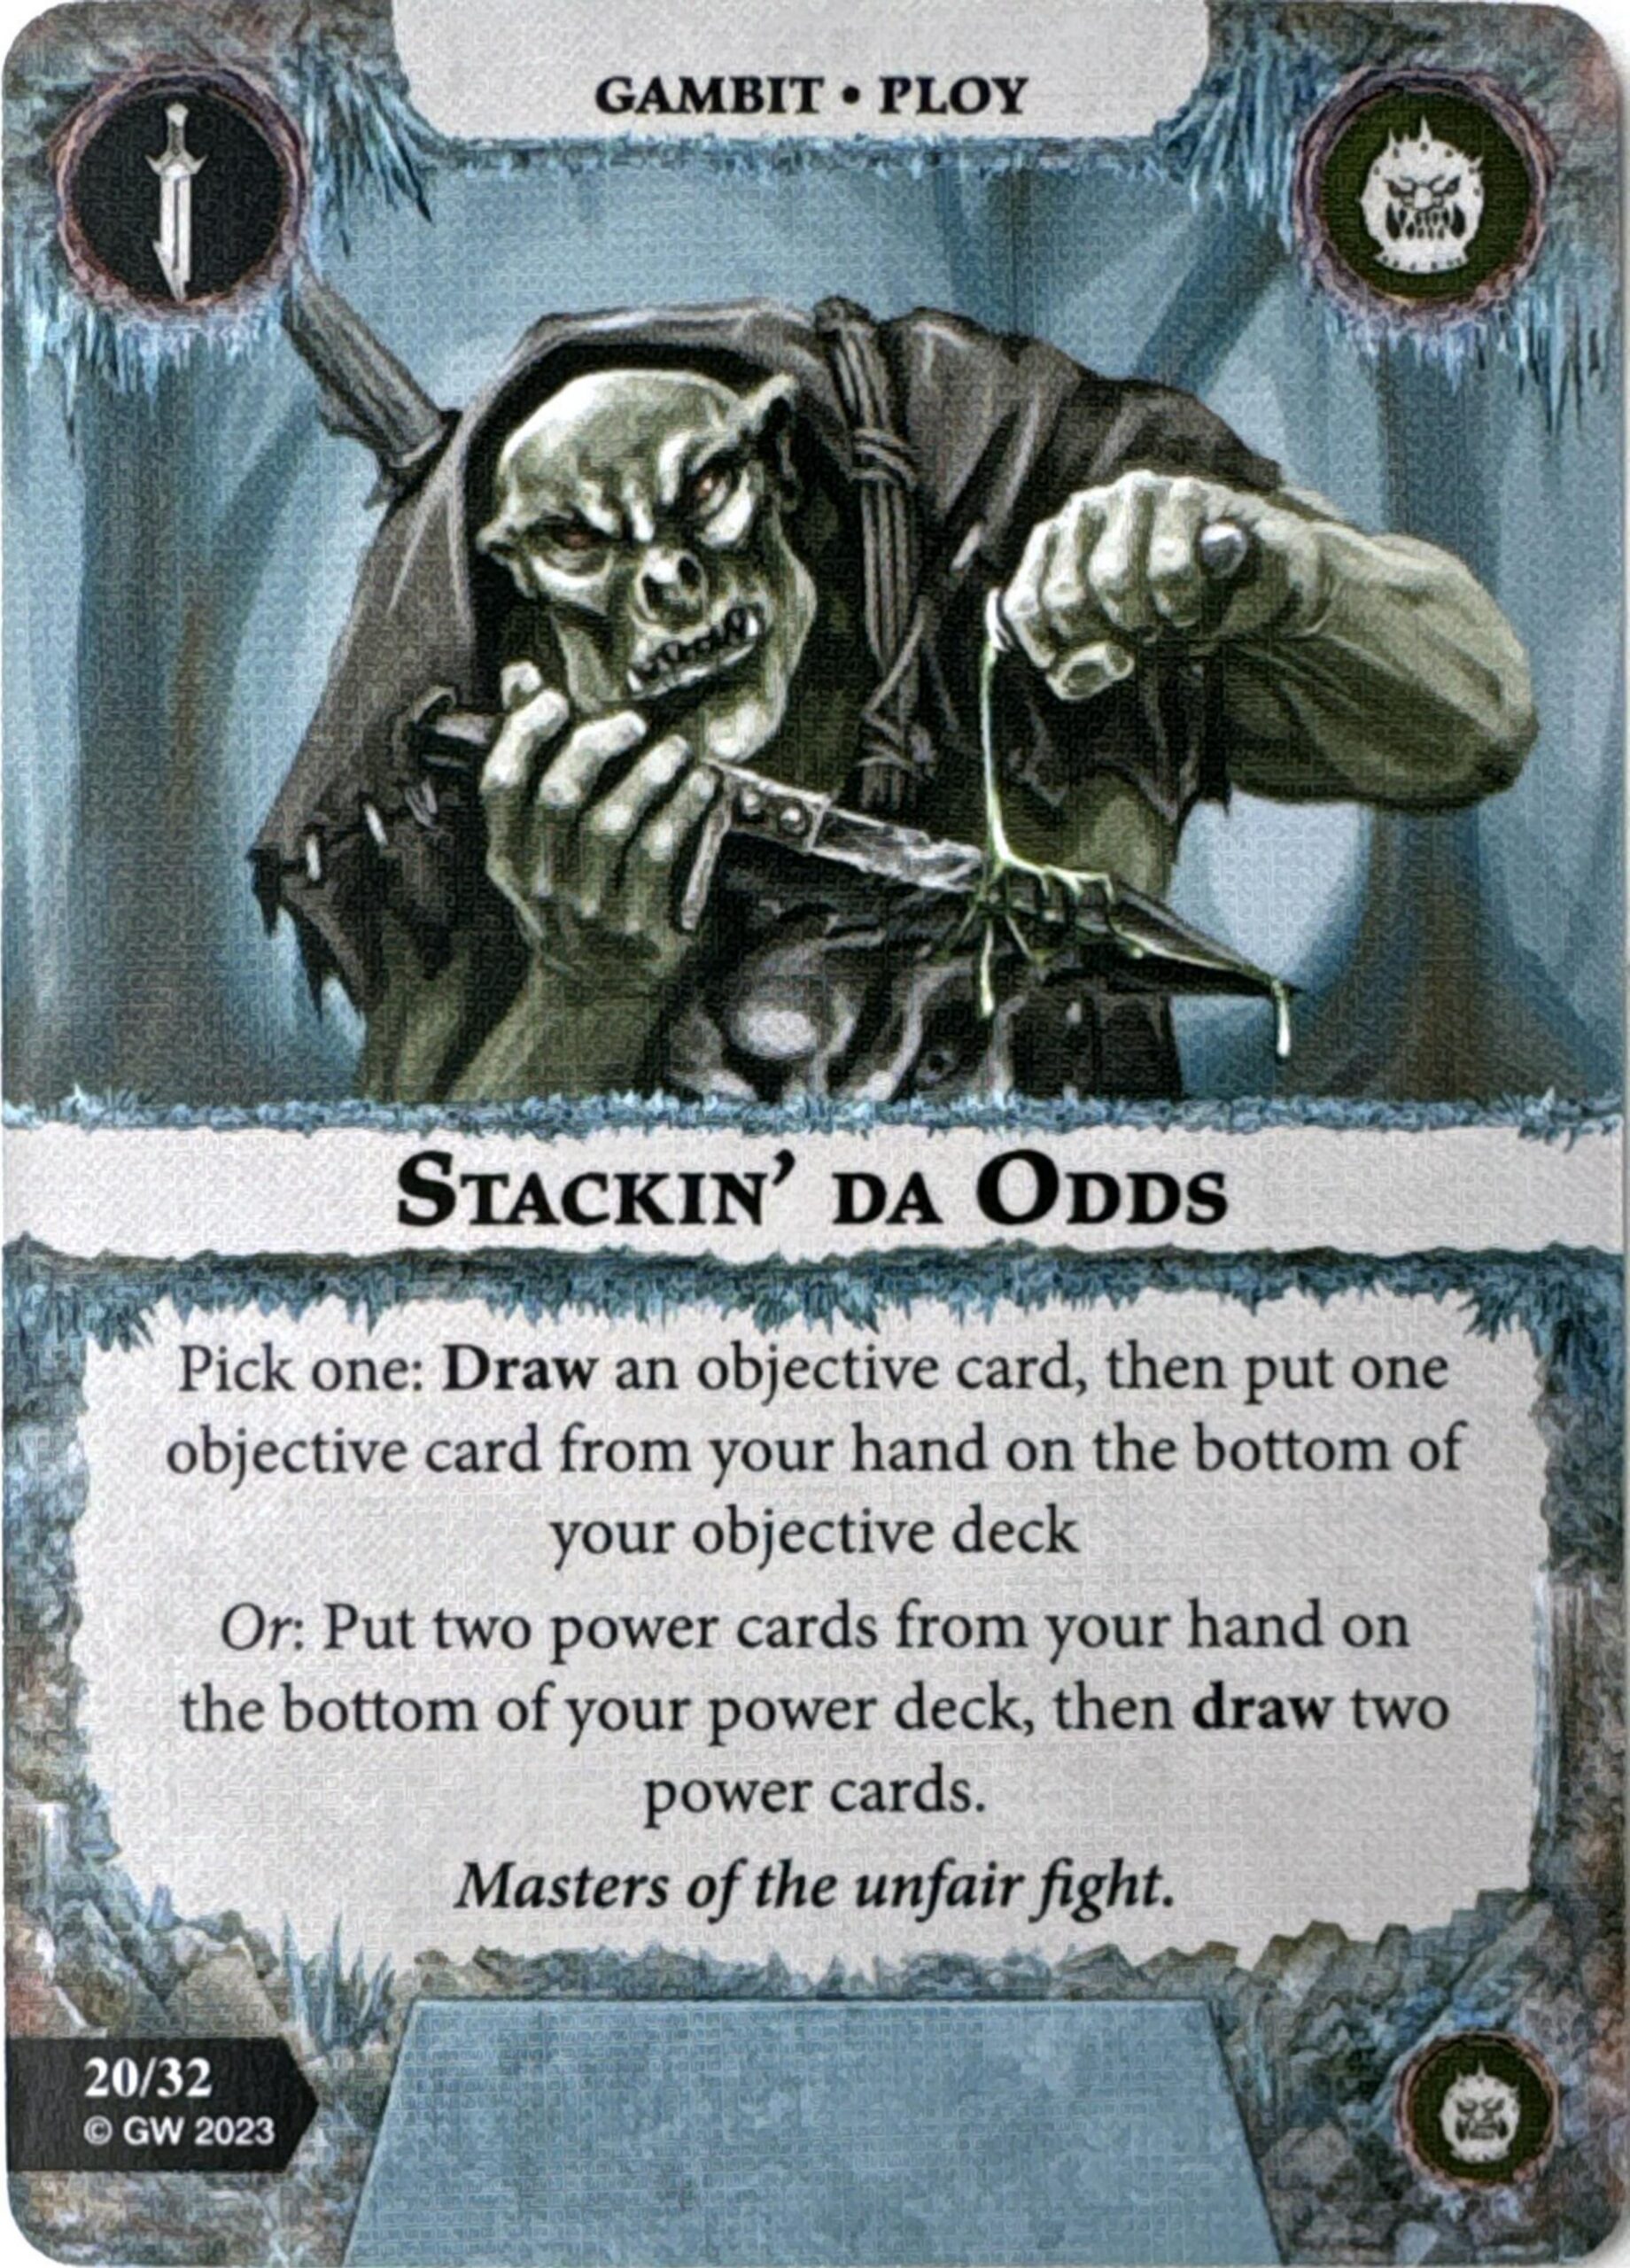
Stackin’ Da Odds allows you to either cycle an objective to the bottom of your deck or cycle two power cards in the same way. I like this one a lot as well. We’ve all had times where we pitch an opening hand of 2 end phase cards and 4 upgrades to instead draw one that has 3 end phases and 4 more upgrades. While it is rare that you get slapped with both at the same time, it is not uncommon to get a little stuck in either half of your hand, so the ability The free objective cycle without having to discard it is fantastic value if you are playing round 2/3 objectives like Chill of the Grave, Winter’s Hunger, Reshaped Realm, etc. In fact, getting to see what you draw into before you discard means you could even potentially cycle the drawn card if it is worse than what was already in your hand. Similarly, there are plenty of games where you get close to the end of your power deck but just need that 1 particular card to come out of your stack. This could immediately cycle it into your hand or, at worst, significantly increase your odds of actually drawing into it via player action. One minor synergy that’s worth pointing out as well is that this card can complete the condition on Outfink ‘Em if you happen to miss out on the card draw when you played that one. I think this card might get overlooked often just because its effect is not immediately obvious to the opponent, but, particularly in Nemesis, the improved deck smoothness will feel really good.
Power Ceiling: 2, Consistency: 3
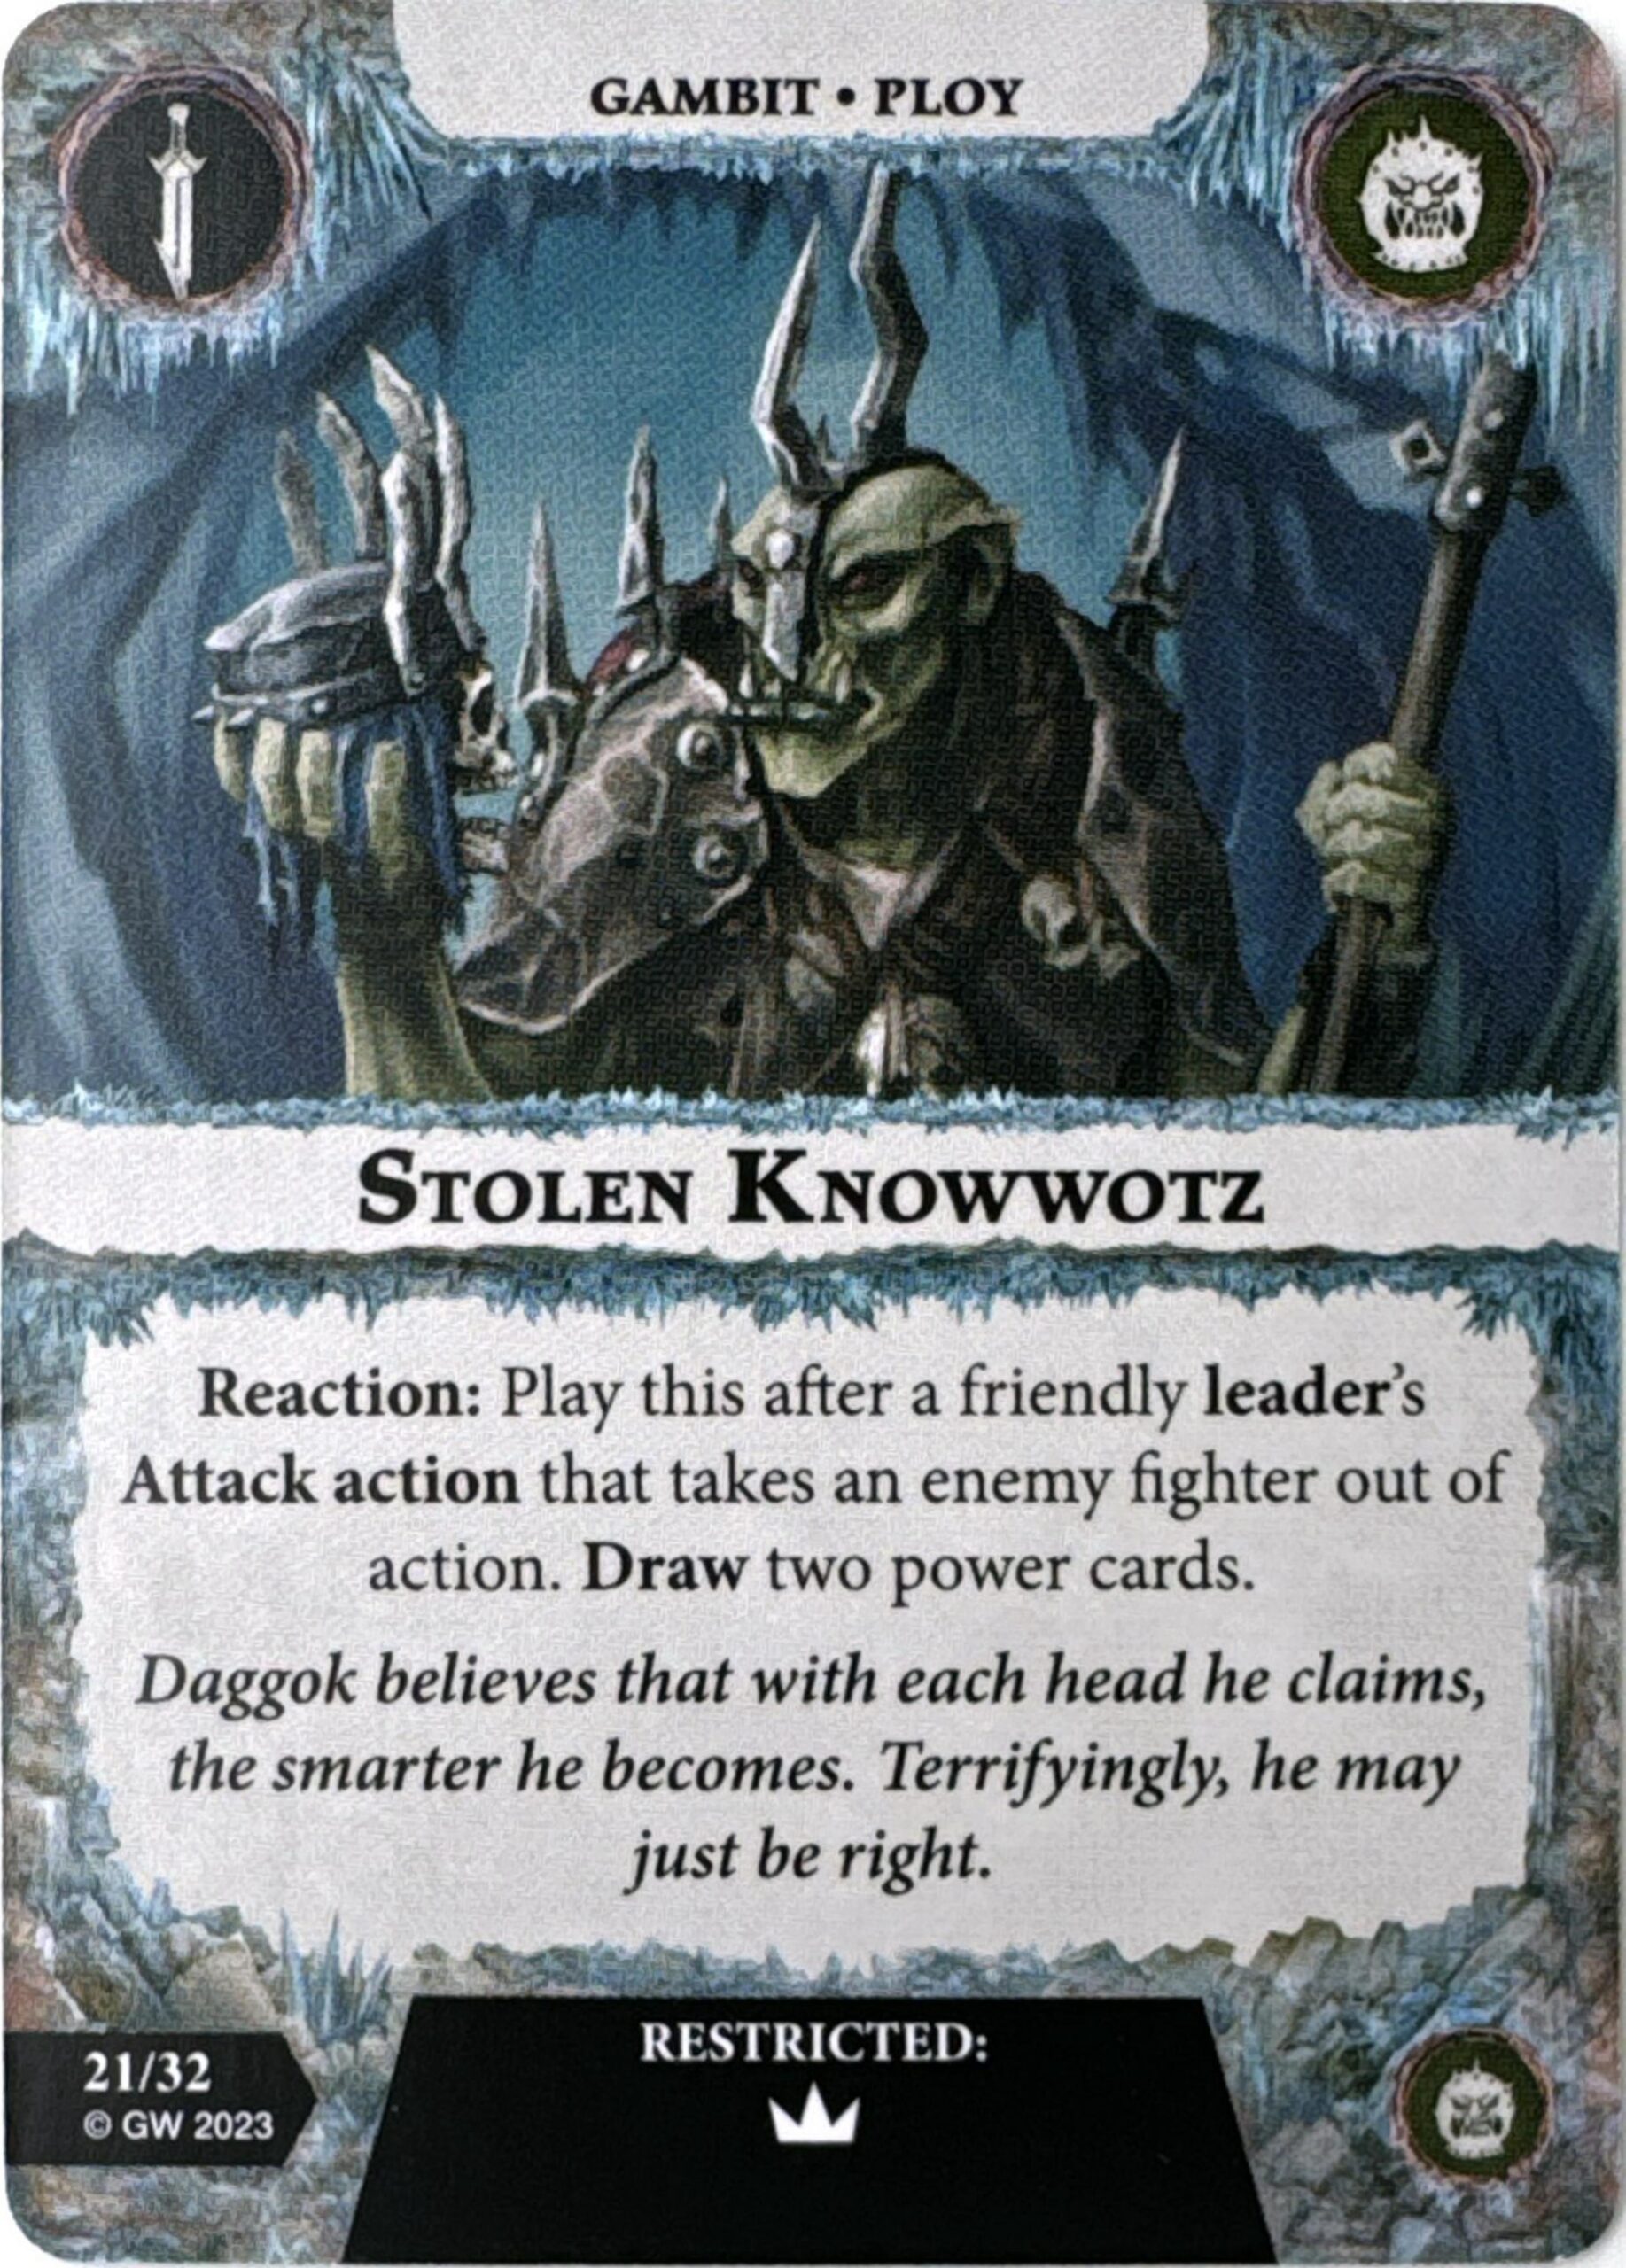
Speaking of cards which can complete Outfink ‘Em (seems like the designers came to a similar conclusion as I did on that card), Stolen Knowwotz allows you to draw two power cards after your leader’s attack kills an enemy fighter. Note that, if you have 0 or 1 power cards in your deck, you actually can’t use this reaction. Since you have the surge for making reactions, I think this does play nicely with it and gets you that extra bit of deck thinning you need to fish for your schemes. While Daggok is no Mollog, he is just capable enough between his base profile and his attack reaction that you should be playing to achieve this window anyway during normal gameplay. If you really juice him up with accuracy and damage, you can sort of control the reliability of the card draw, which in turn improves the reliability of your deck as a whole. Being restricted to just him is a bit unfortunate, but worst case scenario, it does part of its deck thinning job by allowing you to salvage it if he’s dead. Just be mindful of matchup before deciding whether to keep it in an opening hand, as you might end up with a dead card in situations where you struggle to force interaction or are playing against a very tanky warband.
Power Ceiling: 3, Consistency: 2
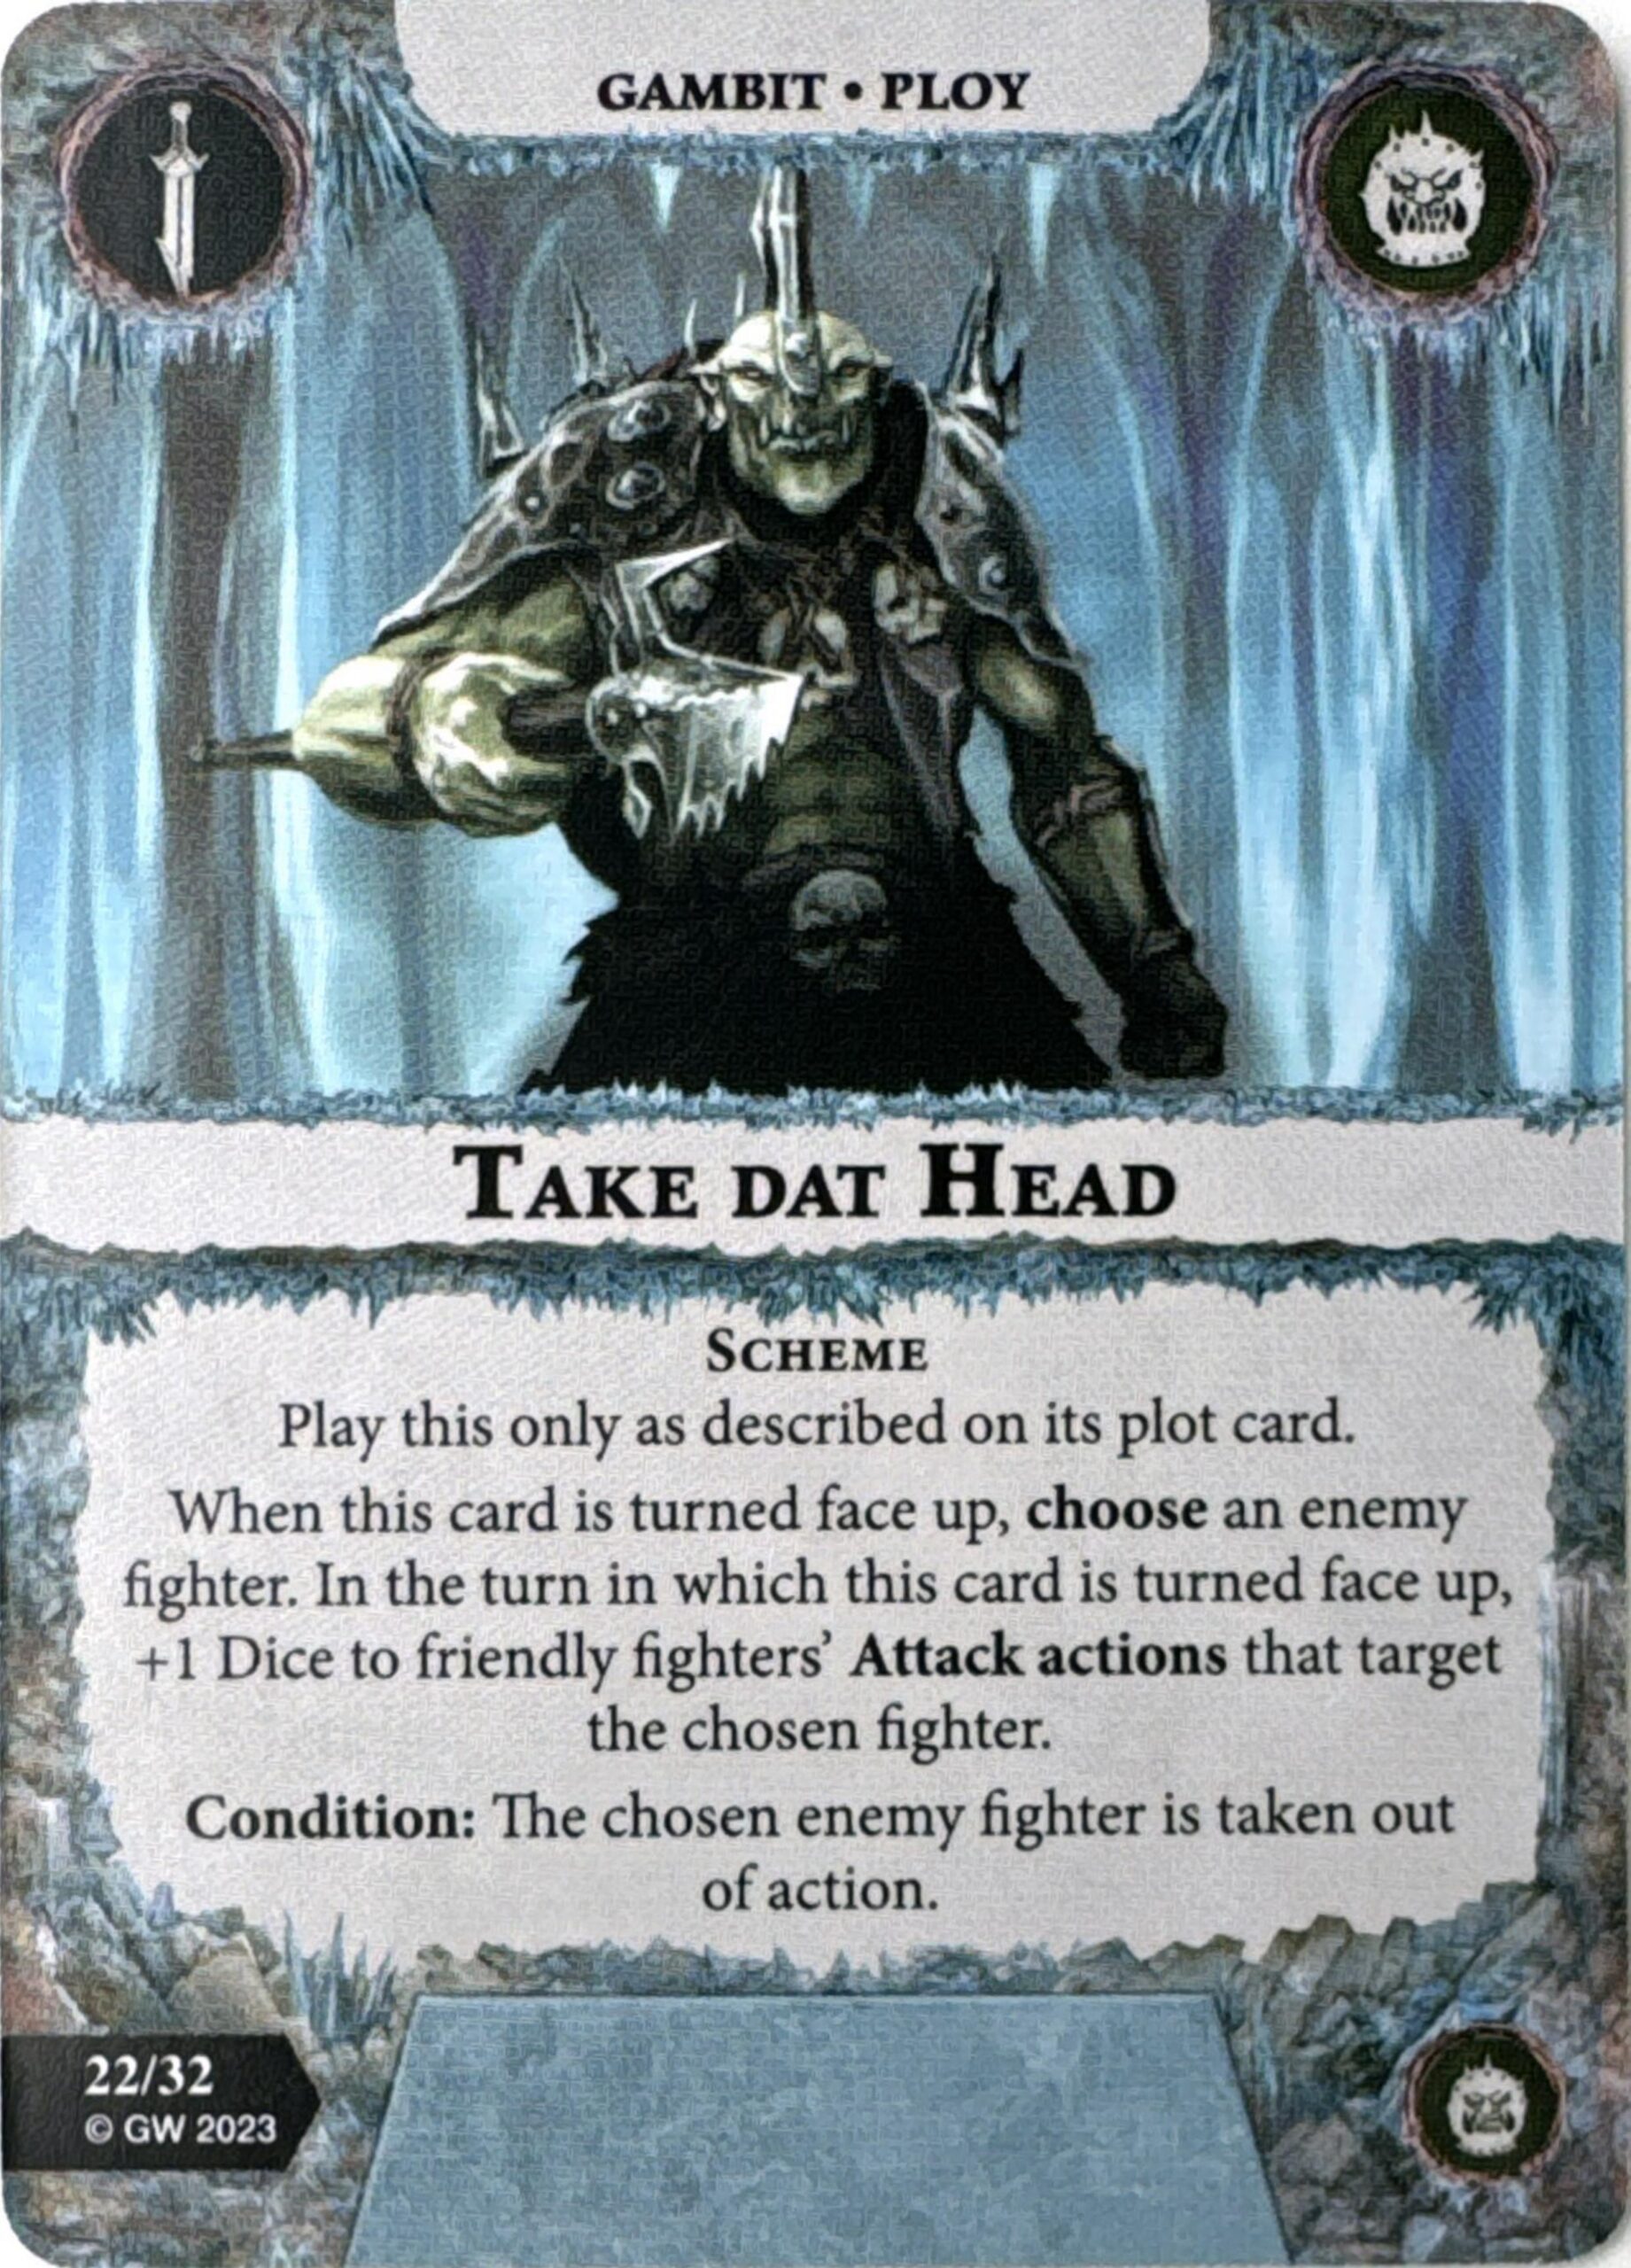
Our last gambit is, fittingly, also our last scheme in Take Dat Head (cough…phrasing…cough). This one allows you to choose an enemy fighter, giving you +1 Dice against them this turn. +1 Dice gambits are fine, particularly in the more limited formats, but I don’t love having to telegraph the target. There are some games where you only get a couple shots on goal for a particular fighter (thinking of Deintalos and Ephilim), so if you happen to miss the turn you reveal the scheme, you might be in a tough spot trying to score it later. Even factoring in the scheme objectives that would incentivize you to take a card like this, I feel like this is a prime example of the schemes being just a bit weaker than I’d like them to be. Would it have been so bad to just make this blanket +1 Dice for the turn, then have the completion condition be “an enemy fighter is taken out of action?” The only upside I can really see here on a standard accuracy gambit (aside from the scheme synergy) is that this will also work for any out-of-sequence attacks you might make that turn, the most relevant of which is likely to be Voidcursed Assault. Not a bad card, just seems a touch awkward.
Power Ceiling: 2, Consistency: 2
Our Favorites
- Mark: Skare ‘Em
- Aman: Stackin’ Da Odds
- Zach: Outfink ‘Em
- George: Stackin’ Da Odds
Upgrades
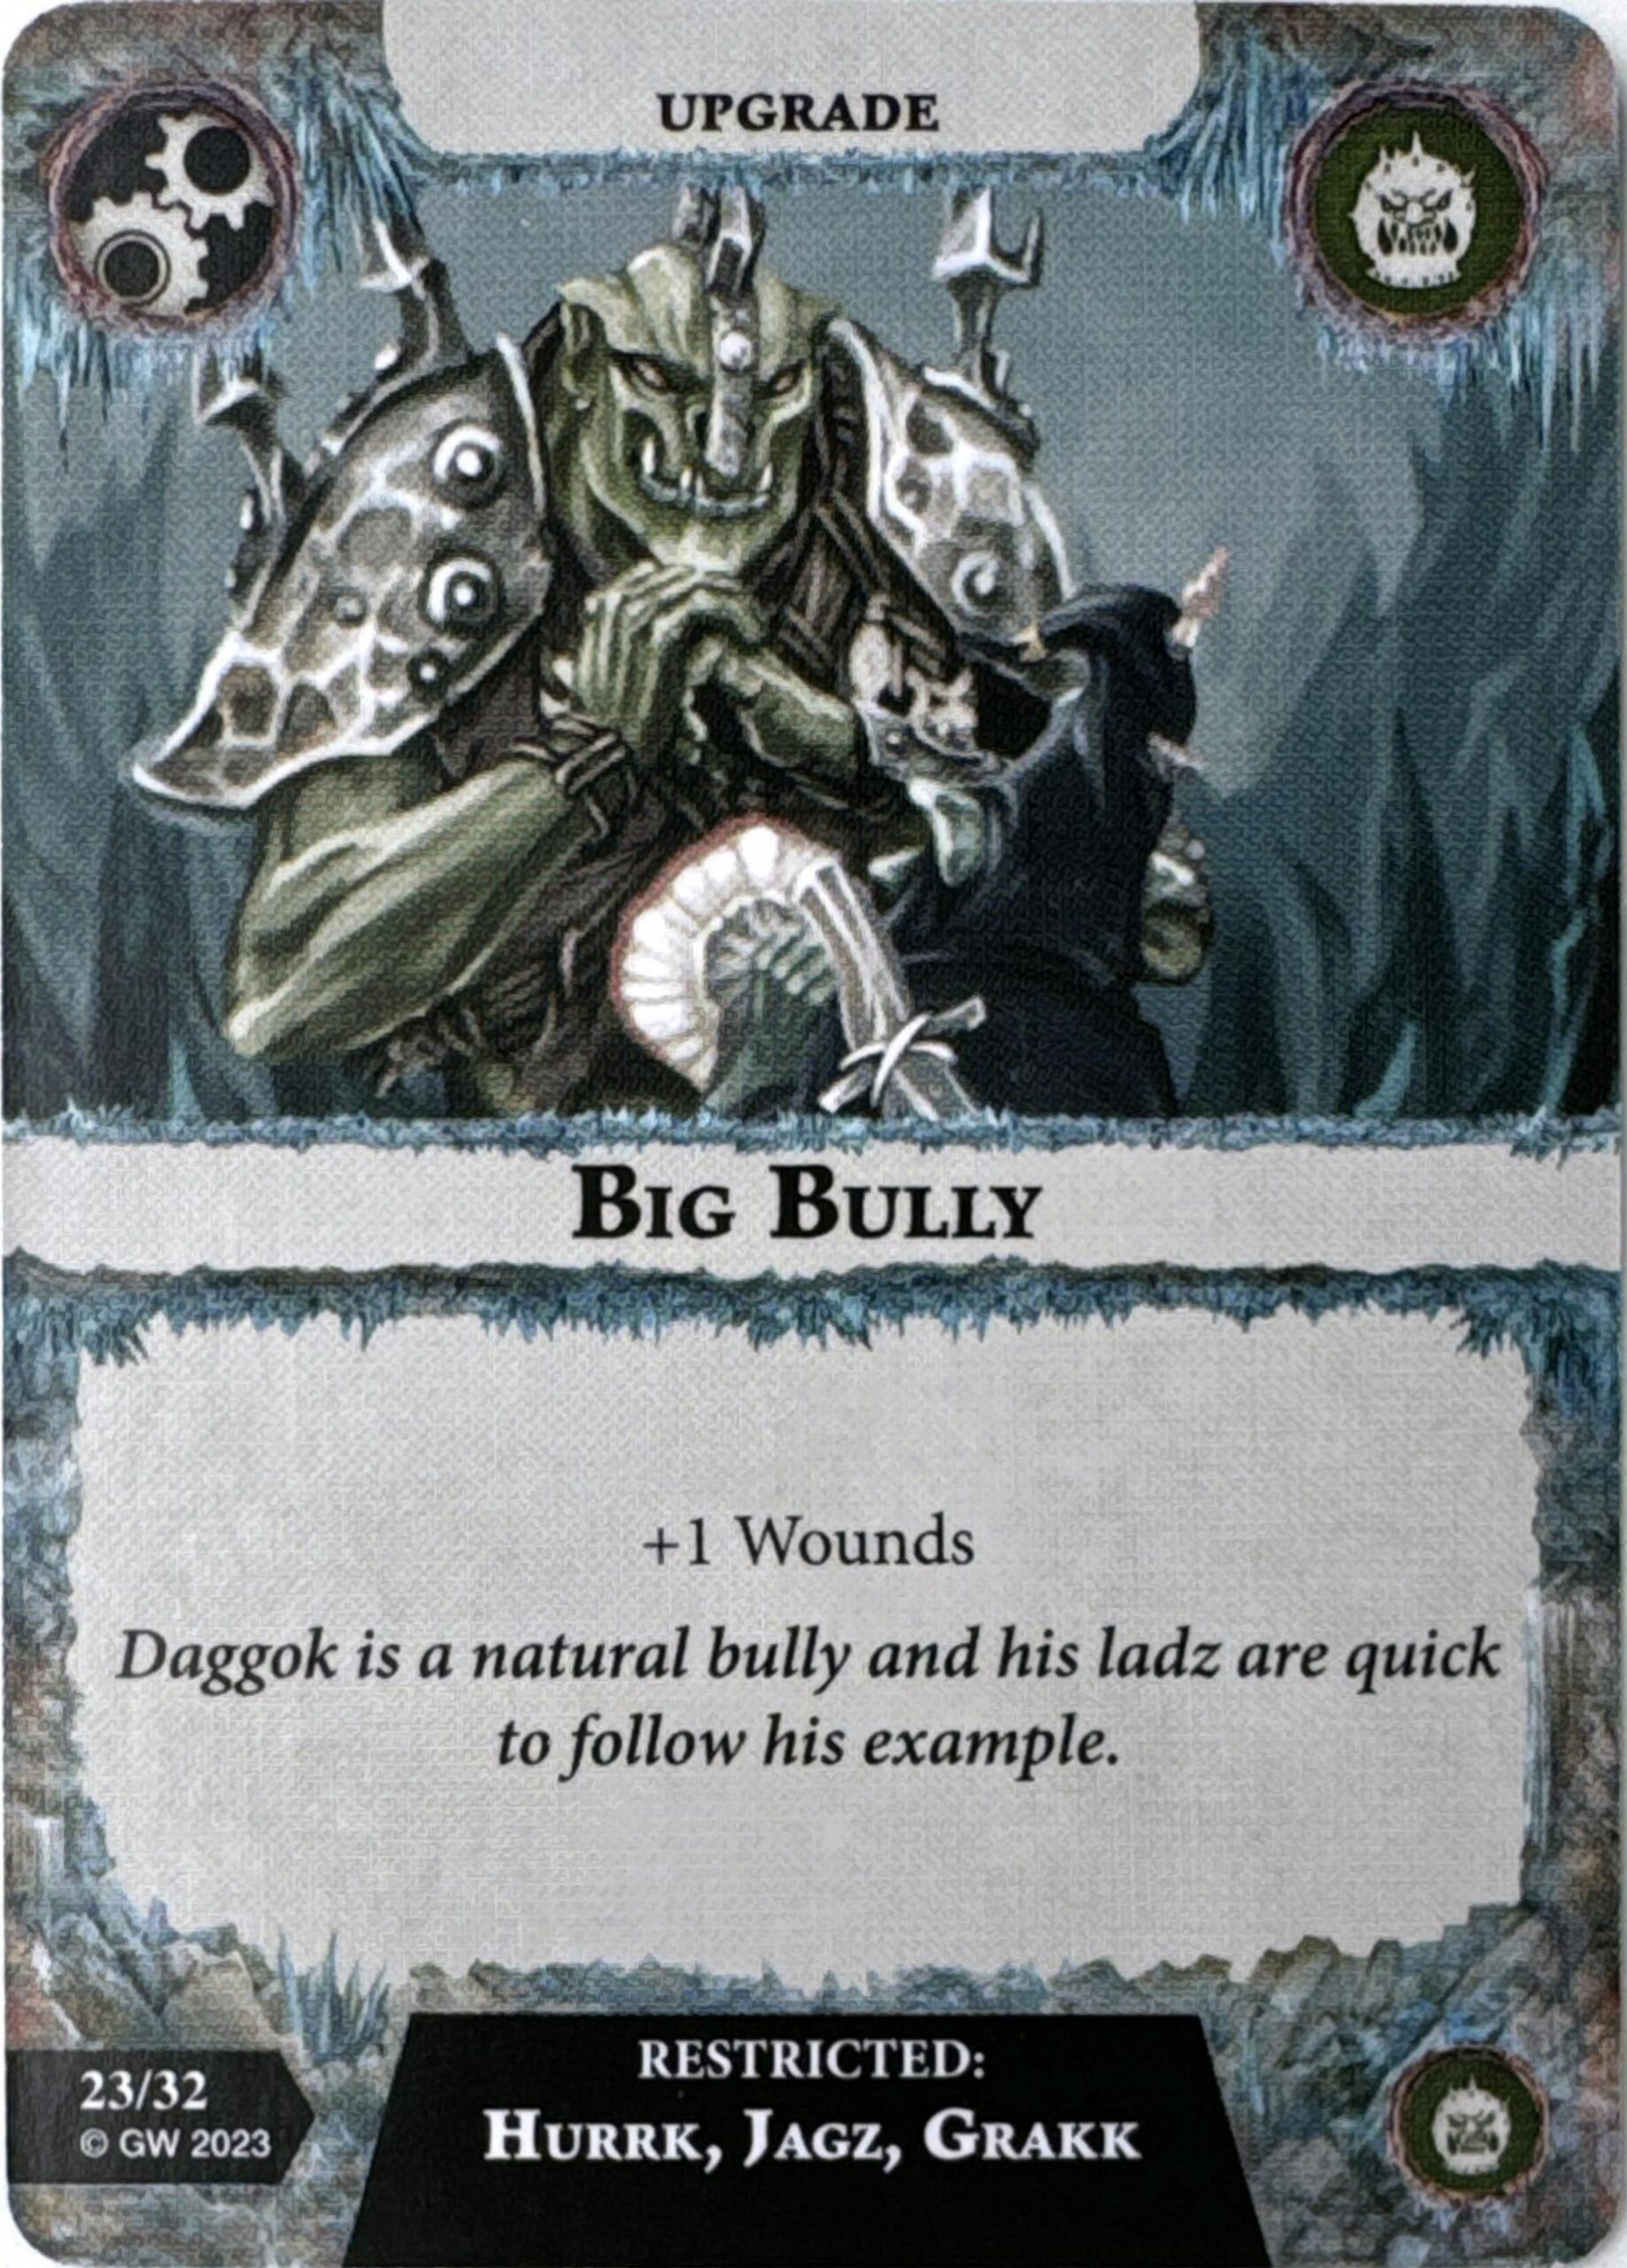
Our first upgrade is very straightforward with Big Bully. +1 Wounds is always nice, although you are a bit concerned since this will be making the equipped fighter Large, which not only plays poorly with fantastic universals such as Frostwyrm Cloak or Unnatural Resilience but also immediately puts a 2-glory target on your back. Not being able to hand it to your leader stinks, especially since he’s the one who inspires to become Large anyway.
Power Ceiling: 2, Consistency: 2
Deffproof grants the equipped fighter +1 Defence while you have a scheme persisting. Even on a deck that leans heavily into the schemes, this seems a bit odd. The scheme will start persisting at the beginning of your turn, meaning you are unlikely to be getting hit back at that time. Furthermore, if you are playing the scheme game, it seems like your ideal scenario would be to complete the scheme in the turn it is revealed, as many of the conditions become more difficult after the activation in which they are revealed. In that respect, this card feels more like a parachute than it does a primary strategy, which I think is fine in cases like the inspiration conditions of the Thricefold Discord, but not as much when I am crafting a deck and effectively betting on some kind of failed synergy. I suppose you could make an argument to use Rush ‘Em and just deliberately never accomplish the condition, but I just don’t like the idea of adding synergy by reducing it elsewhere.
Power Ceiling: 2, Consistency: 1

When we started out Gnarlwood I thought we were finally beyond the days where upgrades that gave ensnare had that as their only effect, but recent releases (Extra Kunnin’) included, have confirmed that sadly we are not.
Power Ceiling: 1, Consistency: 1
Extra Skarey gives you a reaction to stagger an adjacent enemy fighter after an activation in which the equipped fighter made one or more attack actions. I often have harped on that you either want to be killing people or driving them back when you attack them, so all that commentary applies to this card as well. I suppose it’s a nice compensation if you totally whiff an attack, but even Snyp, who gets to do this after any activation and gets to stagger all enemy fighters adjacent to him and has internal faction synergy with staggers still tends to opt for driveback so as not to yield supports later.
Power Ceiling: 1, Consistency: 2
Finkin’ Muscles is another reaction upgrade, this time restricted to your leader. It allows you to take a reaction after your Pass action to add a scheme from your discard pile or persisting gambits back to your hand. This can be interesting to reactivate the effect of a scheme that didn’t quite work out the first time in the event you land in a spot where you don’t think you’ll complete it otherwise, but needing to make a Pass action to do so is really bad. The only universal synergy on this would be with Time Freeze, but now you’re looking at a two-card combo that still is not all that much return on investment. No thanks.
Power Ceiling: 1, Consistency: 1
Intimidatin’ grants -1 Dice on attacks targeting the equipped fighter from adjacent enemy fighters. Unlike cards such as [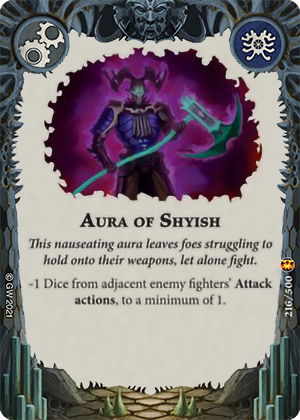 Aura of Shyish], this unfortunately does not work if the target is not the equipped fighter, which is where a good chunk of the value on those comes from. Furthermore, we are in a meta that is increasingly dominated by Range 2 and 3 threats who will often be able to play around this without much issue. I like it on VCT builds since the move reactions could get you to adjacency during a charge, but otherwise it is a bit matchup dependent, although it likely makes it into a Nemesis build.
Power Ceiling: 2, Consistency: 2
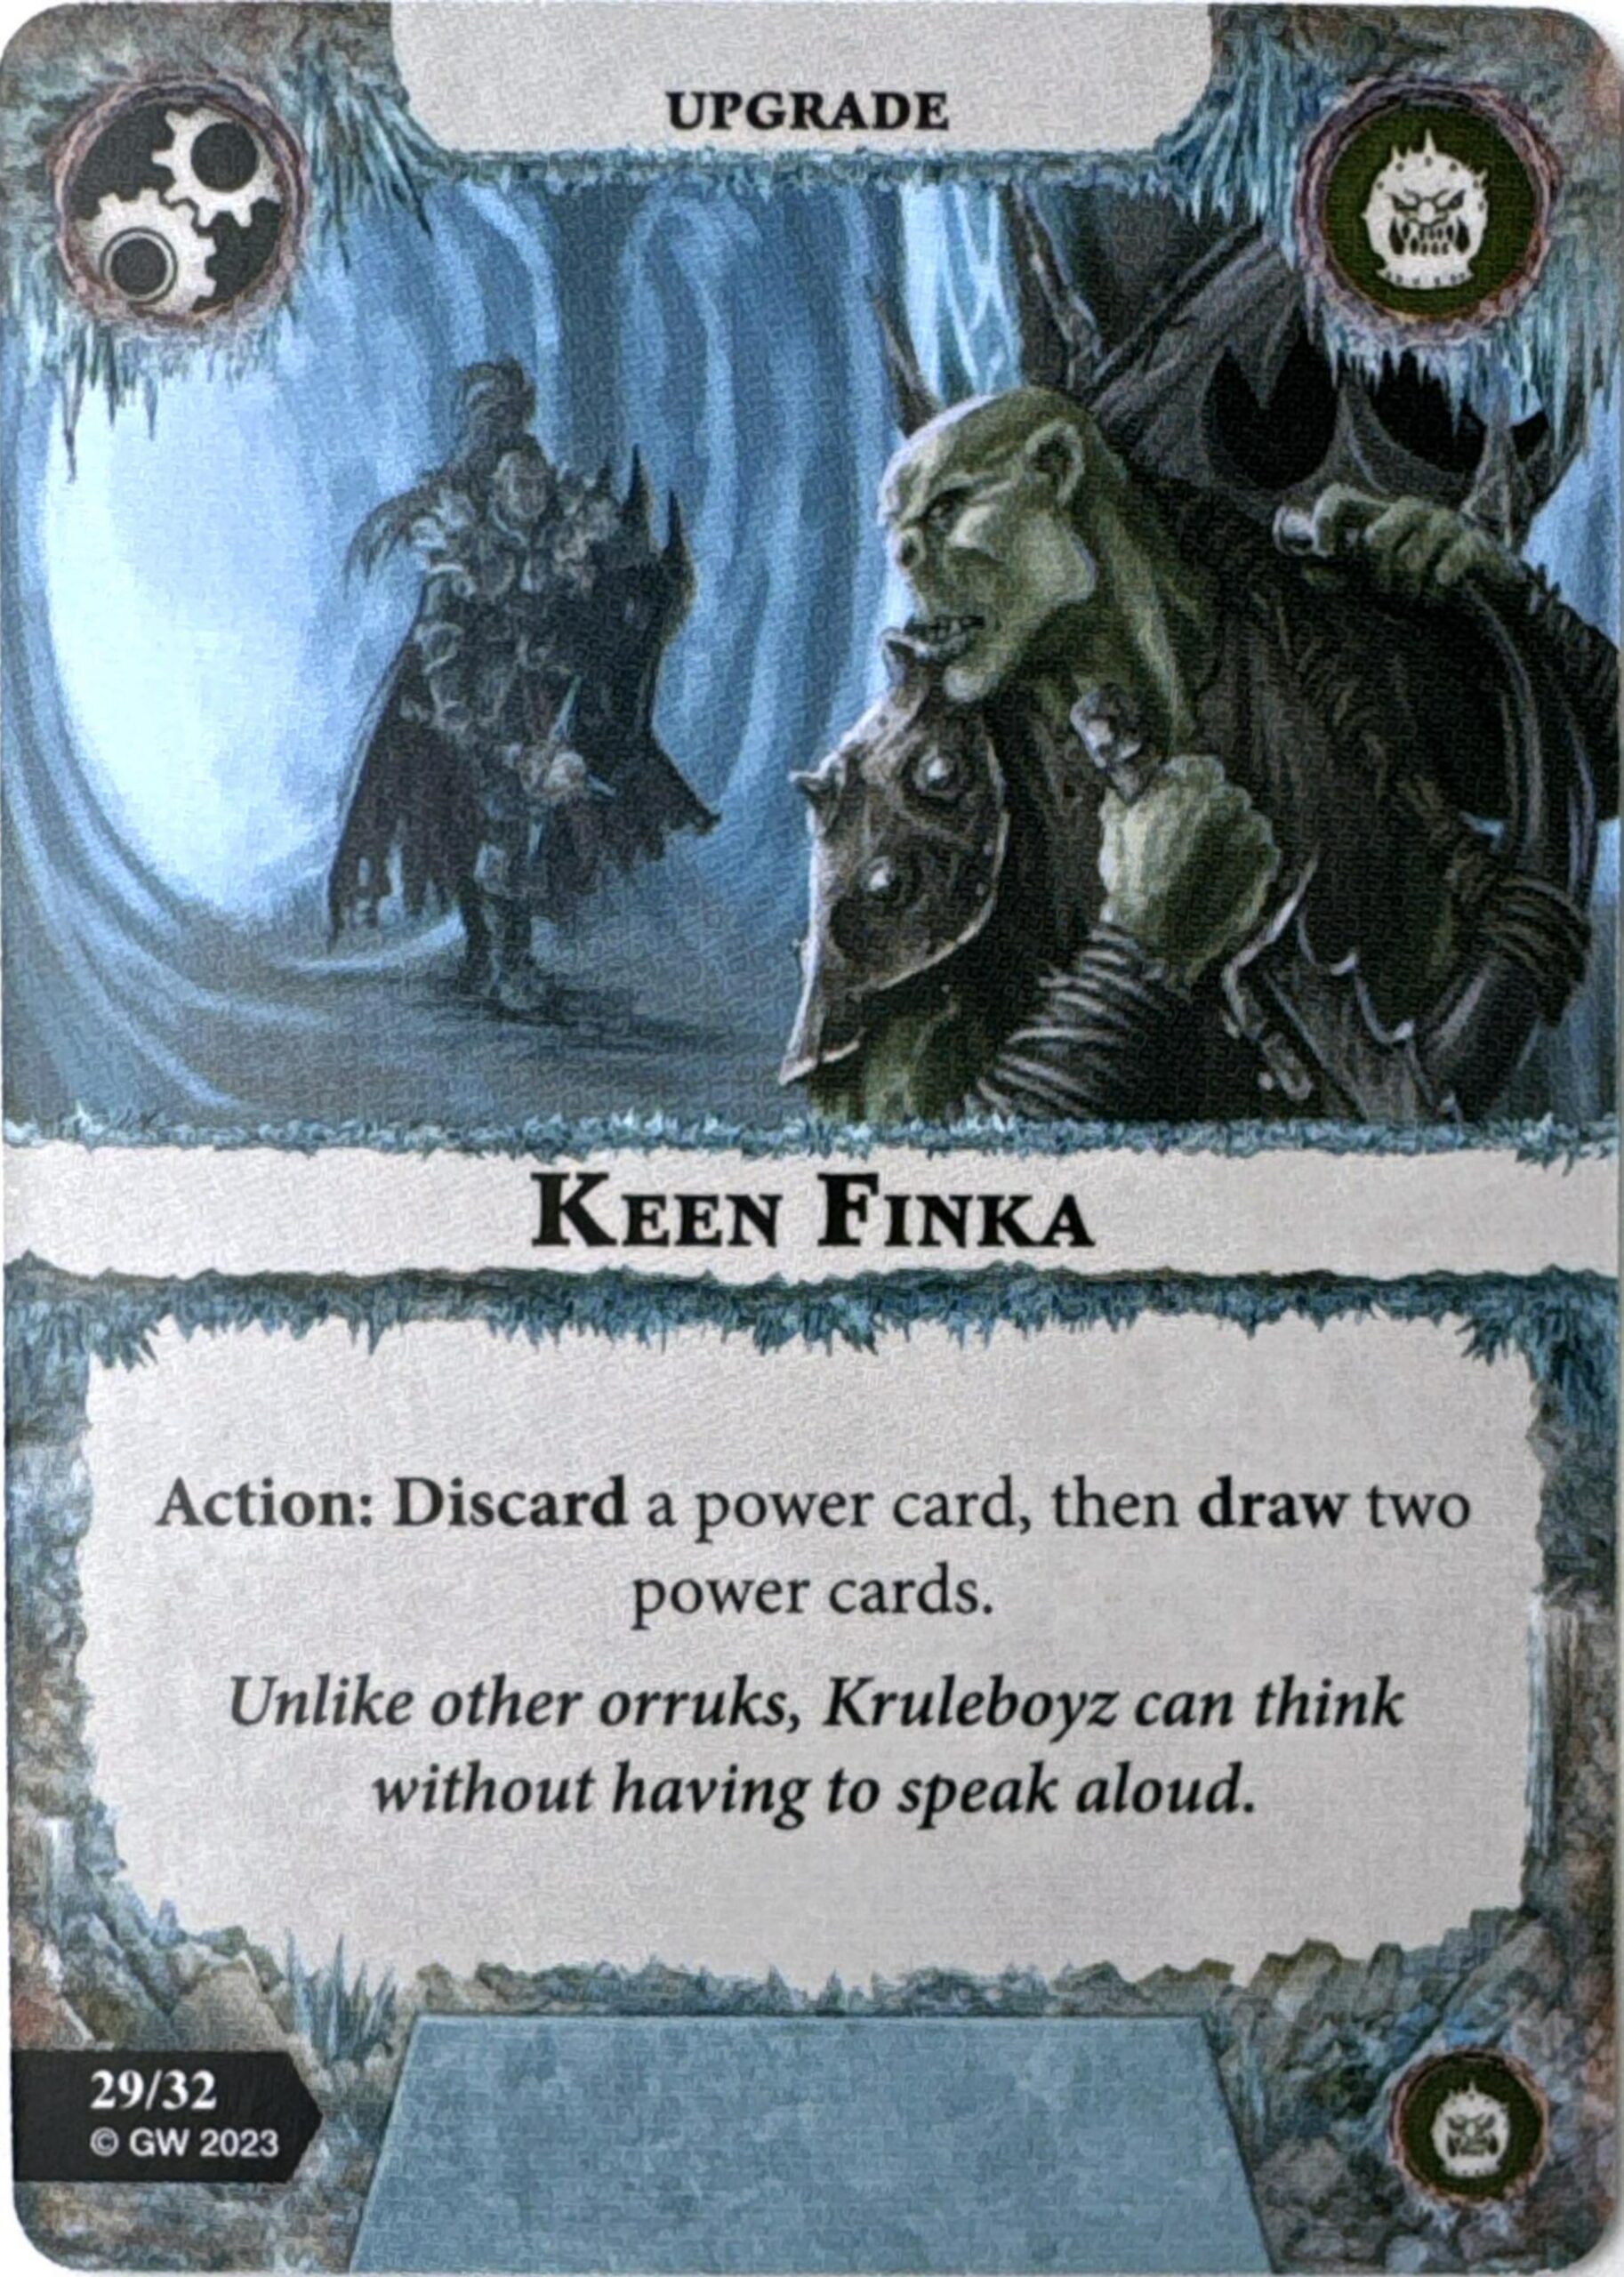
Keen Finka allows you to take an action to discard one power card in order to draw two more. The idea here again seems to be making sure all your schemes get to see play, but I’d much rather take my card draw in the power step than as a full action. Unfortunately passing on this one too.
Power Ceiling: 1, Consistency: 2
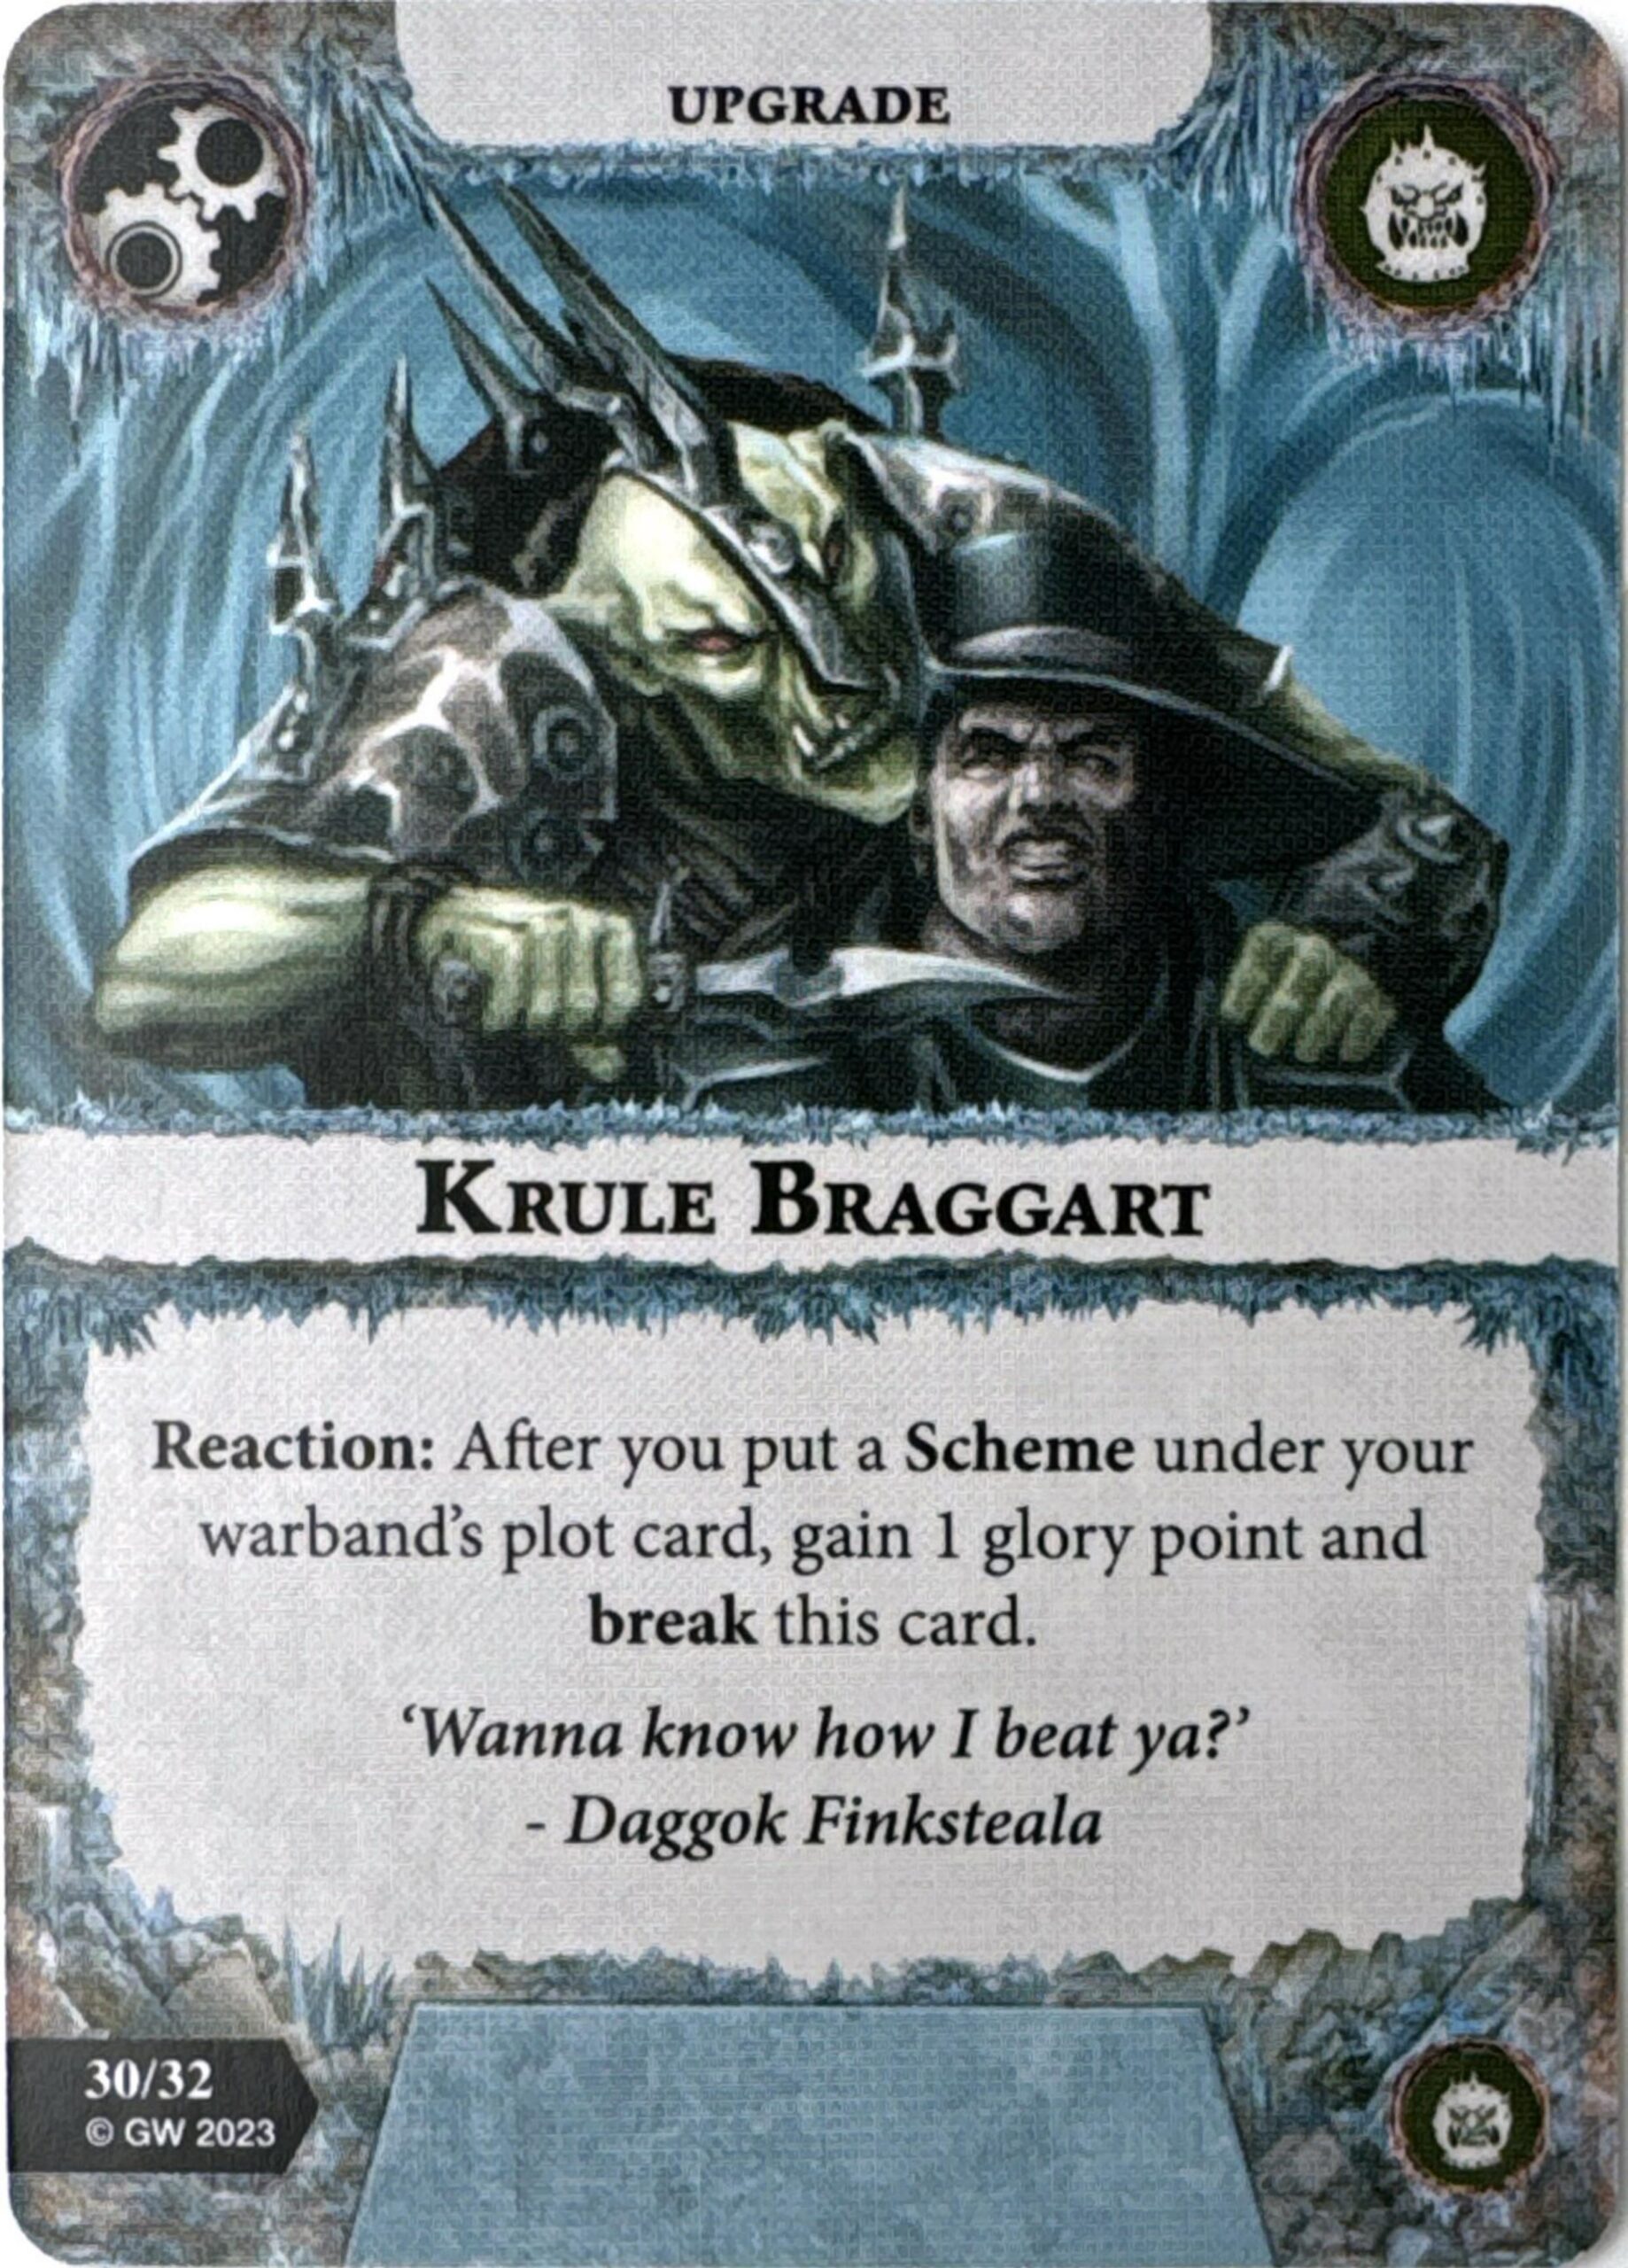
Krule Braggart gives you a reaction to score a glory after you complete a scheme, then break the card. While this would certainly be too strong if you could keep using it, I do think there’s still value here in one-time use. With the draw access available to the warband, you shouldn’t have much issue getting into both this and your schemes, and glory can be hard to come by in the limited formats. I think it’s pretty fair value on a scheme heavy build, especially if drawn in conjunction with the more reliable schemes to complete.
Power Ceiling: 2, Consistency: 2
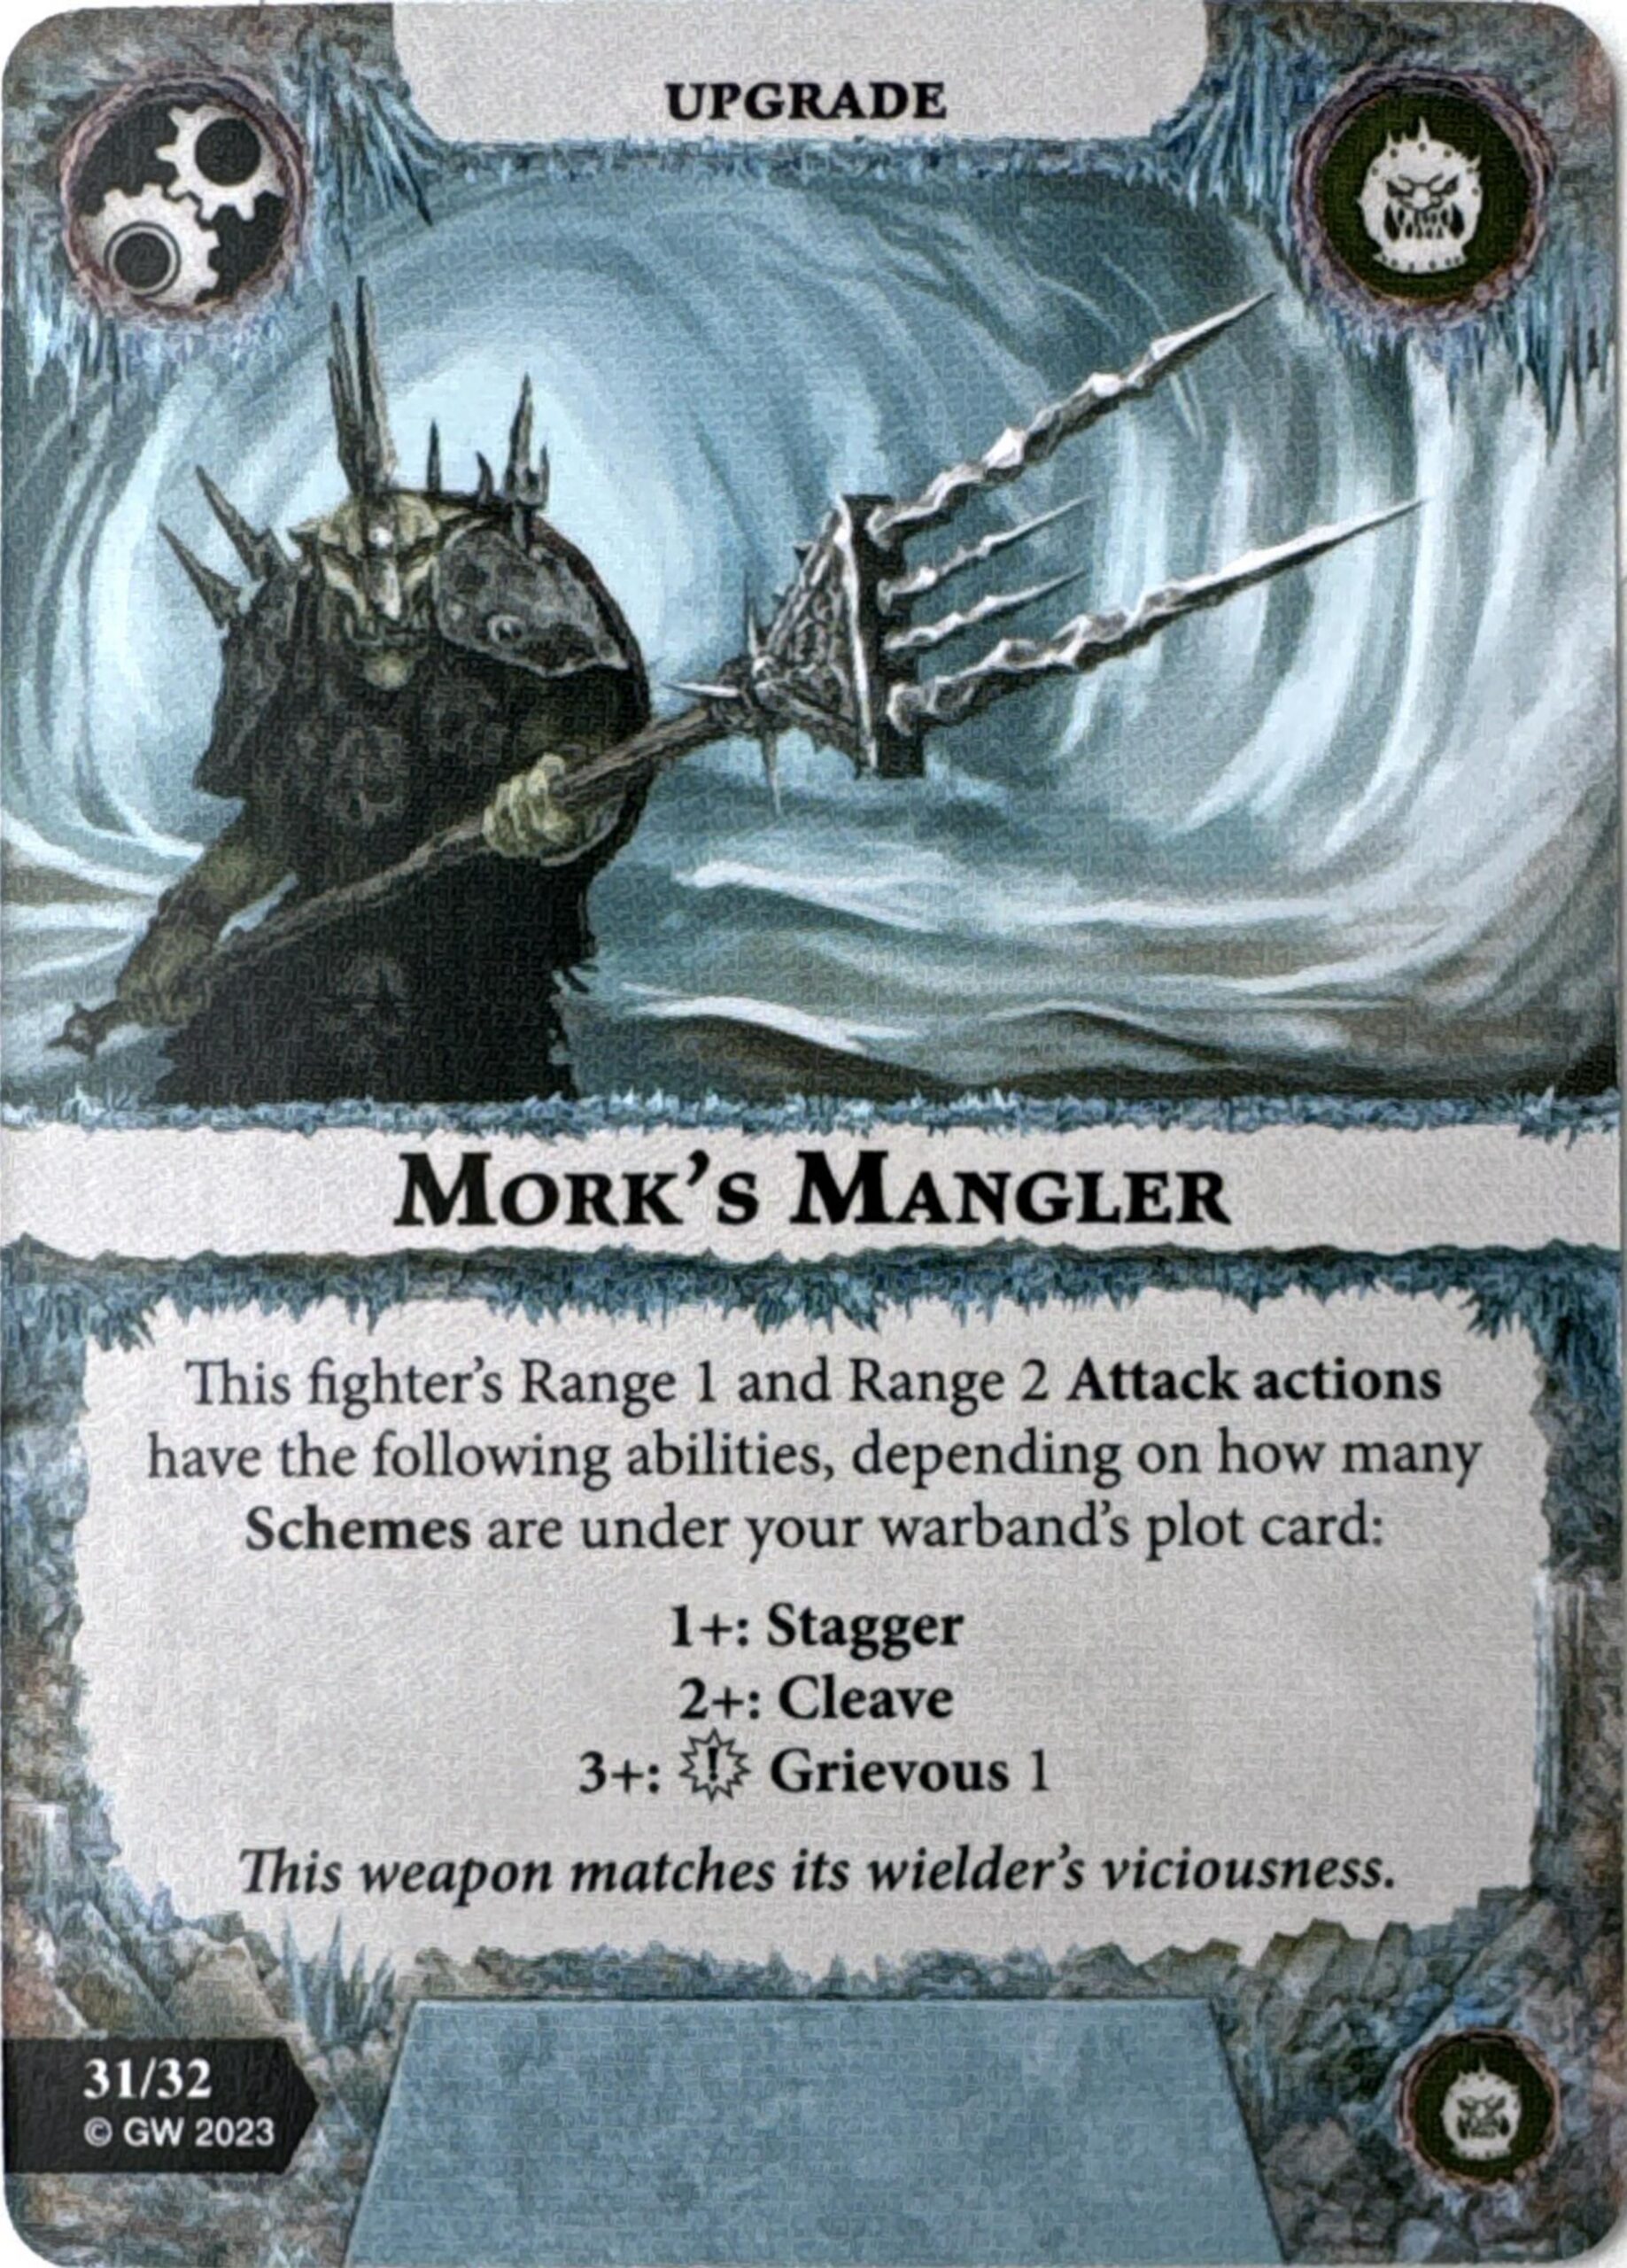
Mork’s Mangler stacks effects onto your Range 1 and 2 attacks based on how many schemes you have accomplished, going from stagger at 1 to cleave on 2 to grievous on 3+. Another card that incentivizes the schemes, this one is fine. I do think that stagger being the first thing in the list makes it a little less attractive. I would have much preferred to follow suit on lots of other cumulative upgrades and had this be +1 Wounds or “this fighter cannot be driven back” instead. That being said, the value is decent at 2+, which is presumably fairly accessible in the type of build you’d be packing it anyway. It can be really frustrating though if you start with the harder schemes in hand or have some rough draw luck.
Power Ceiling: 2, Consistency: 1
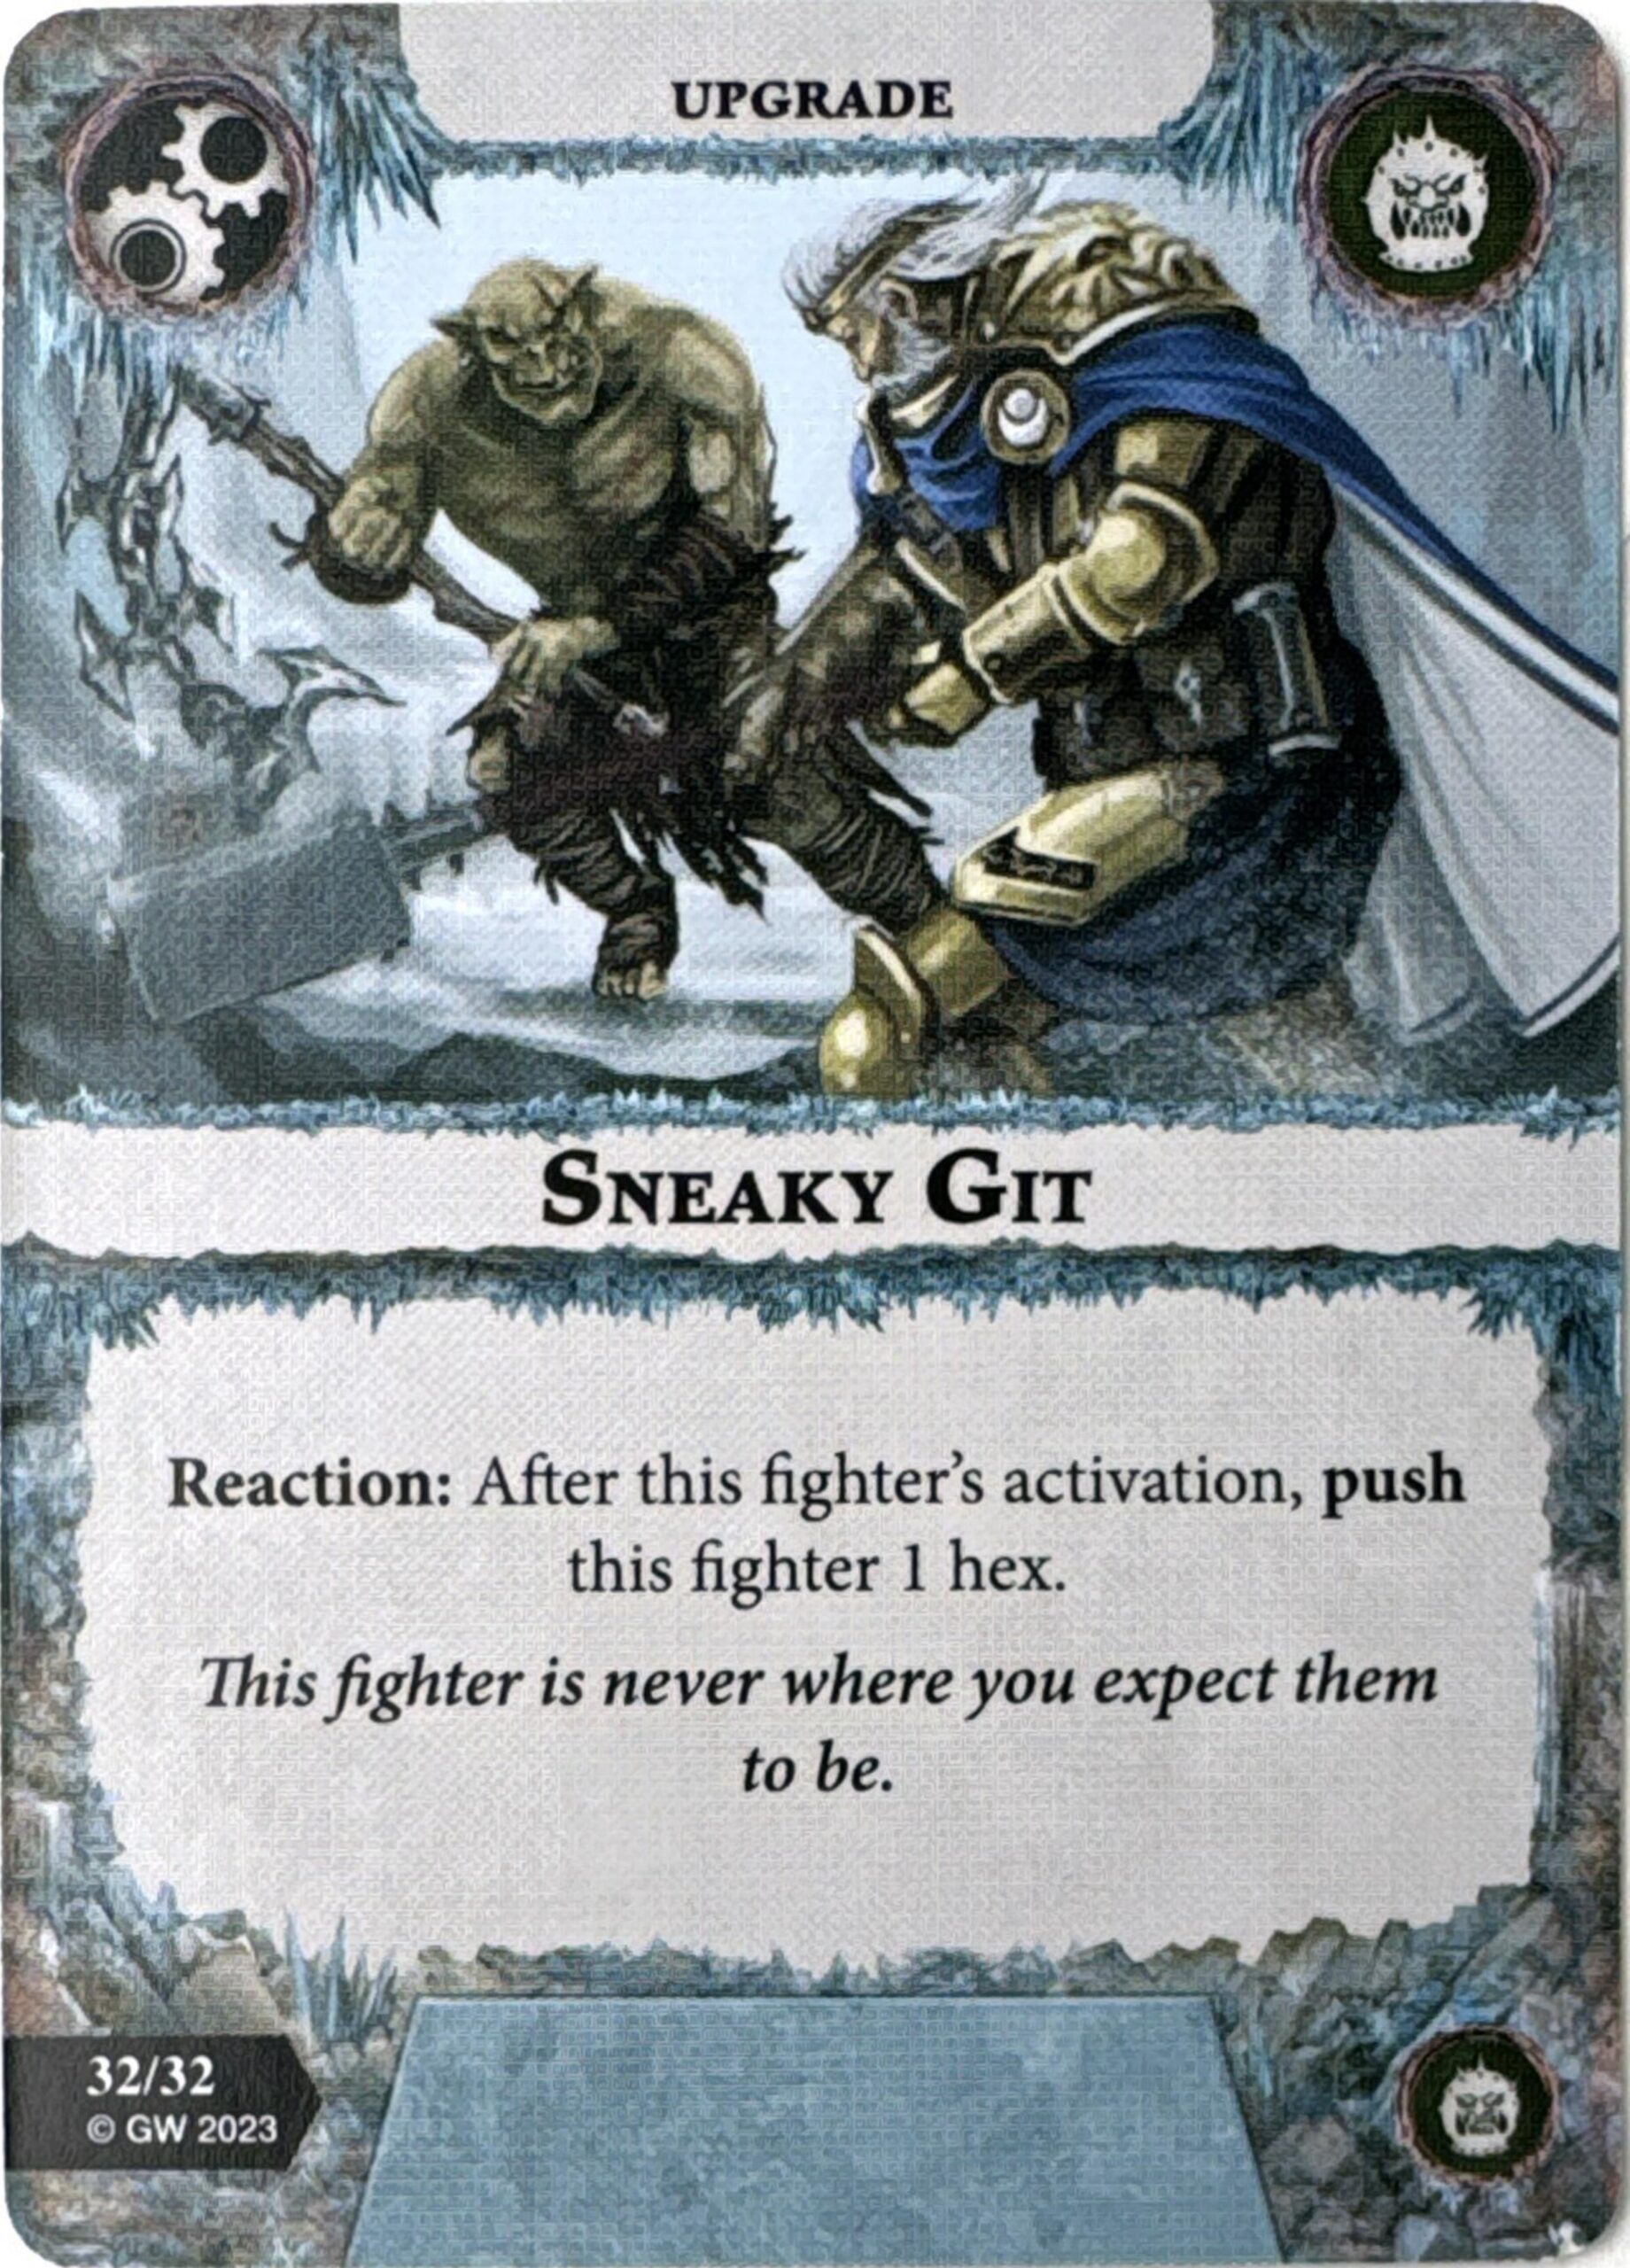
Saving probably the best for last, Sneaky Git is in-faction [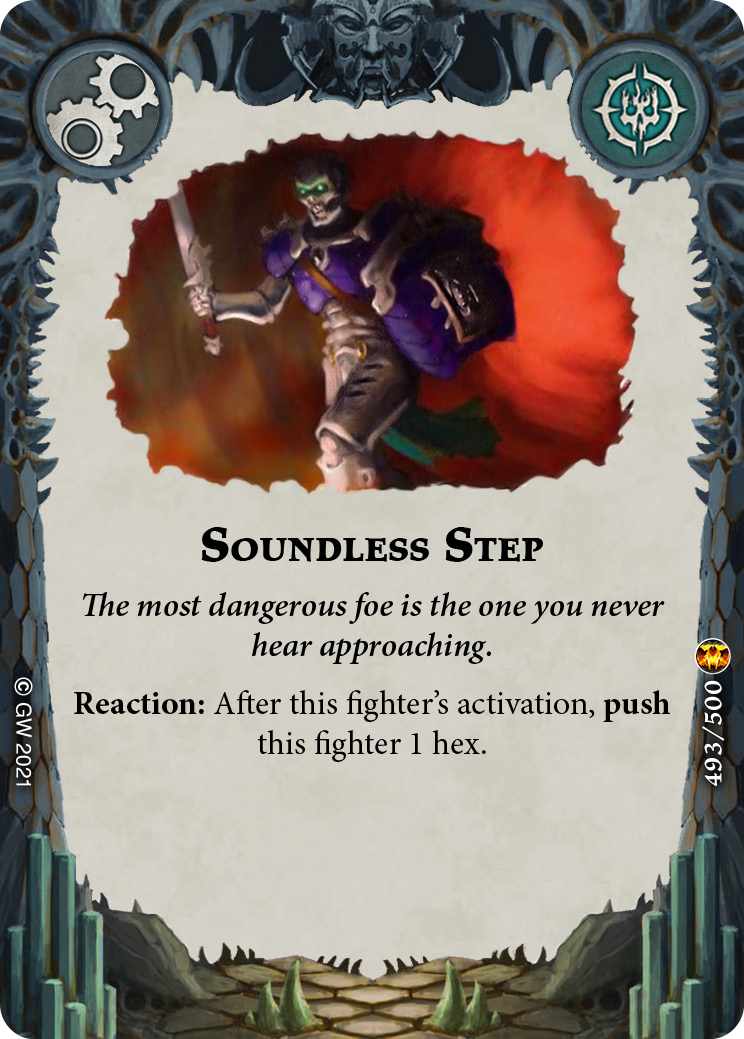 Soundless Step]. Man do I miss this effect as a universal. While the charged out and move-move rules have lessened the need for playlines like this, I always loved the sequence of going on guard, pushing into charge range, then being able to execute on the next turn. Still, even in the current state of the rules, free pushes are always welcome and not being restricted to types of actions or directionality should make this a staple in every Stabladz deck.
Power Ceiling: 3, Consistency: 3
Our Favorites
- Mark: Sneaky Git
- Aman: Sneaky Git
- Zach: Krule Braggart
- George: Sneaky Git
Conclusion
Overall, I’m not madly in love with this warband. I mentioned at the top of the article that the aesthetic doesn’t really do it for me, but I feel like the mechanics were a bit of a miss as well. We already discussed the clunkiness on Hurrk’s reaction, but I think the bigger thing to discuss is Daggok. I love the reaction attack and I feel like it adds some really cool plays, but I can’t help but notice they have not a single in-faction out-of-sequence move action. I would really have liked to see at least one gambit for this to encourage/support the leader’s efficiency. Additionally, I think the schemes were just not quite up to snuff. They’re decently cohesive with the overall gameplan, but I would’ve like to see a bit of a tune-up in effect, much like we saw with the Thricefold Discord’s temptation gambits. Furthermore, their faction end phase cards are largely lacking and their upgrades, save 2 or 3, are very bad. As-is, and I mentioned this a few times, I think the warband pairs best with Voidcursed Thralls. None of them have multiple defence dice, so the 1 Shield and no driveback is a straight upgrade, the out-of-sequence move actions are fantastic with the leader’s reaction, and you fill in what otherwise is a fairly mediocre power deck. Another solid mention is Breakneck Slaughter, which not only increases their overall mobility, but also fills in their objective deck very nicely, particularly their end phases. As you might expect, I’m not planning to bust these guys out myself, but hopefully somebody out there can crack these guys and prove me wrong.
Thanks for reading and best of luck on YOUR Path to (Finkstealin’) Glory!
____________________
Written by: Mark Breault
Edited by: Aman Khusro